


Halaman 1
YAMAHA SCORPIO ( SX-4 ) SERVICE MANUAL 5BP-F8197-B0
Pertanyaan dan jawaban berikut diambil langsung dari isi dokumen manual ini. Klik tombol halaman untuk membuka bagian yang relevan.
FAQ ini disusun untuk memberikan informasi akurat dan mudah dipahami mengenai spesifikasi dan perawatan Yamaha Scorpio Z berdasarkan dokumen manual resmi.
Apakah konten ini membantu?
YAMAHA SCORPIO ( SX-4 ) SERVICE MANUAL 5BP-F8197-B0
--- +--------------------------------------------------+ | SERVICE MANUAL | | SCORPIO | | © 2006 oleh Yamaha Motor Co., Ltd. | | Edisi kedua, Agustus 2006 | | dialih bahasakan oleh : | | Technical Publication | | Yamaha Indonesia Motor Manufacturing | | di cetak di Indonesia | +--------------------------------------------------+
Halaman 3
PENDAHULUAN Service Manual ini dibuat oleh Yamaha Motor Company, Ltd. dan dialih bahasakan oleh, Technical Publication Yamaha Indonesia diharapkan dapat dipakai oleh Teknisi Bengkel dan Dealer Yamaha Kami menyadari bahwa tidak mungkin menjelaskan seluruh pelajaran teknik perbaikan sepeda motor dalam satu buku saja. sehingga kami meyarankan kepada para mekanik harus terlebih dahulu menguasai dasar-dasar perbaikan sepeda motor Yamaha dengan mengikuti training-training reguler yang diadakan oleh Yamaha. Tanpa pengetahuan ini, usaha perbaikan akan kurang sempurna. Yamaha Motor Indonesia akan terus menerus berusaha meningkatkan mutu produksinya, untuk itu, jika ada perubahan yang mendasar dalam spesifikasi dan prosedur pengerjaan, kami akan sampaikan ke seluruh jaringan Yamaha melalui buletin "Servioce Information" INFORMASI PENTING YANG ADA DIDALAM BUKU PETUNJUK INI : Informasi penting secara khusus ditandai dengan tanda-tanda sebagai berikut : Simbol ini, mengharuskan anda BERHATI-HATI MENYANGKUT KESELAMATAN ANDA ! Memberikan petunjuk khusus, yang harus diikuti untuk menghindari kecelakaan bagi pengendara dan orang lain yang sedang memperbaiki sepeda-motor PERINGATAN PERHATIAN Perlu perhatian khusus yang harus diikuti untuk menghindari kerusakan pada sepeda motor. CATATAN : Memberikan keterangan tambahan, untuk mempermudah pengerjaan. TECHNICAL PUBLICATION GROUP 1 SERVICE INFORMATION DIV. YAMAHA MOTOR CO., LTD
Halaman 4
TEKNIK MEMBACA CEPAT BUKU PETUNJUK SUSUNAN BUKU PETUNJUK Buku ini terdiri dari beberapa BAB utama yang didalamnya terdapat beberapa judul (lihat "simbol") Judul pertama 1: BAB yang disertai simbol, terletak disudut kanan atas, pada setiap halaman. Judul kedua 2: Judul ini adalah judul bagian BAB yang terletak hanya pada halaman pertama dari tiap-tiap bagian, judul ini terletak disudut kiri atas halaman Judul ketiga 3: Judul ini adalah judul yang lebih spesifik. FORMAT BUKU Semua prosedur dalam buku ini, dikemas dalam rangkaian tahap demi tahap, sehingga petunjuk- petunjuk yang ada secara lengkap dapat diterima dengan mudah oleh para mekanik. Petunjuk yang ada meliputi berbagai hal, antara lain tentang cara membongkar, memperbaiki, dan pemeriksaan, jika ada prosedur yang penting, dan perlu perhatian khusus 4 kami beri garis “*” dengan tiap-tiap prosedur kami beri tanda “G” INFORMASI PENTING G Data spesifikasi dan special tool, diinformasikan dalam frame dengan gambar alat 5. G Angka didalam lingkaran 6 menunjukkan nama komponen dan penjelasan yang melengkapi gambar 7, ada kalanya kita gunakan huruf didalam segi empat/box 8. G Untuk penjelasan tentang tindakan lebih lanjut, kita gunakan tanda panah. sebagai contoh, tindakan lebih lanjut jika diluar spesifikasi dengan simbol panah ---> 9. DIAGRAM Semua BAB, dilengkapi dengan gambaran sebelum dibongkar, hal ini untuk mempermudah prosedur yang benar cara memasang dan membongkar.
Halaman 5
1 2 GEN INFO SPEC 3 4 INSP ADJ ENG 5 6 CARB CHAS 7 8 – + ELEC TRBL SHTG 9 0 A B C D T R . . E F G H I E G M J K L B LS M M N LT New SIMBOL (sesuai illustrasi) Illustrasi simbol 1 hingga 8 merupakan simbol di setiap BAB, yang menggambarkan isi dari setiap BAB. 1 Informasi Umum 2 Spesifikasi 3 Perawatan berkala dan pelumasan 4 Membongkar mesin 5 Karburator 6 Rangka/Chassis 7 Kelistrikan/Electrical 8 Cara mengatasi masalah/Troubleshooting Illustrasi simbol 9 hingga F menjelaskan sebagai berikut. 9 Perbaikan dengan mesin terpasang 0 Pengisian cairan A Pelumasan B Alat khusus/Special tool C Pengencangan. D Bats keausan/kelonggaran E Putaran mesin F Ω, V, A Illustrasi simbol G hingga N pada gambar menunjukkan tipe pelumas dan bagian yang perlu dilumasi. G Lumasi dengan oli mesin H Lumasi dengan oli gear I Lumasi dengan molybdenum disulfide oil J Lumasi dengan gemuk bearing roda K Lumasi dengan gemuk lightweight lithium-soap base L Lumasi dengan gemuk molybdenum disulfide M Berikan cairan pengunci (LOCTITE®) N Ganti dengan yang baru.
Halaman 6
DAFTAR ISI INFORMASI UMUM GEN INFO 1 SPESIFIKASI SPEC 2 PERAWATAN BERKALA DAN PENYETELAN INSP MEMBONGKAR MESIN ENG 4 CARBURATOR CARB 5 RANGKA/CHASSIS CHAS 6 KELISTRIKAN ELEC 7 TRBL SHTG 8 ADJ 3 – +
Halaman 7
GEN INFO BAB 1. INFORMASI UMUM IDENTIFIKASI SEPEDA MOTOR ............................................................... 1-1 NOMOR RANGKA ................................................................................ 1-1 NOMOR MESIN .................................................................................... 1-1 INFORMASI PENTING ................................................................................. 1-2 PROSEDUR PERSIAPAN MEMBONGKAR ......................................... 1-2 PART PENGGANTI .............................................................................. 1-2 GASKETS, OIL SEALS DAN O-RINGS ................................................ 1-2 LOCK WASHERS/PLATES DAN COTTER PINS ................................. 1-3 BEARING DAN SEAL OIL ..................................................................... 1-3 CIRCLIPS .............................................................................................. 1-3 MEMERIKSA SAMBUNGAN KABEL .................................................... 1-4 SPECIAL TOOLS ......................................................................................... 1-5
Halaman 8
| GEN INFO | [Motorcycle Icon] | | :--- | :--- | ---
Halaman 9
IDENTIFIKASI SEPEDA MOTOR 1 2 1 - 1 GEN INFO YP100000 INFORMASI UMUM IDENTIFIKASI SEPEDA MOTOR YP100020 NOMOR RANGKA/CHASIS Nomor rangka 1 tercetak pada rangka di bagian down tube EB100030 NOMOR MESIN Nomor mesin (2) tercetak pada crankcase mesin sebelah kanan. CATATAN: bentuk dan spesifikasi sewaktu-waktu dapat berubah tanpa pemberitahuan.
Halaman 10
GEN INFO INFORMASI PENTING 1 - 2 EB101000 INFORMASI PENTING PROSEDUR PERSIAPAN MEMBONGKAR 1. Bersihkan dari debu, dan kotoran yang menempel pada sepeda motor 2. Pergunakan peralatan yang tepat dan bersih 3. Lihat bagian “ SPECIAL TOOLS” 4. Komponen yang telah dibongkar, tempatkan dalam kondisi terangkai. Misalnya rangkaian gears, cylinders, pistons dan komponen lain yang memerlukan pengepasan. komponen komponen yang bekerja bersamaan, harus diganti lengkap satu set. 5. Pada saat konsdisi komponen part dilepas, bersihkan dari kotoran yang menempel pada komponen, untuk mempermudah dan mem- percepat pemasangan kembali. 6. Jaga semua komponern dari pengaruh panas. EB101010 PART PENGGANTI 1. Pergunakan hanya spare part asli Yamaha/ genuine part. pergunakan juga oli dan gemuk yang disarankan Yamaha untuk pelumasan. Komponen imitasi, terlihat sama dengan yang asli, tetapi kualitasnya jauh lebih buruk. EB101020 GASKETS, SEAL OIL DAN O-RINGS 1. Ganti semua gaskets, seals dan O-rings pada saat membongkar mesin. bersihkan gasket yang menempel pada permukaan sambungan dengan sempurna. 2. Lumasi dengan pelumas pada saat memasang bearing. dan lumasi gemuk pada permukaan singgung seal oli.
Halaman 11
INFORMASI PENTING 1 - 3 GEN INFO EB101030 LOCK WASHERS/PLATES DAN COTTER PINS 1. Ganti lock washers/plates dan cotter pin setelah dibuka. Tekuk lock washer plat, di bagian yang rata pada bagian Mur, setelah mur dikencang- sesuai spesifikasi pengencangan. EB101040 BEARING DAN SEAL OIL Pasang bearing dan seal oli dengan posisi marking berada di luar. Pada saat memasang seal oli, lumasi dengan gemuk light weight lithium pada- pada permukaan lidah seal. dan pada saat mema- sang bearings lumasi dengan oli dan pastikan bearing berputar lancar. 1 Oil seal PERHATIAN Jangan menggunakan udara bertekanan, untuk membersihkan bearing, hal ini akan merusak permukaan bearing 1 Bearing EB101050 CIRCLIPS 1. Periksa dengan seksama circlip, sebelum pemasangan. Selalu ganti circlip pin piston dengan yang baru. Ganti circlip, jika telah rusak Pemasangan circlip 1, pastikan sudut yang tajam pada permukaan tekanan 2 berlawa- nan dengan gaya tekanan 3 lihat gambar penjelasan disamping. 4 As/Shaft
Halaman 12
GEN INFO INFORMASI PENTING 1 - 4 EB801000 MEMERIKSA SISTIM PENYAMBUNGAN Bersihkan debu dan kotoran yang terdapat pada pada connector. 1. Lepaskan: • Connector 2. Semprot dengan udara bertekanan. 3. Pasang dan cabut connector dua atau tiga kali pemasangan 4. Tarik kabel untuk memeriksa, agar kabel tidak tercabut, terlepas. 5. Jika mudah tercabut, bengkokkan pin pengait 1 dan pasangkan kembali ke terminal connector. 6. Pasang: • Connector CATATAN: Kedua connectors harus “click” bersamaan 7. Periksa sistim penyambungan dengan tester. CATATAN: • Jika tidak ada sambungan, bersihkan terminal. • Lakukan langkah pemeriksaan 1 hingga 7 pada saat memeriksa kabel bodi. • Untuk pemeriksaan, dapat menggunakan tester yang ada di pasaran. • Pergunakan tester, seperti pada gambar.
Halaman 13
EB102000 SPECIAL TOOLS The following special tools are necessary for complete and accurate tune-up and assembly. Use only the appropriate special tools; this will help prevent damage caused by the use of inappropriate tools or improvised techniques. When placing an order, refer to the list provided below to avoid any mistakes Nomor tool Nama tool Gambar illustrasi Weight Slide hammer bolt 90890-01084 90890-01085 Alat ini digunakan untuk melepas, dan memasang as rocker arm. Crankcase separating tool 90890-01135 Alat ini digunakan untuk memisahkan crank case. Crankshaft installer pot Crankshaft installer bolt Pot 90890-01274 Bolt 90890-01275 Alat ini digunakan untuk memasang poros engkol/crankshaft. Spacer Adapter (M10) Spacer 90890-01288 Adapter (M10) 90890-01383 Alat ini digunakan untuk memasang poros engkol/crankshaft. Tappet adjusting tool 90890-01311 Alat ini digunakan untuk menyetel kelonggaran klep/valve clearance. Fuel level gauge 90890-01312 Alat ini digunakan untuk mengukur ke- tinggian pelampung kondisi terpasang T-handle Damper rod holder (19 mm) T-handle 90890-01326 Rod holder 90890-04084 Alat ini digunakan untuk mengendorkan dan mengencangkan baut damper rod 1 - 5 GEN INFO SPECIAL TOOLS
Halaman 14
Nomor Tool. Nama Tool Gambar Illustrasi Flywheel puller 90890-01362 Alat ini digunakan untuk melepas magnet Fork seal driver weight Fork seal driver attachment (ø33) Weight 90890-01367 Attachment 90890-01368 Alat ini digunakan untuk memasang seal oli dan seal debu pada fork depan. Steering nut wrench 90890-01403 Alat ini digunakan untuk mengencangkan, dan mengendorkan baut kemudi/steering Sheave holder 90890-01701 Alat ini digunakan untuk menahan magnet secondary sheave. Compression gauge 90890-03081 Alat ini digunakan untuk mengukur tekanan kompresi mesin. Pocket tester 90890-03112 Alat ini digunakan untuk memeriksa rangkaian kelistrikan. Engine tachometer 90890-03113 Alat ini digunakan untuk menyetel putaran langsam mesin Valve spring compressor 90890-04019 Alat ini digunakan untuk memasang, dan melepas rangkaian klep. 1 - 6 GEN INFO SPECIAL TOOLS
Halaman 15
Nomor Tool Nama Tool Gambar Illustrasi Universal clutch holder 90890-04086 Alat ini digunakan untuk menahan clutch boss, pada saat memasang dan melepas baut clutch boss nut. Ignition checker 90890-06754 Alat ini digunakan untuk memeriksa komponen sistim pengapian. 1 - 7 GEN INFO SPECIAL TOOLS
Halaman 16
BAB 2. SPESIFIKASI SPESIFIKASI UMUM ................................................................................. 2-1 SPESIFIKASI PERAWATAN ..................................................................... 2-4 MESIN .................................................................................................. 2-4 RANGKA/CHASSIS ............................................................................ 2-12 KELISTRIKAN .................................................................................... 2-15 SPESIFIKASI TORSI UMUM ..................................................................... 2-17 UNIT SATUAN ............................................................................................ 2-17 POIN PELUMASAN DAN TIPE PELUMAS YANG DIPAKAI .................... 2-18 MESIN ................................................................................................. 2-18 RANGKA/CHASSIS ............................................................................. 2-19 JALUR KABEL ........................................................................................... 2-20 SPEC
Halaman 17
SPEC
Halaman 18
SPEC SPESIFIKASI UMUM SPESIFIKASI SPESIFIKASI UMUM Model SX-4 Kode model : 5BP1 Dimensi: Panjang 2.020 mm Lebar 770 mm Tinggi 1.090 mm Tinggi tempat duduk 770 mm Jarak sumbu roda 1.295 mm Jarak ketanah 165 mm Berat: Dengan Oli dan bahan bakar terisi penuh 131 kg Kemampuan berbelok : 2.100 mm Mesin : Tipe Mesin pendingin udara 4-tak bensin, SOHC Susunan Cylinder Tegak single cylinder Volume cylinder 223 cm3 Diameter × Langkah 70 × 58 mm Perbandingan kompresi 9.5 : 1 Tekanan kompresi 8.5 kg/cm2/370 r/min Sistim starter Motor starter dan kick starter Sistem pelumasan : Pelumasan basah Tipe oli atau grade: Oli mesin SAE 20W40 tipe SE motor oil (YAMALUBE) (jika temperature dibawah 15°C) SAE 10W30 tipe SE motor oil (jika temperatur diatas 15°C) Kapasitas oli Oli mesin : Penggantian berkala 1.2 Liter Dengan melepas filter oli 1.3 Liter Kapasitas total 1.4 Liter Saringan udara: Element tipe kering Bahan bakar : Tipe Bensin reguler Kapasitas tangki bensin : Total 12 Liter Cadangan/Reserve 3 Liter Karburator: Tipe/pabrik pembuat BS30/MIKUNI 2 - 1
Halaman 19
SPEC SPESIFIKASI UMUM Model SX-4 Busi : Tipe/pabrik pembuat D8EA/NGK atau X24ES-U/DENSO Gap 0.6 ~ 0.7 mm Tipe kopling : Basah, multiple-disc Transmisi : Sistim reduksi Primary Spur gear Perbandingan reduksi primary 74/24 (3.083) Sistim reduksi secondary Rantai penggerak Perbandingan reduksi secondary 44/15 (2.933) Tipe Transmission Constant mesh, 5-kecepatan Operation Left foot operation Gear ratio: 1st 36/14 (2.571) 2nd 32/19 (1.684) 3rd 28/22 (1.273) 4th 26/25 (1.040) 5th 23/27 (0.852) Chassis: Frame type Double-cradle Caster angle 25.3° Trail 85 mm Tire: Type With tube Size (F) 80/100-18 M/C 47P Size (R) 100/90-18 M/C 56P Wear limit 0.8 mm Tire pressure (cold tire): Basic weight: With oil and full fuel tank 131 kg Maximum load * 180 kg Cold tire pressure: FRONT REAR Rider 2.00 kg/cm2 2.00 kg/cm2 With passenger 2.00 kg/cm2 2.25 kg/cm2 * Load is the total weight of cargo, rider, pas- senger, and accessories. Brake: Front Single disc brake Operation Right hand operation Rear Drum brake Operation Right foot operation Suspension: Front suspension Telescopic fork Rear suspension Swing arm 2 - 2
Halaman 20
# GENERAL SPECIFICATIONS SPEC 🔌 | Model | SX-4 | | :--- | :--- | | **Shock absorber:** | | |  Front shock absorber | Coil spring, oil damper | |  Rear shock absorber | Coil spring, oil damper | | **Wheel travel:** | | |  Front wheel travel | 140 mm | |  Rear wheel travel | 100 mm | | **Electrical:** | | |  Ignition system | CDI | |  Generator system | A.C. magneto generator | |  Battery type or model | GM7B-4B | |  Battery capacity | 12 V 7 AH | | **Headlight type:** | Bulb type | | **Bulb wattage × quantity:** | | |  Headlight | 12 V, 35 W/36.5 W × 1 | |  Auxiliary light | 12 V, 3.4 W × 1 | |  Tail/brake light | 12 V, 5 W/21 W × 1 | |  Flasher light | 12 V, 10 W × 4 | |  Meter light | 12 V, 1.7 W × 2 | |  Indicator light: | | |   “NEUTRAL” | 12 V, 3.4 W × 1 | |   “HIGH BEAM” | 12 V, 3.4 W × 1 | |   “TURN” | 12 V, 3.4 W × 2 | <br> <p align="center">2 - 3</p>
Halaman 21
SPEC MAINTENANCE SPECIFICATIONS MAINTENANCE SPECIFICATIONS ENGINE Model SX-4 Cylinder head: Warp limit <0.03 mm> Lines indicate straight edge measurement. * * Cylinder: Bore size/measuring point 70.000 ~ 70.018 mm 40 mm * Wear limit <0.01 mm> Camshaft: Drive method Chain drive (right) Camshaft outside dia. 24.96 ~ 24.98 mm Cam dimensions: Intake: “A” 36.52 ~ 36.62 mm “B” 30.201 ~ 30.301 mm Exhaust: “A” 36.564 ~ 36.664 mm “B” 30.216 ~ 30.316 mm Camshaft runout limit <0.03 mm> Rocker arm and rocker arm shaft: Rocker arm inside diameter 14.992 ~ 15.000 mm Shaft outside diameter 14.960 ~ 14.981 mm Arm-to-shaft clearance 0.009 ~ 0.037 mm Cam chain: Cam chain type/no. of links DID SCR-0404SDH Cam chain adjustment method Automatic Valve, valve seat, valve guide: Valve clearance (cold): IN. 0.05 ~ 0.10 mm EX. 0.10 ~ 0.15 mm A B 2 - 4
Halaman 22
# MAINTENANCE SPECIFICATIONS SPEC ⚙️ | Model | SX-4 | | :--- | :--- | | **Value dimensions:** | | | **"A" head dia.** | IN. 33.9 ~ 34.1 mm<br>EX. 28.4 ~ 28.6 mm | | **"B" face width** | IN. 2.26 mm<br>EX. 2.26 mm | | **"C" seat width** | IN. 0.9 ~ 1.1 mm<br>EX. 0.9 ~ 1.1 mm | | **"D" margin thickness** | IN. 0.8 ~ 1.2 mm<br>EX. 0.8 ~ 1.2 mm | | **Stem outside dia.** | IN. 5.975 ~ 5.990 mm<br>EX. 5.960 ~ 5.975 mm | | **Guide inside dia.** | IN. 6.000 ~ 6.012 mm<br>EX. 6.000 ~ 6.012 mm | | **Stem-to-guide clearance** | IN. 0.010 ~ 0.037 mm<br>EX. 0.025 ~ 0.052 mm | | **Stem runout limit** | <0.03 mm> | | **Valve spring:** | | | **Free length** | **Inner:**<br>IN. 36.17 mm<br>EX. 36.17 mm<br><br>**Outer:**<br>IN 36.63 mm<br>EX. 36.63 mm | | **Set length (valve closed)** | **Inner:**<br>IN. 30.5 mm<br>EX. 30.5 mm<br><br>**Outer:**<br>IN. 32 mm<br>EX. 32 mm | | **Compressed pressure (installed)** | **Inner:**<br>IN. 7.65 ~ 9.35 kg<br>EX. 7.65 ~ 9.35 kg<br><br>**Outer:**<br>IN. 13.1 ~ 16.1 kg<br>EX. 13.1 ~ 16.1 kg | *** 2-5
Halaman 23
# MAINTENANCE SPECIFICATIONS | Model | SX-4 | | :--- | :--- | | **Tilt limit \***<br>IN.<br>EX. | <br><2.5°/1.6 mm><br><2.5°/1.6 mm> | | **Direction of winding**<br>Inner IN.<br>Inner EX.<br>Outer IN.<br>Outer EX. | <br>Counterclockwise<br>Counterclockwise<br>Clockwise<br>Clockwise | | **Piston:**<br>Piston-to-cylinder clearance<br><Limit><br>Piston size "D"<br>Measuring point "H" | <br>0.020 ~ 0.025 mm<br><0.05 mm><br>69.977 ~ 69.996 mm<br>4 mm | | **Piston ring:**<br>**Top ring:**<br>Type<br>Dimensions (B × T)<br>End gap (installed)<br>Side clearance (installed)<br><br>**2nd ring:**<br>Type<br>Dimensions (B × T)<br>End gap (installed)<br>Side clearance<br><br>**Oil ring:**<br>Dimensions (B × T)<br>End gap (installed) | <br><br>Barrel<br>1.2 × 2.8 mm<br>0.15 ~ 0.30 mm<br>0.03 ~ 0.07 mm<br><br>Taper<br>1.2 × 2.8 mm<br>0.15 ~ 0.30 mm<br>0.02 ~ 0.06 mm<br><br>2.5 × 2.8 mm<br>0.3 ~ 0.9 mm | --- **2 - 6**
Halaman 24
SPEC MAINTENANCE SPECIFICATIONS Model SX-4 Crankshaft: B B C A Crank width “A” 69.25 ~ 69.30 mm Runout limit “B” <0.03 mm> Big end side clearance “C” 0.35 ~ 0.85 mm Clutch: Friction plate: Thickness 2.9 ~ 3.1 mm Quantity 6 pcs. Wear limit <2.8 mm> Clutch plate: Thickness 1.5 ~ 1.7 mm Quantity 5 pcs. Warp limit <0.2 mm> Clutch spring: Free length 34.9 mm Quantity 4 pc. Minimum length <33.2 mm> Push rod bending limit <0.5 mm> Transmission: Main axle deflection limit <0.08 mm> Drive axle deflection limit <0.08 mm> Shifter: Shifter type Cam drum and guide bar Guide bar bending limit <0.025 mm> Carburetor: I.D. mark 5BP1 00 Main jet (M.J.) #110 Main air jet (M.A.J.) #120 Jet needle (J.N.) 4EL10-2 Needle jet (N.J.) O-2 Pilot jet (P.J.) #17.5 Pilot air jet (P.A.J. #1) #65 (P.A.J. #2) 1.2 Pilot screw (P.S.) 3 Pilot outlet (P.O.) ø0.8 Bypass (B.P.1) ø0.9 (B.P.2) ø0.8 (B.P.3) ø0.8 Valve seat size (V.S.) ø2.0 Starter jet (G.S.1) #25 (G.S.2) 0.7 2 - 7
Halaman 25
SPEC MAINTENANCE SPECIFICATIONS Model SX-4 Fuel level 2.7 ~ 4.7 mm below the float chamber line Engine idling speed 1,350 ~ 1,450 r/min Lubrication system: Oil filter type Paper and wire mesh type Oil pump type: Trochoid type Tip clearance 0.15 mm Side clearance 0.04 ~ 0.09 mm 2 - 8
Halaman 26
SPEC MAINTENANCE SPECIFICATIONS Model SX-4 Lubrication chart: PIN WITH HOLE OIL PUMP MAIN AXLE DRIVE AXLE CRANKSHAFT OIL PAN 2 - 9 OIL CLEANER CYLINDER HEAD CAMSHAFT OIL STRAINER
Halaman 27
# MAINTENANCE SPECIFICATIONS [SPEC] ## Tightening torque | Part to be tightened | Part name | Thread size | Q'ty | Tightening torque (Nm) | Tightening torque (m·kg) | Remarks | | :--- | :--- | :--- | :---: | :---: | :---: | :--- | | Camshaft sprocket cover | Bolt | M6 | 2 | 10 | 1.0 | | | Tappet cover | Bolt | M55 | 2 | 18 | 1.8 | | | Cylinder head | Flange bolt | M8 | 4 | 22 | 2.2 | [Icon: E] | | (Cylinder head) | Bolt | M8 | 2 | 20 | 2.0 | | | Cylinder head (exhaust pipe) | Stud bolt | M8 | 4 | 15 | 1.5 | | | Cylinder head bearing plate | Bolt | M6 | 2 | 8 | 0.8 | | | Cylinder head breather plate | Bolt | M6 | 3 | 8 | 0.8 | | | Oil pressure checking screw | Screw | M6 | 1 | 7 | 0.7 | | | Spark plug | — | M12 | 1 | 18 | 1.8 | | | Rotor (CDI magneto) | Flange bolt | M10 | 1 | 60 | 6.0 | | | Valve adjusting locknut | Nut | M6 | 2 | 14 | 1.4 | | | Cam sprocket | Bolt | M10 | 2 | 60 | 6.0 | | | Chain guide | Bolt | M6 | 2 | 8 | 0.8 | [Icon: LT] | | Chain tensioner | Bolt | M6 | 2 | 10 | 1.0 | | | (Chain tensioner) | Bolt | M8 | 1 | 8 | 0.8 | | | Oil pump | Screw | M6 | 3 | 6 | 0.6 | | | Oil filter cover | Bolt | M6 | 3 | 10 | 1.0 | | | Oil delivery pipe (crankcase cover) | Union bolt | M10 | 1 | 20 | 2.0 | | | Oil delivery pipe (cylinder) | Union bolt | M8 | 1 | 18 | 1.8 | | | Carburetor joint | Bolt | M6 | 2 | 10 | 1.0 | | | Air filter case (lower) | Bolt | M6 | 2 | 6 | 0.6 | | | Air filter case (upper) | Bolt | M6 | 2 | 10 | 1.0 | | | Exhaust pipe joint (lower) | Flange bolt | M8 | 2 | 20 | 2.0 | | | Exhaust pipe | Nut | M8 | 2 | 18 | 1.8 | | | Muffler | Flange bolt | M8 | 2 | 30 | 3.0 | | | Crankcase | Flange bolt | M6 | 12 | 10 | 1.0 | | | Crankcase cover (left) | Flange bolt | M6 | 9 | 10 | 1.0 | | | Crankcase cover (right) | Flange bolt | M6 | 13 | 10 | 1.0 | | | Magneto lead clamp | Bolt | M5 | 1 | 7 | 0.7 | [Icon: LT] | | Neutral switch lead clamp | Screw | M6 | 1 | 7 | 0.7 | | | Drain bolt | — | M12 | 1 | 20 | 2.0 | | | Starter clutch | Bolt | M8 | 3 | 30 | 3.0 | Stake [Icon: LT] | | Primary drive gear | Nut | M16 | 1 | 80 | 8.0 | Use lock washer | | Clutch boss | Nut | M14 | 1 | 70 | 7.0 | Use lock washer | | Clutch spring | Screw | M5 | 4 | 6 | 0.6 | | | Clutch adjuster locknut | Nut | M6 | 1 | 8 | 0.8 | | | Clutch push lever | Screw | M8 | 1 | 12 | 1.2 | | | Drive sprocket | Nut | M18 | 1 | 110 | 11.0 | | | Shiftcam stopper | Bolt | M6 | 1 | 10 | 1.0 | [Icon: LT] | | Shift arm | Bolt | M6 | 1 | 10 | 1.0 | | | Neutral switch | — | M10 | 1 | 20 | 2.0 | | | Stator | Bolt | M6 | 3 | 7 | 0.7 | | <br> <div style="text-align: center;">2 - 10</div>
Halaman 28
## MAINTENANCE SPECIFICATIONS SPEC | Part to be tightened | Part name | Thread size | Q'ty | Tightening torque | Remarks | | :----------------------- | :-------- | :---------- | :--- | :---------------- | :---------------- | | | | | | Nm | m·kg | | | Pickup coil | Bolt | M6 | 2 | 7 | 0.7 | | | Starter motor | Bolt | M6 | 2 | 10 | 1.0 | | | Kick crank | Bolt | M8 | 1 | 20 | 2.0 | | | Kick racket wheel guide | Bolt | M6 | 2 | 10 | 1.0 | Use lock washer | 2 - 11
Halaman 29
SPEC MAINTENANCE SPECIFICATIONS CHASSIS Item SX-4 Steering system: Steering bearing type Angular bearing Front suspension: Front fork travel 140 mm Fork spring free length 391.5 mm Spring rate: K1 0.75 kg/mm K2 1.0 kg/mm Stroke K1 0 ~ 95 mm K2 95 ~ 140 mm Optional spring No. Oil capacity 252 cm3 Oil level 95 mm From top of fully compressed inner tube without fork spring Oil grade Yamaha fork oil 10W or equivalent Rear suspension: Shock absorber travel 32 mm Spring rate: K1 16.01 kg/mm Stroke: K1 0 ~ 32 mm Optional spring No. Swingarm: Swingarm free play limit: End <1 mm> Swingarm free play limit: Side <1 mm> Front wheel: Type Spoke wheel Rim size 1.85 × 1.60 Rim material Steel Rim runout limit: Vertical <2 mm> Lateral <2 mm> Rear wheel: Type Spoke wheel Rim size 1.85 × 2.15 Rim material Steel Rim runout limit: Vertical <2 mm> Lateral <2 mm> Drive chain: Type/manufacturer 428 V/DAIDO No. of links 118 Drive chain slack 20 ~ 30 mm 2 - 12
Halaman 30
SPEC MAINTENANCE SPECIFICATIONS Item SX-4 Front disc brake: Disc brake type Single Disc outside diameter × thickness 267 × 4 <Limit> <3.5 mm> Brake pad lining thickness 5.3 mm <Limit> <0.8 mm> Master cylinder inside diameter 11 mm Caliper cylinder inside diameter 26.99 mm 22.22 mm Recommended fluid DOT 3 or 4 Rear drum brake: Type Leading and trailing Drum inside diameter 130 mm <Limit> <131 mm> Lining thickness 4 mm <Limit> <1 mm> Shoe spring free length 50.5 mm Brake lever and brake pedal: Brake lever free play 2 ~ 5 mm Brake pedal free play 20 ~ 30 mm Clutch lever: Clutch lever free play 10 ~ 15 mm 2 - 13
Halaman 31
SPEC MAINTENANCE SPECIFICATIONS Tightening torque Part to be tightened Thread size Tightening torque Remarks Nm m·kg Handle crown and inner tube M8 × 1.25 23 2.3 Handle crown and steering stem M22 × 1.0 110 11.0 Steering stem and ring nut – 18 1.8 See NOTE Handle crown and upper holder M8 × 1.25 19 1.9 Master cylinder M6 × 1.0 7 0.7 Engine stay and engine M10 × 1.25 58 5.8 Engine stay and frame M8 × 1.25 30 3.0 Engine mounting (rear-lower) and frame M10 × 1.25 79 7.9 Engine mounting (rear-upper) and frame M10 × 1.25 58 5.8 Engine mounting (front) and frame M10 × 1.25 58 5.8 Tension bar and swingarm M8 × 1.25 16 1.6 Kick starter and frame M10 × 1.25 52 5.2 Front wheel axle M14 × 1.5 58 5.8 Front brake disc M6 × 1.0 23 2.3 Front brake caliper M10 × 1.25 30 3.0 Brake hose union bolt M10 × 1.25 26 2.6 Brake caliper bleed screw M7 × 1.0 6 0.6 Rear wheel axle M14 × 1.5 85 8.5 Sprocket and wheel hub M8 × 1.25 30 3.0 Tension bar and rear brake shoe plate M8 × 1.25 16 1.6 Brake lever camshaft M6 × 1.0 10 1.0 Fuel sender and fuel tank M5 × 0.8 4 0.4 Footrest and footrest bracket M8 × 1.25 30 3.0 Footrest bracket and brake pedal M10 × 1.25 30 3.0 Footrest bracket and frame M8 × 1.25 30 3.0 Rear footrest bracket and frame M8 × 1.25 30 3.0 Pivot shaft M12 × 1.25 59 5.9 Rear shock absorber (upper) M12 × 1.25 59 5.9 Rear shock absorber (lower) M12 × 1.25 59 5.9 Relay arm and frame M12 × 1.25 59 5.9 Relay arm and connecting rod M12 × 1.25 59 5.9 Connecting rod and frame M12 × 1.25 59 5.9 Chain case and swingarm M6 × 1.0 7 0.7 Chain guide and swingarm M6 × 1.0 7 0.7 NOTE: 1. First, tighten the ring nut approximately 48 Nm (4.8 m • kg) by using the torque wrench, then loosen the ring nut one turn. 2. Retighten the ring nut 18 Nm (1.8 m • kg). 2 - 14
Halaman 32
# MAINTENANCE SPECIFICATIONS `SPEC` ⚙️ ## ELECTRICAL | Item | SX-4 | | :--- | :--- | | **Voltage:** | 12 V | | **Ignition system:** | | | Ignition timing (B.T.D.C.) | 5° at 1,450 r/min | | Advancer type | Electrical | | **CDI:** | | | Pickup coil resistance (color) | 248 ~ 372 $\Omega$ at 20°C<br>(Red - White) | | Source coil resistance | 688 ~ 1,032 $\Omega$ at 20°C<br>(Brown - Green) | | CDI. unit-model/manufacturer | 5BP/YAMAHA | | **Ignition coil:** | | | Model/manufacturer | 5BP/YAMAHA | | Primary winding resistance | 0.32 ~ 0.48 $\Omega$ at 20°C | | Secondary winding resistance | 5.68 ~ 8.52 k$\Omega$ at 20°C | | Spark plug cap resistance | 10 k$\Omega$ | | **Charging system/type:** | A.C. magneto generator | | **CDI magneto:** | | | Model/manufacturer | F5BP/YAMAHA | | Nominal output | 14 V, 100 W at 5,000 r/min | | Lighting coil resistance | 0.24 ~ 0.36 $\Omega$ at 20°C (Yellow/Red - Black) | | Charging coil resistance | 0.32 ~ 0.48 $\Omega$ at 20°C (White - Black) | | **Rectifier/regulator:** | | | Model/manufacturer | SH656-12/SHINDENGEN | | No load regulated voltage (DC) | 14.1 ~ 14.9 V | | Capacity | 8 A | | **Battery:** | | | Capacity: | 12 V, 7AH | | Specific gravity | 1.280 | | **Electric starter system:** | | | Type | Constant mesh type | | Starter motor: | | | Model/manufacturer | 5BP/YAMAHA | | Output | 0.4 kW | | Brush | | | Overall length | 10 mm | | \<Limit> | \<3.5 mm> | | Spring pressure | 560 ~ 840 g | | Commutator: | | | Outside diameter | 22 mm | | \<Wear limit> | \<21 mm> | | Mica undercut | 1.5 mm | <br> <div align="center">2 - 15</div>
Halaman 33
SPEC MAINTENANCE SPECIFICATIONS Item SX-4 Horn: Type/quantity Plain type × 2 Model/manufacturer 5BP/IMASEN Maximum amperage 1.5 A Flasher relay: Type Condenser type Model/manufacturer 3RS/DENSO Self cancelling device No Flasher frequency 75 ~ 95 cycle/min Wattage 10 W × 2 + 3.4 W Starting circuit cut-off relay: Model/manufacturer ACA12115-3/MATSUSHITA Diode Yes Circuit breaker: Type Fuse Amperage for individual circuit × quantity: Main 15 A × 1 Reserve 15 A × 1 2 - 16
Halaman 34
GENERAL TORQUE SPECIFICATIONS/ DEFINITION OF UNITS GENERAL TORQUE SPECIFICATIONS This chart specifies torque for standard fasten- ers with standard I.S.O. pitch threads. Torque specifications for special components or assemblies are included in the applicable sections of this book. To avoid warpage, tighten multifastener assemblies in a crisscross fash- ion, in progressive stages, until full torque is reached. Unless otherwise specified, torque specifications call for clean, dry threads. Com- ponents should be at room temperature. A B A: Distance across flats B: Outside thread diameter DEFINITION OF UNITS Unit Read Definition Measure mm cm millimeter centimeter 10-3 meter 10-2 meter Length Length kg kilogram 103 gram Weight N Newton 1 kg × m/sec2 Force Nm m • kg Newton meter Meter kilogram N × m m × kg Torque Torque Pa N/mn Pascal Newton per millimeter N/m2 N/mn Pressure Spring rate L cm3 Liter Cubic centimeter – Volume or capacity r/min Rotation per minute – Engine speed 2 - 17 SPEC General torque specifications Nm m·kg ft·lb 10 mm 6 mm 6 0.6 4.3 12 mm 8 mm 15 1.5 11 14 mm 10 mm 30 3.0 22 17 mm 12 mm 55 5.5 40 19 mm 14 mm 85 8.5 61 22 mm 16 mm 130 13.0 94 A (Nut) B (Bolt)
Halaman 35
SPEC LUBRICATION POINTS AND LUBRICANT TYPE LUBRICATION POINTS AND LUBRICANT TYPE ENGINE Lubrication Symbol Lubricant type Oil seal lip LS Lithium-soap base grease O-Ring LS Lithium-soap base grease Bearing E Engine oil Cylinder head bolt/washer E Engine oil Rocker shaft M Molybdeum disulfide oil Crankshaft pin E Engine oil Connecting rod E Engine oil Piston surface E Engine oil Piston pin E Engine oil Camshaft cam lobe/journal E Engine oil Valve stem (IN, EX) M Molybdeum disulfide oil Valve stem end (IN, EX) M Molybdeum disulfide oil Cam chain/cam sprocket E Engine oil Oil pump shaft, rotor (IN, OUT), housing E Engine oil Kick shaft E Engine oil Kick idle sprocket (inside) E Engine oil Kick crank shaft LS Lithium-soap base grease Kick idle gear/kick gear E Engine oil Starter clutch E Engine oil Primary driven gear E Engine oil Push lever axle M Molybdeum disulfide oil Transmission gear (wheel/pinion) M Molybdeum disulfide oil Axle (main/drive) M Molybdeum disulfide oil Shift cam M Molybdeum disulfide oil Shift fork/guide bar E Engine oil Crankcase mating surfaces Yamaha bond No.1215® 2 - 18
Halaman 36
SPEC LUBRICATION POINTS AND LUBRICANT TYPE CHASSIS Lubrication Symbol Lubricant type Steering bearing (upper/lower) LS Lithium-soap base grease Wheel bearing/axle LS Lithium-soap base grease Front wheel oil seal (right/left) LS Lithium-soap base grease Rear wheel oil seal LS Lithium-soap base grease Clutch hub oil seal LS Lithium-soap base grease Clutch hub fitting area LS Lithium-soap base grease Rear brake pedal shaft LS Lithium-soap base grease Change pedal LS Lithium-soap base grease Side/main stand sliding surface LS Lithium-soap base grease Tube guide (throttle grip) inner surface LS Lithium-soap base grease Brake lever bolt, sliding surface LS Lithium-soap base grease Clutch lever collar, sliding surface LS Lithium-soap base grease Swingarm pivot/bearing LS Lithium-soap base grease Rear shock absorber bolt LS Lithium-soap base grease Relay arm color/oil seal LS Lithium-soap base grease Speedometer gear unit LS Lithium-soap base grease Rear brake camshaft LS Lithium-soap base grease Brake shoe plate pivot LS Lithium-soap base grease 2 - 19
Halaman 37
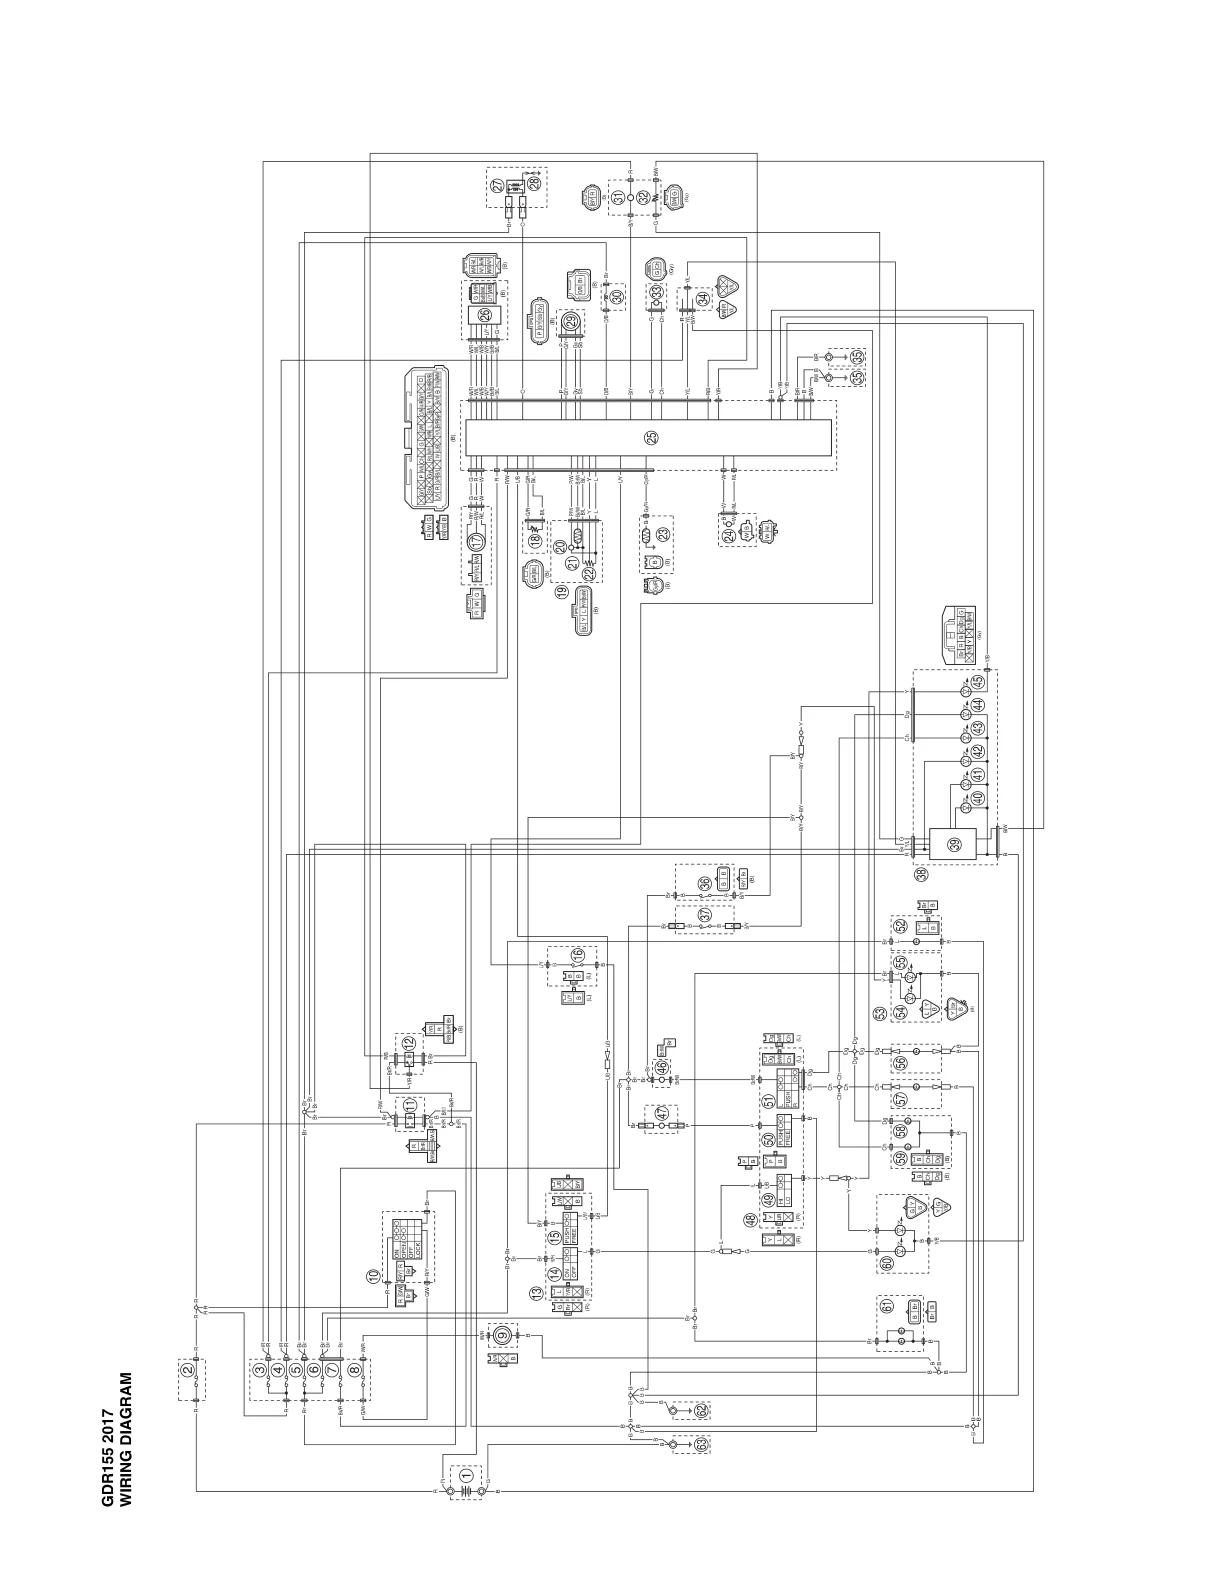
CABLE ROUTING 1 Tachometer cable 2 Brake hose 3 Brake hose holder 4 Wire harness 5 Air vent hose 6 Starting motor lead 7 Battery negative lead 8 Battery positive lead 9 Rear brake switch lead 0 Taillight lead A Fuel sender lead B Breather hose C Air vent hose D Throttle cable E Clutch cable F Magneto lead G Pick-up coil lead H Wire harness Ó Ñ F G H 0 A B C D E Ë Ì Í Î 9 7 8 6 5 2 - 20 SPEC CABLE ROUTING È Clamp the wire harness. É Pass the cable holder through the tachometer cable. Ê Install the horn lead (short side) to the right side of the horn. Ë Clamp the taillight lead. Ì Clamp the wire harness. Í Clamp the wire harness at the white tape portion. Ò Ð Ï È 1 2 3 4 É Ê
Halaman 38
Î To fuel tank Ï Clamp the throttle cable and clutch cable. Turn the clamp end to inside of motorcycle. Ð Clamp the throttle cable and clutch cable. Ñ Insert the air vent hose into the frame. Ò Clamp the wire harness and turn the clamp end to inside of motorcycle. Ó Clamp the magneto lead and pick-up coil lead and push the leads into holder. Ó Ñ F G H 0 A B C D E Ë Ì Í Î 9 7 8 6 5 2 - 21 SPEC CABLE ROUTING Ò Ð Ï È 1 2 3 4 É Ê
Halaman 39
1 Clutch cable 2 Breather hose 3 Fuel tank over flow hose 4 Magneto lead 5 Battery breather hose 6 Carburetor over flow hose 7 Fuel tank over flow hose 8 Speedometer cable 9 Wire harness 0 Pick-up coil lead A Magneto lead B Fuel tank over flow hose È Install the horn lead (long side) to the left side of the horn É Clamp the battery breather hose, carburetor over flow hose and fuel tank over flow hose. Ê Pass the speedometer cable through the holder 1 9 8 Ê 2 - 22 SPEC CABLE ROUTING Ë Clamp the magneto lead and pick-up coil lead. Ì Clamp the battery breather hose. 0 A B Ë Ë E Ì D A C È 2 3 A 4 5 6 7 É
Halaman 40
2 - 23
Halaman 41
INSP ADJ BAB 3. PARAWATAN BERKALA DAN PENYETELAN PENDAHULUAN ........................................................................................... 3-1 PERAWATAN BERKALA/PELUMASAN .................................................... 3-1 TEMPAT DUDUK/JOK ................................................................................. 3-3 PENUTUP SAMPING/SIDE COVER ............................................................ 3-3 TANGKI BENSIN .......................................................................................... 3-3 MESIN .......................................................................................................... 3-4 MENYETEL KELONGGARAN KLEP .................................................... 3-4 MENYETEL PUTARAN LANGSAM .......................... 3-5 .......... MENYETL GAS. 3-6 SPARK PLUG INSPECTION ................................................................ 3-8 COMPRESSION PRESSURE MEASUREMENT .................................. 3-8 ENGINE OIL LEVEL INSPECTION ....................................................... 3-9 ENGINE OIL REPLACEMENT ............................................................ 3-10 CLUTCH ADJUSTMENT ..................................................................... 3-12 AIR FILTER CLEANING ...................................................................... 3-13 CARBURETOR JOINT INSPECTION ................................................. 3-15 FUEL LINE INSPECTION ................................................................... 3-15 EXHAUST SYSTEM INSPECTION ..................................................... 3-16 CHASSIS .................................................................................................... 3-17 FRONT BRAKE ADJUSTMENT .......................................................... 3-17 BRAKE PAD INSPECTION ................................................................. 3-17 BRAKE FLUID LEVEL INSPECTION .................................................. 3-18 AIR BLEEDING (HYDRAULIC BRAKE SYSTEM) .............................. 3-18 BRAKE HOSE INSPECTION .............................................................. 3-19 REAR BRAKE ADJUSTMENT ............................................................ 3-20 BRAKE SHOE INSPECTION .............................................................. 3-21 BRAKE LIGHT SWITCH ADJUSTMENT ............................................ 3-21 DRIVE CHAIN SLACK ADJUSTMENT ............................................... 3-22 TIRE INSPECTION ............................................................................. 3-23 STEERING HEAD INSPECTION ........................................................ 3-23 REAR SHOCK ABSORBER INSPECTION ......................................... 3-25 WHEEL INSPECTION ......................................................................... 3-26 SPOKE INSPECTION AND TIGHTENING ......................................... 3-26 CABLE INSPECTION .......................................................................... 3-26 LUBRICATION .................................................................................... 3-27
Halaman 42
┌──────┬───┐ │ INSP │ 🔧│ │ ADJ │ │ └──────┴───┘ --- **ELECTRICAL** .................................................................................................... 3-28 * BATTERY INSPECTION ............................................................................... 3-28 * FUSE INSPECTION .................................................................................... 3-31 * HEADLIGHT BEAM ADJUSTMENT .............................................................. 3-32 * HEADLIGHT BULB REPLACEMENT .............................................................. 3-32
Halaman 43
INSP ADJ INTRODUCTION/PERIODIC MAINTENANCE/ LUBRICATION PERIODIC INSPECTION AND ADJUSTMENT INTRODUCTION This chapter includes all information necessary to perform recommended inspections and adjust- ments. These preventive maintenance procedures, if followed, will ensure more reliable vehicle operation and a longer service life. The need for costly overhaul work will be greatly reduced. This information applies to vehicles already in service as well as new vehicles that are being prepared for sale. All service technicians should be familiar with this entire chapter. PERIODIC MAINTENANCE/LUBRICATION NO. ITEM CHECK OR MAINTENANCE JOB ODOMETER READING (× 1,000 km) 1 * Fuel line • Check fuel hoses for cracks or damage. 2 * Fuel filter • Check condition. Replace if necessary. • Check condition. • Clean and regap. 3 Spark plug • Replace if necessary. 4 * Valves • Check valve clearance. • Adjust. 5 Air filter element • Clean. Replace if necessary. 6 * Battery • Check electrolyte level and specific gravity. • Make sure that the breather hose is properly routed. 7 Clutch • Check operation. • Adjust. 8 * Front brake • Check operation, fluid level and vehicle for fluid leakage. • Replace brake pads if necessary. 9 * Rear brake • Check operation and adjust brake pedal free play. • Replace brake shoes if necessary. 10 * Wheels • Check runout, spoke tightness and for damage. • Tighten spokes if necessary. 11 * Wheel bearings • Check bearing for looseness damage. 12 * Swingarm • Check operation and for excessive play. • Lubricate with lithium-soap based grease, every 24,000 km. 13 Drive chain • Check chain slack. • Make sure that the rear wheel is properly aligned. • Clean and lubricate. 14 * Steering bearings • Check bearing play and steering for roughness. • Lubricate with lithium-soap-based grease, every 12,000 km. 15 * Chassis fasteners • Make sure that all nuts, bolts and screws are properly tightened. 16 Sidestand/center- stand • Check operation. • Lubricate. 17 * Front fork • Check operation and for oil leakage. 18 * Shock absorber assembly • Check operation and shock absorber for oil leak- age. Rear suspension relay arm and con- necting arm pivoting points • Check operation. 19 * • Lubricate with lithium-soap-base grease, every 24,000 km. 3 - 1 0.5 2 4 8 12 Every 500 km and after washing the motorcycle or riding in the rain.
Halaman 44
INSP ADJ PERIODIC MAINTENANCE/LUBRICATION NO. ITEM CHECK OR MAINTENANCE JOB ODOMETER READING (× 1,000 km) 20 * Carburetor • Check starter (choke) operation. • Adjust engine idling speed. 21 Engine oil • Change. 22 Engine oil filter ele- ment • Clean. 23 * Engine oil strainer • Clean. 24 * Front and rear brake switches • Check operation. 25 Moving parts and cables • Lubricate. 26 * Lights, signals and switches • Check operation. • Adjust headlight beam. *Since these items require special tools, data and technical skills, have a Yamaha dealer perform the service. NOTE: G The air filter needs more frequent service if you are riding in unusually wet or dusty areas. G Hydraulic brake systems G After disassembling the brake master cylinder, and caliper cylinder, always change the fluid. Regularly check the brake fluid levels and fill the reservoirs as required. G Replace the oil seals on the inner parts of the brake master cylinder and caliper cylinder every two years. G Replace the brake hose every four years or if cracked or damaged. 3 - 2 0.5 2 4 8 12
Halaman 45
INSP ADJ SEAT/SIDE COVER/FUEL TANK 3 - 3 SEAT 1.Install: G Seat 1 NOTE: Insert the projection a on the front of the seat into the seat holder b as shown. SIDE COVER 1.Remove: G Seat 2.Remove: G Side covers (left and right) NOTE: Remove screws a and knob b, and then pull the side cover off as shown. FUEL TANK 1.Remove: G Air scoop (left and right) G Bolt G Washer G Fuel sender coupler G Breather hose G Fuel hose G Fuel tank 1 NOTE: Turn the fuel cock to “OFF” position before removing fuel hose.
Halaman 46
INSP ADJ VALVE CLEARANCE ADJUSTMENT 3 - 4 ENGINE VALVE CLEARANCE ADJUSTMENT NOTE: Valve clearance adjustment should be made with the engine cool, at room temperature. When the valve clearance is to be measured or adjusted, the piston must be at Top Dead Center (T.D.C) on the compression stroke. 1.Remove: G Air scoop (left and right) 1 2.Remove: G Spark plug G Tappet cover (intake side) 1 G Tappet cover (exhaust side) 2 3.Remove: G Timing mark accessing screw (with O-ring) 1 G Camshaft end cover (with O-ring) 2 4.Measure: G Valve clearance Out of specification → Adjust. Valve clearance (cold): Intake valve 0.05 ~ 0.10 mm Exhaust valve 0.10 ~ 0.15 mm ***************************************************** Measurement steps: GRotate the crankshaft counterclockwise to align the slit a on the rotor with the slit b on the crankcase cover when the piston is Top Dead Center (TDC).
Halaman 47
INSP ADJ VALVE CLEARANCE ADJUSTMENT/ IDLING SPEED ADJUSTMENT 3 - 5 GMeasure the valve clearance by using a feeler gauge. Out of specification → Adjust clearance. ***************************************************** 5.Adjust: G Valve clearance ***************************************************** Adjustment steps: GLoosen the locknut 1. GTurn the adjuster 2 in or out with the tappet adjusting tool 3 until specified clearance is obtained. Turning in Valve clearance is decreased. Turning out Valve clearance is increased. Tappet adjusting tool: 90890-01311 GHold the adjuster to prevent it from moving and tighten the locknut. 14 Nm (1.4 m • kg) T R . . GMeasure the vale clearance. GIf the clearance is incorrect, repeat above steps until specified clearance is obtained. ***************************************************** 6.Install: G O-ring G Tappet cover (intake side) 18 Nm (1.8 m • kg) T R . . IDLING SPEED ADJUSTMENT 1.Start the engine and let it warm up for sev- eral minutes. 2.Attach: G Engine tachometer to the spark plug lead. Engine tachometer: 90890-03113
Halaman 48
INSP ADJ IDLING SPEED ADJUSTMENT/ THROTTLE CABLE ADJUSTMENT 3 - 6 3.Check: G Engine idling speed Out of specification → Adjust. Engine idling speed: 1,350 ~ 1,450 r/min. 4.Adjust: G Engine idle speed ***************************************************** Adjustment steps: GTurn the pilot screw 1 until it is lightly seated. GTurn the pilot screw out by the specified number of turns. Pilot screw: 3 turns out GTurn the throttle stop screw 2 in or out until the specified idling speed is obtained. Turning in Idling speed is increased. Turning out Idling speed is decreased. ***************************************************** 5.Adjust: G Throttle cable free play Refer to the “THROTTLE CABLE ADJUST- MENT” section. THROTTLE CABLE ADJUSTMENT NOTE: Prior to adjusting the throttle cable free play, the engine idling speed should be adjusted. 1.Check: G Throttle cable free play a Out of specification → Adjust. Free play (throttle cable): 3 ~ 5 mm at throttle grip flange
Halaman 49
INSP ADJ THROTTLE CABLE ADJUSTMENT 3 - 7 2.Adjust: G Throttle cable free play ***************************************************** Adjustment steps: Carburetor side GLoosen the locknut 1. GTurn the adjusting nut 2 in or out until the specified throttle cable free play is obtained. Turn in Throttle cable free play is increased. Turn out Throttle cable free play is decreased. GTighten the locknut. NOTE: If the specified throttle cable free play cannot be obtained on the carburetor side of the cable, use the adjusting nut on the handlebar side. Handlebar side GLoosen the locknut 1. GTurn the adjusting nut 2 in or out until the specified throttle cable free play is obtained. Turn in Throttle cable free play is increased. Turn out Throttle cable free play is decreased. GTighten the locknut. WARNING After adjusting the throttle cable free play, start the engine and turn the handlebar to the right or left to ensure that this does not cause the engine idling speed to change. *****************************************************
Halaman 50
INSP ADJ SPARK PLUG INSPECTION/ COMPRESSION PRESSURE MEASUREMENT 3 - 8 EB303040 SPARK PLUG INSPECTION 1.Check: G Spark plug type Incorrect → Replace. Standard spark plug: D8EA (NGK), X24ES-U (DENSO) 2.Inspect: G Electrode 1 Wear/damage → Replace. G Insulator 2 Abnormal color → Replace. Normal color is a medium-to-light tan color. 3.Clean: G Spark plug (with spark plug cleaner or wire brush) 4.Measure: G Spark plug gap a (with a wire gauge) Out of specification → Adjust gap. Spark plug gap: 0.6 ~ 0.7 mm COMPRESSION PRESSURE MEASUREMENT NOTE: Insufficient compression pressure will result in performance loss. 1.Start the engine and let it warm up for sev- eral minutes. 2.Turn off the engine. 3.Remove: G Spark plug 4.Attach: G Compression gauge 1 Compression gauge: 90890-03081
Halaman 51
INSP ADJ COMPRESSION PRESSURE MEASUREMENT/ ENGINE OIL LEVEL INSPECTION 3 - 9 5.Measure: G Compression pressure If it exceeds the maximum pressure allowed → Inspect the cylinder head, valve surfaces and piston crown for carbon deposits. If it is below the minimum pressure → Squirt a few drops of oil into the affected cylinder and measure again. Follow the table below. Compression pressure (With oil applied into cylinder) Reading Diagnosis Higher than without oil Worn or damaged pistons Possible defective ring(s), valves, cylinder head gas- ket or piston → Repair. Same as without oil Compression pressure (at sea level): Standard: 1,200 kPa (12.0 Kg/cm2, 12.0 bar) Minimum: 1,050 kPa (10.5 Kg/cm2, 10.5 bar) ***************************************************** Measurement steps: GCrank the engine with the throttle wide-open until the reading on the compression gauge stabilizes. WARNING Before cranking the engine, ground all spark plug leads to prevent sparking. ***************************************************** ENGINE OIL LEVEL INSPECTION 1.Stand the motorcycle on a level surface. NOTE: Place the motorcycle on a suitable stand. 2.Start the engine, warm it up for several min- utes, and then turn it off.
Halaman 52
INSP ADJ ENGINE OIL LEVEL INSPECTION/ ENGINE OIL REPLACEMENT 3 - 10 3.Check: G Engine oil level The engine oil level should be between the minimum level mark a and maximum level mark b. Below the minimum level mark → Add the recommended engine oil to the proper level. Recommended oil: Refer to the chart for the engine oil grade API standard SE or higher grade CAUTION: Do not allow foreign materials to enter the crankcase. NOTE: Before checking the engine oil level, wait a few minutes until the oil has settled. ENGINE OIL REPLACEMENT 1.Start the engine, warm it up for several min- utes, and then turn it off. 2.Place a container under the engine oil drain bolt. 3.Remove: G Engine oil filler bolt G Engine oil drain bolt 1 (along with the gasket) G Oil filter element drain bolt 2 (along with the gasket) 4.Drain: G Engine oil (completely from the crankcase)
Halaman 53
INSP ADJ ENGINE OIL REPLACEMENT 3 - 11 5.If the oil filter element is also to be replaced, perform the following procedure. ***************************************************** Replacement steps: GRemove the oil filter element cover 1 and oil filter element 2. GCheck the O-rings 3 and replace them if they are cracked or damaged. GInstall the new oil filter element and the oil fil- ter element cover. Oil filter element cover bolt: 10 Nm (1.0 m • kg) T R . . È Outside É Inside ***************************************************** 6.Check: G Engine oil drain bolt gasket G Oil filter element drain bolt gasket Damage → Replace. 7.Install: G Engine oil drain bolt (along with the gasket) 20 Nm (2.0 m • kg) T R . . G Oil filter element drain bolt (along with he gasket) 10 Nm (1.0 m • kg) T R . . 8.Fill: G Crankcase (With the specified amount of the recom- mended engine oil) Quantity: Total amount: 1.4 L Without oil filter element replacement: 1.2 L With oil filter element replace- ment: 1.3 L 9.Install: G Engine oil filler cap
Halaman 54
INSP ADJ ENGINE OIL REPLACEMENT/ CLUTCH ADJUSTMENT 3 - 12 10.Start the engine, warm it up for several min- utes, and then turn it off. 11.Check: G Engine (for engine oil leaks) 12.Check: G Engine oil level Refer to the “ENGINE OIL LEVEL INSPEC- TION” section. 13.Check: G Engine oil pressure ***************************************************** Checking steps: GSlightly loosen the oil gallery bolt 1. GStart the engine and keep it idling until engine oil starts to seep from the oil gallery bolt. If no engine oil comes out after one minute, turn the engine off so that it will not seize. GCheck the engine oil passages and the oil pump for damage or leakage. Refer to the “OIL PUMP” section in CHAPTER 4. GStart the engine after solving the problem(s) and check the engine oil pressure again. GTighten the oil gallery bolt to specification. Oil gallery bolt: 7 Nm (0.7 m • kg) T R . . ***************************************************** CLUTCH ADJUSTMENT 1.Check: G Clutch cable free play a Out of specification → Adjust. Clutch cable free play (at the end of the clutch lever): 10 ~ 15 mm
Halaman 55
INSP ADJ CLUTCH ADJUSTMENT/ AIR FILTER CLEANING 3 - 13 2.Adjust: G Clutch cable free play ***************************************************** Adjustment steps: Handlebar side GLoosen the locknut 1. GTurn the adjusting bolt 2 in or out until the specified clutch cable free play is obtained. Turn in Clutch cable free play is increased. Turn out Clutch cable free play is decreased. GTighten the locknut. NOTE: If the specified clutch cable free play cannot be obtained on the handlebar side of the cable, use the adjusting nut on the engine side. Engine side GLoosen the locknuts 1. GTurn the adjusting bolt 2 in or out until the specified clutch cable free play is obtained. Turn in Clutch cable free play is increased. Turn out Clutch cable free play is decreased. GTighten the locknuts. ***************************************************** AIR FILTER CLEANING 1.Check: G Air filter check hoses 1 NOTE: On the bottom of the air filter case is a check hoses 1. If dust or water or both collects in this hoses, clean the air filter element and air filter case. 2.Remove: G Side cover (left) Refer to the “SIDE COVER” section.
Halaman 56
INSP ADJ AIR FILTER CLEANING 3 - 14 3.Remove: G Air filter case cover 1 G Air filter element 2 4.Clean: G Air filter element (with solvent) WARNING Never use low flash point solvents, such as gasoline, to clean the air filter element. Such solvents may cause a fire or an explo- sion. NOTE: After cleaning, gently squeeze the air filter ele- ment to remove the excess solvent. CAUTION: Do not twist the air filter element when squeezing it. 5.Check: G Air filter element Damage → Replace. 6.Apply the recommended oil to the entire sur- face of the air filter element and squeeze out the excess oil. The air filter element should be wet but not dripping. Recommended oil: Engine oil
Halaman 57
INSP ADJ AIR FILTER CLEANING/CARBURETOR JOINT INSPECTION/FUEL LINE INSPECTION 3 - 15 7.Install: G Air filter element G Air filter case cover CAUTION: Never operate the engine without the air fil- ter element installed. Unfiltered air will cause rapid wear of engine parts and may damage the engine. Operating the engine without the air filter element will also affect the carburetor tuning, leading to poor engine performance and possible overheat- ing. CARBURETOR JOINT INSPECTION 1.Inspect: G Carburetor joint 1 Cracks/Damage → Replace. FUEL LINE INSPECTION 1.Inspect: G Fuse hose Cracks/Damage → Replace.
Halaman 58
INSP ADJ EXHAUST SYSTEM INSPECTION 3 - 16 EXHAUST SYSTEM INSPECTION 1.Inspect: G Exhaust pipe 1 G Muffler 2 Cracks/Damage/Leak → Repair or replace. G Exhaust pipe Joint 3 G gasket 4 Damage/Leak → Repair or replace. 2.Tighten: G Muffler and exhaust pipe Nuts (exhaust pipe joint) 5: 18 Nm (1.8 m • kg) Bolt (exhaust pipe joint) 6: 20 Nm (2.0 m • kg) Bolts (muffler) 7: 30 Nm (3.0 m • kg) T R . .
Halaman 59
FRONT BRAKE ADJUSTMENT/ BRAKE PAD INSPECTION 3 - 17 INSP ADJ CHASSIS FRONT BRAKE ADJUSTMENT 1.Check: G Brake lever free play a Out of specification → Adjust. Free play (brake lever): 2 ~ 5 mm (at brake lever end) 2.Adjust: G Brake lever free play ***************************************************** Adjustment steps: GLoosen the locknut 1. GTurn the adjuster 2 in or out until the speci- fied free play is obtained. Turning in brake lever free play is decreased. Turning out brake lever free play is increased. GTighten the locknut. CAUTION: After adjusting the front brake lever free play, make sure that there is no brake drag. ***************************************************** BRAKE PAD INSPECTION 1.Operate the brake lever. 2.Inspect: G Brake pad Wear indicators 1 almost touch the brake disc → Replace the brake pads as set. Refer to the “BRAKE PAD PEPLCEMENT” section in CHPTER 6.
Halaman 60
INSP ADJ BRAKE FLUID LEVEL INSPECTION/ AIR BLEEDING (HYDRAULIC BRAKE SYSTEM) 3 - 18 BRAKE FLUID LEVEL INSPECTION 1.Stand the motorcycle on a level surface. NOTE: When inspecting the brake fluid level, make sure the motorcycle is upright. 2.Inspect: G Brake fluid level Brake fluid level is below the “LOWER” level line a → Fill to proper level. Recommended brake fluid: DOT 3 or 4 NOTE: For a correct reading of the brake fluid level, make sure the top of the handlebar brake fluid reservoir is horizontal. AIR BLEEDING (HYDRAULIC BRAKE SYSTEM) WARNING Bleed the brake system whenever: G The system is disassembled G A brake hose is loosened or removed G The brake fluid level is very low G Brake operation is faulty If the brake system is not properly bled, a loss of braking performance may occur. 1.Bleed: G Brake system ***************************************************** Air bleeding steps: a. Fill the reservoir with the proper brake fluid. b. Install the diaphragm. Be careful not to spill any fluid or allow the reservoir to overflow. c. Connect a clear plastic hose 1 tightly to the caliper bleed screw 2. d. Place the other end of the hose into a con- tainer. e. Slowly apply the brake lever several times. f. Pull the lever in. Hold the lever in position. g. Loosen the bleed screw and allow the lever to travel towards its limit. h. Tighten the bleed screw when the lever limit has been reached, then release the lever.
Halaman 61
INSP ADJ AIR BLEEDING (HYDRAULIC BRAKE SYSTEM)/ BRAKE HOSE INSPECTION 3 - 19 i. Repeat steps (e) to (h) until all the air bub- bles have disappeared from the bake fluid. NOTE: When bleeding the brake system, make sure that there is always enough brake fluid in the brake fluid reservoir, before applying the brake lever. Ignoring this precaution could allow air to enter the brake system, lengthening the bleeding procedure, considerably. j. Tighten the bleed screw. Bleed screw: 6 Nm (0.6 m • kg) T R . . NOTE: If bleeding is difficult, it may be necessary to let the brake fluid settle for a few hours. Repeat the bleeding procedure when the tiny bubbles in the brake system have disappeared. k. Fill the brake fluid reservoir to the proper level. Refer to the “BRAKE FLUID LEVEL INSPECTION” section. WARNING After bleeding the brake system check the brake operation. ***************************************************** BRAKE HOSE INSPECTION 1.Inspect: G Brake hose Cracks/wear/damage → Replace. 2.Check: G Brake hose clamp(s) Loose → Tighten. 3.Hold the motorcycle upright and apply the front brake. 4.Check: G Brake hose Activate the brake lever several times. Brake fluid leakage → Replace the faulty hose. Refer to the “FRONT BRAKE” section in CHAPTER 6.
Halaman 62
INSP ADJ REAR BRAKE ADJUSTMENT 3 - 20 REAR BRAKE ADJUSTMENT 1.Check: G Brake pedal position (distance a from the top of the rider footrest to the top of the brake pedal) Out of specification → Adjust. Brake pedal position (below the top of the rider footrest): 30 mm 2.Adjust: G Brake pedal position ***************************************************** Adjustment steps: GLoosen the locknut 1. GTurn the adjusting bolt 2 in or out until the specified brake pedal position is obtained. Turn in Brake pedal is raised. Turn out Brake pedal is lowered. GTighten the locknut to specification. Locknut: 10 Nm (1.0 m • kg) T R . . ***************************************************** 3.Check: G Brake pedal free play a Out of specification → Adjust. Free play: 20 ~ 30 mm
Halaman 63
INSP ADJ REAR BRAKE ADJUSTMENT/BRAKE SHOE INSPECTION/BRAKE LIGHT SWITCH ADJUSTMENT 3 - 21 4.Adjust: G Brake pedal free play ***************************************************** Adjustment steps: GTurn the adjuster 1 in or out until the speci- fied free play is obtained. Turning in Free play is decreased. Turning out Free play is increased. CAUTION: Make sure that the brake does not drag after adjusting it. ***************************************************** 5.Adjust: G Brake light switch Refer to the “BRAKE LIGHT SWITCH ADJUSTMENT” section. BRAKE SHOE INSPECTION 1.Operate the brake pedal. 2.Inspect: G Brake shoes Wear indicator 1 reaches the wear limit line 2 → Replace the brake shoes as a set. Refer to the “REAR WHEEL AND REAR BRAKE” section in CHAPTER 6. BRAKE LIGHT SWITCH ADJUSTMENT 1.Check: G Brake light operation timing Incorrect → Adjust. 2.Adjust: G Brake light operation timing ***************************************************** Adjustment steps: GHold the main body 1 of the switch with your hand so that it does not rotate, and turn the adjuster 2 in or out until the proper opera- tion timing is obtained. Turning in Brake light comes on first. Turning out Brake light comes on slow. *****************************************************
Halaman 64
DRIVE CHAIN SLACK ADJUSTMENT 3 - 22 INSP ADJ DRIVE CHAIN SLACK ADJUSTMENT WARNING G Securely support the motorcycle so that there is no danger of it falling over. G Stand the motorcycle on its centerstand. 1.Check: G Drive chain slack a Out of specification → Adjust. Drive chain slack: 20 ~ 30 mm 2.Adjust: G Drive chain slack ***************************************************** Adjustment steps: GLoosen the each locknuts 1 and chain adjuster nuts 2. GLoosen the axle nut 3. GTurn the chain adjustment nuts 2 clockwise or counterclockwise until the specified drive chain slack is obtained. Turning in Drive chain slack is decreased. Turning out Drive chain slack is increased. NOTE: G Turn each chain adjuster nuts exactly the same amount to maintain correct axle align- ment. (There are marks a on each chain adjuster nuts. Use them when adjusting the slack for proper alignment.) G Before tightening the axle nut and locknuts to specification, make sure that there is no clearance at the adjuster nuts (or the swin- garm end) on both sides by pushing the wheel forward. GTighten the axle nut. 85 Nm (8.5 m • kg) T R . . GTighten the locknut. 7 Nm (0.7 m • kg) T R . . *****************************************************
Halaman 65
INSP ADJ TIRE INSPECTION/ STEERING HEAD INSPECTION 3 - 23 TIRE INSPECTION 1.Measure: G Tire inflation pressure Out of specification → Adjust. Basic weight (with oil and full fuel tank) 131 kg Maximum load* 180 kg Cold tire pressure Front Rear Up to 100 kg load* 200 kPa (2.0 kg/cm2) 200 kPa (2.0 kg/cm2) 100 kg ~ maximum. Load* 200 kPa (2.0 kg/cm2) 225 kPa (2.25 kg/cm2) * Load is the total weight of the cargo, rider, pas- senger and accessories. 2.Inspect: G Tire surfaces Wear/Damage → Replace. Minimum tire tread depth (front and rear): 0.8 mm 1 Tread depth 2 Side wall 3 Wear indicator 3.After a tire repair or replacement, be sure to tighten the valve stem locknut 1 to specifi- cation. STEERING HEAD INSPECTION 1.Stand the motorcycle on a level surface. NOTE: Stand the motorcycle on its centerstand. 2.Elevate the front wheel by placing a suitable stand under the engine.
Halaman 66
INSP ADJ STEERING HEAD INSPECTION 3 - 24 3.Check: G Handlebar assembly Grasp the handlebar and gently rock the steering. Looseness → Adjust the handlebar. G Steering assembly bearings Grasp the bottom of the lower front fork tubes and gently rock the fork assembly. Looseness → Adjust the steering head. 4.Adjust: G Steering head 5.Remove: G Handlebar G Pinch bolt G Steering stem nut G Handle crown 6.Adjust: G Steering head ***************************************************** Adjustment steps: GRemove the lock washer 1, the upper ring nut 2, and the rubber washer 3. GLoosen the lower ring nut 4 and then tighten it to specification with a ring nut wrench 5. NOTE: Set the torque wrench at a right angle to the ring nut wrench. Steering nut wrench: 90890-01403 Lower ring nut (initial tightening torque): 48 Nm (4.8 m • kg) T R . . GLoosen the lower ring nut 4 completely, then tighten it to specification. WARNING Do not overtighten the lower ring nut. Lower ring nut (final tightening torque): 18 Nm (1.8 • kg) T R . .
Halaman 67
INSP ADJ STEERING HEAD INSPECTION/ REAR SHOCK ABSORBER INSPECTION 3 - 25 GCheck the steering head for looseness or binding by turning the front fork all the way in both directions. If any binding is felt, remove the lower bracket and inspect the upper and lower bearings. Refer to the “STEERING HEAD AND HAN- DLEBAR” in section CHAPTER 6. GInstall the rubber washer 3. GInstall the upper ring nut 2. GFinger tighten the upper ring nut 2, then align the slots of both ring nuts. If necessary, hold the lower ring nut and tighten the upper ring nut until their slots are aligned. GInstall the lock washer 1. NOTE: Make sure that the lock washer tabs a sit cor- rectly in the ring nut slots b. ***************************************************** 7.Install: G Handle crown G Steering stem nut 110 Nm (11.0 m • kg) T R . . G Pinch bolt 23 Nm (2.3 m • kg) T R . . REAR SHOCK ABSORBER INSPECTION 1.Remove: G Seat G Side cover (right) Refer to the “SIDE COVER” section. G Fuel tank Refer to the “FUEL TANK” section. 2.Check: G Rear shock absorber mount Looseness → Tighten. Bolt (upper) 1 Nut (lower) 2 Refer to the “REAR SHOCK ABSORBER AND SWINGARM” section in CHAPTER 6. 59 Nm (5.9 m • kg) T R . . 59 Nm (5.9 m • kg) T R . .
Halaman 68
INSP ADJ WHEEL INSPECTION/SPOKE INSPECTION AND TIGHTENING/CABLE INSPECTION 3 - 26 WHEEL INSPECTION 1.Inspect: G Wheels Damage/Bends → Replace. NOTE: Always balance the wheel when a tire or wheel has been changed or replaced. WARNING G Never attempt even small repairs to the wheel. G Ride conservatively after installing a tire to allow it to seat itself properly on the rim. SPOKE INSPECTION AND TIGHTENING 1.Inspect: G Spokes 1 Bend/Damage → Replace. Loose spoke → Retighten. 2.Tighten: G Spokes Nipple: 0.6 m • kg T R . . CABLE INSPECTION WARNING Damage cable sheath may cause corrosion and interfere with the cable movement. An unsafe condition may result so replace such cable as soon as possible. 1.Inspect: G Cable sheath G Cables (throttle, clutch and starter) Damage → Replace.
Halaman 69
3 - 27 INSP ADJ LUBRICATION LUBRICATION Cables 1.Check: G Cable operation Unsmooth operation → Lubricate. Recommended lubricant: Engine oil NOTE: Hold cable end high and apply several drops of lubricant to cable. 2.Apply the grease to the throttle cable end and cable guide groove at inside of throttle housing 1. Lithium soap base grease Level/pedal 1.Lubricate the pivoting parts of the each lever and pedal. Recommended lubricant: Engine oil Sidestand/centerstand 1.Lubricate the pivoting parts. Recommended lubricant: Engine oil Rear suspension 1.Lubricate the pivoting parts. Recommended lubricant: Lithium-soap base grease
Halaman 70
INSP ADJ BATTERY INSPECTION 3 - 28 ELECTRICAL BATTERY INSPECTION WARNING Battery electrolyte is dangerous. It con- tains sulfuric acid which is poisonous and highly caustic. Always follow these preventive measures: G Avoid bodily contact with electrolyte as it can cause severe burns and permanent eye injury. G Wear protective eye gear when handling or working near batteries. G Antidote (EXTERNAL): G SKIN - Flush with water. G EYES - Flush with water for 15 minutes and get immediate medical attention. G Antidote (INTERNAL): G Drink large quantities of water or milk fol- lowed with milk of magnesia, beaten egg or vegetable oil. Get immediate medical attention. G Batteries generate explosive hydrogen gas. G Always follow these preventive measures: G Change batteries in a well - ventilated area. G Keep batteries away from fire, sparks or open flames (e.g., welding equipment, lighted cigarettes, etc.) G DO NOT SMOKE when charging or han- dling batteries. G KEEP BATTERIES AND ELECTROLYTE OUT OF REACH OF CHILDREN. 1.Remove: G Side cover (right) Refer to the “SIDE COVER” section. G battery band 1 2.Disconnect: G battery leads (from the battery terminals) CAUTION: First, disconnect the negative lead 2, then the positive lead 3. 3.Remove: G battery
Halaman 71
INSP ADJ BATTERY INSPECTION 3 - 29 4.Inspect: G Electrolyte level Electrolyte level should be between the upper 1 and lower 2 level marks. Electro- lyte level is too low → Add electrolyte to proper level. CAUTION: Refill with distilled water only. Tap water contains minerals which are harmful to a battery. 5.Inspect: G Breather hose Obstruction → Remove. Damage → Replace. CAUTION: When inspecting the battery, make sure that the breather hose is routed correctly. If the breather hose is positioned in such a way as to allow battery electrolyte or gas to come into contact with the frame, this could damage the motorcycle and ruin its finish. 6.Check: G Specific gravity Less than 1.280 → Recharge the battery. Charging Current: 0.7 amps/10 hr Specific Gravity: 1.280 at 20 °C ***************************************************** Replace the battery if: GBattery voltage will not rise to a specific value or bubbles fail to rise during charging. GSulphation of one or more cells occurs, (as indicated by the plates turning white, or material accumulating in the bottom of the cell).
Halaman 72
INSP ADJ BATTERY INSPECTION 3 - 30 GSpecific gravity readings after a long, slow charge indicate that one cell is charged lower than the rest. GWarpage or buckling of plates or insulators is evident. ***************************************************** 7.Connect: G Breather hose (battery) Be sure the hose is properly attached and routed. CAUTION: When inspecting the battery, be sure the breather pipe is routed correctly. If the breather pipe touches the frame or exits in such a way as to cause battery electrolyte or gas to exit onto the frame, structural and cosmetic damage to the motorcycle can occur. 8.Inspect: G Battery terminals Dirty → Clean with a wire brush. Poor connection → Correct. NOTE: After cleaning the terminals, apply a light coat of grease. 9.Install: G Battery 10.Connect: G Battery leads CAUTION: First, connect the positive lead 1, then connect the negative lead 2. 11.Install: G Battery band 3 G Side cover (right) Refer to the “SIDE COVER” section.
Halaman 73
3 - 31 INSP ADJ FUSE INSPECTION FUSE INSPECTION 1.Remove: G Side cover (right) Refer to the “SIDE COVER” section. 2.Remove: G Fuse 1 3.Inspect: G Fuse Defective → Replace. Blown fuse (new) → Inspect circuit. NOTE: Install new fuse of proper amperage. Amperage: 10 A 4.Replace: G Blown fuse ***************************************************** Blown fuse replacement steps: GTurn off ignition and the circuit. GInstall a new fuse of proper amperage. GTurn on switches to verify operation of elec- trical device. GIf fuse blows immediately again check circuit in question. ***************************************************** WARNING Do not use fuse of higher amperage rating than recommended. Extensive electrical system damage and fire could result from substitution of a fuse of improper amper- age. 5.Install: G Fuse
Halaman 74
INSP ADJ HEADLIGHT BEAM ADJUSTMENT/ HEADLIGHT BULB REPLACEMENT 3 - 32 HEADLIGHT BEAM ADJUSTMENT 1.Remove: G Holding screw 1 G Headlight unit 2 2.Adjust: G Headlight beam (vertical) ***************************************************** Headlight beam adjustment steps: GLoosen the bolt (headlight body). GPosition the headlight body up or down to adjust the headlight beam. ***************************************************** 3.Install: G Headlight unit HEADLIGHT BULB REPLACEMENT 1.Remove: G Holding screw 1 G Headlight unit 2 2.Remove: G Cover 1 G Bulb (defective) NOTE: Turn the bulb holder 2 counterclockwise to remove the bulb. WARNING Keep flammable products and your hands away from the bulb while it is on, it will be hot. Do not touch the bulb until it cools down.
Halaman 75
INSP ADJ HEADLIGHT BULB REPLACEMENT 3 - 33 3.Install: G Bulb (new) Secure the new bulb with the bulb holder. CAUTION: Avoid touching glass part of bulb. Also keep it free from oil otherwise, transpar- ency of glass, bulb life and illuminous flux will be adversely affected. If oil gets on bulb, clean it with a cloth moistened thor- oughly with alcohol or lacquer thinner. 4.Install: G Cover G Headlight unit
Halaman 76
CHAPTER 4. ENGINE OVERHAUL ENGINE REMOVAL ......................................................................................4-1 ENGINE OIL ..........................................................................................4-1 EXHAUST PIPE ASSEMBLY ................................................................4-1 LEFT FOOTREST BRACKET ...............................................................4-2 DRIVE CHAIN ........................................................................................4-2 CARBURETOR ......................................................................................4-3 WIRE, CABLE AND TUBE ....................................................................4-3 STARTER MOTOR ................................................................................4-4 ENGINE .................................................................................................4-4 ENGINE INSTALLATION .............................................................................4-5 ENGINE ASSEMBLY .............................................................................4-5 STARTER MOTOR ................................................................................4-5 WIRE AND CABLES ..............................................................................4-5 CARBURETOR ......................................................................................4-6 DRIVE CHAIN ........................................................................................4-6 LEFT FOOTREST BRACKET ...............................................................4-6 EXHAUST ASSEMBLY .........................................................................4-7 FUEL TANK AND SEAT ........................................................................4-7 CYLINDER HEAD .........................................................................................4-9 CYLINDER HEAD REMOVAL .............................................................4-10 CYLINDER HEAD INSPECTION .........................................................4-12 TIMING CHAIN TENSIONER INSPECTION .......................................4-13 CYLINDER HEAD INSTALATION .......................................................4-14 CAMSHAFT AND ROCKER ARMS ..........................................................4-16 ROCKER ARM AND CAMSHAFT REMOVAL ....................................4-17 CAMSHAFT INSPECTION ..................................................................4-18 ROCKER ARMS AND ROCKER ARM SHAFTS INSPECTION ..........4-18 CAMSHAFT AND ROCKER ARM INSTALLATION ............................4-19 VALVES AND VALVE SPRINGS ...............................................................4-21 VALVE AND VALVE SPRINGS REMOVAL ........................................4-22 VALVES AND VALVE SPRINGS INSPECTION .................................4-24 VALVE SEATS INSPECTION .............................................................4-25 VALVES AND VALVE SPRINGS INSTALLATION ..............................4-27 CYLINDER AND PISTON ...........................................................................4-29 PISTON REMOVAL .............................................................................4-30 CYLINDER INSPECTION ....................................................................4-31 PISTON AND PISTON PIN INSPECTION ..........................................4-32 PISTON RINGS INSPECTION ............................................................4-33 PISTON RINGS, PISTON AND CYLINDER INSTALLATION .............4-34 ENG
Halaman 77
GENERATOR .............................................................................................4-36 CRANKCASE COVER (LEFT) REMOVAL ..........................................4-37 GENERATOR ROTOR REMOVAL .....................................................4-38 STARTER CLUTCH INSPECTION .....................................................4-39 GENERATOR INSTALLATION ...........................................................4-39 CRANKCASE COVER (LEFT) INSTALLATION ..................................4-40 CLUTCH ......................................................................................................4-42 CRANKCASE COVER (RIGHT) REMOVAL .......................................4-43 CLUTCH REMOVAL ............................................................................4-44 CLUTCH INSPECTION .......................................................................4-45 CLUTCH INSTALLATION ....................................................................4-47 KICK STARTER AND SHIFT SHAFT .........................................................4-50 KICK SHAFT AND SHIFT SHAFT REMOVAL ....................................4-51 KICK STARTER INSPECTION ............................................................4-51 SHIFT SHAFT INSPECTION ...............................................................4-52 KICK SHAFT ASSEMBLING ...............................................................4-53 SHIFT SHAFT AND KICK STARTER INSTALLATION .......................4-53 OIL PUMP ...................................................................................................4-54 OIL PUMP REMOVAL .........................................................................4-55 OIL PUMP INSPECTION .....................................................................4-55 OIL PUMP INSTALLATION .................................................................4-56 CRANKCASE AND CRANKSHAFT ...........................................................4-57 CRANKCASE SEPARATING ..............................................................4-58 CRANKSHAFT INSPECTION .............................................................4-59 BEARINGS AND OIL SEALS INSPECTION .......................................4-60 TIMING CHAIN, TIMING CHAIN DRIVE SPROCKET AND TIMING CHAIN GUIDES INSPECTION ..................................4-60 CRANKSHAFT INSTALLATION ..........................................................4-61 CRANKCASE ASSEMBLING ..............................................................4-61 TRANSMISSION .........................................................................................4-63 TRANSMISSION REMOVAL ...............................................................4-64 SHIFT FORK SHIFT CAM INSPECTION ............................................4-64 TRANSMISSION INSPECTION ..........................................................4-65 TRANSMISSION INSTALLATION .......................................................4-67 ENG
Halaman 78
4 - 1 ENG ENGINE REMOVAL ENGINE OVERHAUL ENGINE REMOVAL NOTE: It is not necessary to remove the engine in order to remove the following components. G Cylinder head G Cylinder G Piston G Clutch G Kickstarter shaft and shift shaft G Oil pump G Generator 1.Remove: G Seat G Fuel tank Refer to the “SEAT, FUEL TANK” section in CHAPTER 3. WARNING Securely support the motorcycle so there is no danger of it falling over. ENGINE OIL 1.Remove: G Drain plug Refer to the “ENGINE OIL REPLACEMENT” section in CHAPTER 3. EXHAUST PIPE ASSEMBLY 1.Remove: G Bolts (right footrest bracket) G Right footrest bracket 1
Halaman 79
4 - 2 ENG ENGINE REMOVAL 2.Loosen: G Bolt 1 (exhaust pipe joint) 3.Remove: G Nuts 1 (exhaust pipe) 4.Remove: G Exhaust pipe assembly 5.Remove: G Bolts (muffler) G Nut (muffler) G Muffler 1 LEFT FOOTREST BRACKET 1.Remove: G Bolt (shift pedal) G Bolts (left footrest bracket) G Left footrest bracket 1 NOTE: When removing shift pedal, shift the transmis- sion into 1st gear. DRIVE CHAIN 1.Remove: G Drive chain case 1
Halaman 80
4 - 3 ENG ENGINE REMOVAL 2.Remove: G Lock washer 1 G Drive sprocket 2 3.Loosen: G Rear wheel axle nut G Locknuts G Drive chain adjuster nuts CARBURETOR 1.Remove: G Carburetor Refer to the “CARBURETOR” section in CHAPTER 5. WIRE, CABLE AND TUBE 1.Remove: G Spark plug lead cap 1 G Ignition coil 2 2.Straighten: G Stopper 3.Remove: G Clutch cable 1 4.Remove: G Breather hose 1 G Tachometer cable 2
Halaman 81
4 - 4 ENG ENGINE REMOVAL 5.Remove: G Neutral switch lead 1 G Generator lead coupler 2 G Generator leads 3 STARTER MOTOR 1.Remove: G Starter motor Refer to the “ELECTRIC STARTING SYS- TEM” in CHAPTER 7. ENGINE 1.Remove: G Engine mounting bracket 1 2.Remove: G Rear upper mounting bolt 1 G Front mounting bolt 2 G Rear lower mounting bolt 3
Halaman 82
ENG ENGINE INSTALLATION 4 - 5 ENGINE INSTALLATION ENGINE ASSEMBLY WARNING Securely support the motorcycle so there is no danger of it falling over when install- ing engine. 1.Install: G Engine assembly G Rear lower mounting bolt G Rear upper mounting bolt Rear lower mounting bolt: 79 Nm (7.9 m • kg) Rear upper mounting bolt: 58 Nm (5.8 m • kg) T R . . 2.Install: G Front mounting bolt Front mounting bolt: 58 Nm (5.8 m • kg) T R . . 3.Install: G Engine mounting bracket G Bolt (engine mounting bracket-frame) G Bolt (engine mounting bracket-engine) Bolt (engine mounting bracket- frame): 30 Nm (3.0 m • kg) Bolt (engine mounting bracket- engine): 58 Nm (5.8 m • kg) T R . . STARTER MOTOR 1.Install: G Starter motor Refer to the “ELECTRIC STARTING SYS- TEM” in CHAPTER 7. WIRE AND CABLES 1.Install: G Generator leads 1 G Generator lead coupler 2 G Neutral switch lead 3
Halaman 83
ENG ENGINE INSTALLATION 4 - 6 2.Install: G Tachometer cable G Breather hose 3.Install: G Clutch cable 4.Install: G Ignition coil G Spark plug lead cap CARBURETOR 1.Install: G Carburetor Refer to the “CARBURETOR” section in CHAPTER 5. DRIVE CHAIN 1.Install: G Drive chain G Drive sprocket G Lock washer Nut (drive chain): 110 Nm (11.0 m • kg) T R . . 2.Install: G Drive chain case LEFT FOOTREST BRACKET 1.Install: G Left footrest bracket Bolt (shift arm): 10 Nm (1.0 m • kg) Bolt (footrest bracket): 30 Nm (3.0 m • kg) T R . .
Halaman 84
ENGINE INSTALLATION 4 - 7 ENG EXHAUST ASSEMBLY 1.Install: G Muffler G Nut (muffler) G Bolts (muffler) 2.Install: G Exhaust pipe 3.Tighten: G Bolt (exhaust pipe joint) 4.Tighten: G Nuts G Bolts Nuts (exhaust pipe): 18 Nm (1.8 m • kg) Bolt (exhaust pipe joint): 20 Nm (2.0 m • kg) Bolts (muffler) 30 Nm (3.0 m • kg) T R . . 5.Install: G Right footrest bracket G Bolts (right footrest bracket) FUEL TANK AND SEAT 1.Install: G Fuel tank G Seat Refer to the “SEAT, FUEL TANK REMOVAL AND INSTALLATION” section in CHAPTER 3. 2.Fill: G Engine oil Into crankcase Refer to the “ENGINE OIL REPLACEMENT” section in CHAPTER 3.
Halaman 85
ENG ENGINE INSTALLATION 4 - 8 3.Adjust: G Throttle cable free play G Clutch lever free play Refer to the “THROTTLE CABLE ADJUST- MENT”, “CLUTCH ADJUSTMENT” section in CHAPTER 3. Throttle cable free play: 3 ~ 5 mm Clutch lever free play: 10 ~ 15 mm 4.Adjust: G Drive chain slack Refer to the “DRIVE CHAIN SLACK ADJUSTMENT” section in CHAPTER 3. Drive chain slack: 20 ~ 30 mm
Halaman 86
# CYLINDER HEAD | | | | :--- | :--- | | ① O-ring | ⑦ Gasket | | ② Tappet cover | ⑧ Camshaft sprocket | | ③ O-ring | ⑨ Gasket | | ④ Camshaft sprocket cover | ⑩ Dowel pin | | ⑤ Plate | ⑪ Cylinder head | | ⑥ Cam chain tensioner | ⑫ Spark plug | | | ⑬ Timing chain guide (exhaust side) | --- ### Torque Specifications * **Camshaft sprocket cover bolts:** $10\text{ Nm } (1.0\text{ m} \cdot \text{kg})$ * **Camshaft sprocket bolt:** $60\text{ Nm } (6.0\text{ m} \cdot \text{kg})$ * **Camshaft sprocket cover bolts (alternative/secondary):** $10\text{ Nm } (1.0\text{ m} \cdot \text{kg})$ * **Camshaft sprocket bolts (to cam):** $20\text{ Nm } (2.0\text{ m} \cdot \text{kg})$ * **Breather hose bolt:** $8\text{ Nm } (0.8\text{ m} \cdot \text{kg})$ * **Cylinder head nuts/bolts:** $22\text{ Nm } (2.2\text{ m} \cdot \text{kg})$ <img src="oil_icon.png" alt="Apply engine oil" width="15"/> *(Apply engine oil)* * **Cam chain tensioner bolts:** $18\text{ Nm } (1.8\text{ m} \cdot \text{kg})$ * **Cylinder head side bolt:** $7\text{ Nm } (0.7\text{ m} \cdot \text{kg})$ * **Spark plug:** $18\text{ Nm } (1.8\text{ m} \cdot \text{kg})$ --- * **New** (Replace gasket ⑦) * **New** (Replace gasket ⑨) --- **4 - 9**
Halaman 87
4 - 10 ENG CYLINDER HEAD CYLINDER HEAD REMOVAL NOTE: Prior to remove the cylinder head, remove the seat, fuel tank and air scoop, and drain the engine oil. 1.Remove: G Exhaust pipe assembly Refer to the “ENGINE REMOVAL” section in CHAPTER 3. 2.Remove: G Carburetor Refer to the “CARBURETOR” section in CHAPTER 5. 3.Remove: G Carburetor joint 1 G Spark plug 2 4.Remove: G Tappet cover 1 G Tachometer cable 2 G Camshaft sprocket cover 3 5.Remove: G Timing mark accessing screw (with O-ring) 1 G Camshaft end cover (with O-ring) 2 6.Align: G Camshaft sprocket “I” mark With the stationary pointer on the cylinder head. *********************************************** TDC alignment steps: GTurn the crankshaft counter clockwise with a wrench. GAlign the camshaft sprocket “I” mark 1 with the stationary pointer 2 on the cylinder head. When the “I” mark is aligned with the stationary pointer, the piston is at Top Dead Center (TDC).
Halaman 88
4 - 11 ENG CYLINDER HEAD NOTE: TDC on compression stroke check: G Both rocker arms must have a valve clearance when the “l” mark a on the flywheel is aligned with the slit b on the crankcase cover. G If not, give the crankshaft one counter clock- wise turn to meet above condition. *********************************************** 7.Loosen: G Bolt (camshaft sprocket) 1 NOTE: Hold the crankshaft end with a wrench 2. 8.Remove: G Cam chain tensioner 1 9.Remove: G Camshaft sprocket NOTE: Fasten a safety wire to the cam chain. 10.Remove: G Engine mounting bracket Refer to the “ENGINE REMOVAL” section. 11.Remove: G Cylinder head 1 NOTE: Loosen the bolts in this stage, using a criss- cross pattern.
Halaman 89
4 - 12 ENG CYLINDER HEAD 12.Remove: G Dowel pins 1 G Gasket (cylinder head) 2 G Timing chain guide (exhaust side) 3 CYLINDER HEAD INSPECTION 1.Eliminate: G Carbon deposits (from combustion chambers) Use a rounded scraper. NOTE: Do not use a sharp instrument to avoid damag- ing or scratching: G Spark plug threads G Valve seats 2.Inspect: G Cylinder head Scratches/damage → Replace. 3.Measure: G Cylinder head warpage Out of specification → Resurface. Cylinder head warpage: Less than 0.03 mm *********************************************** Warpage measurement and resurfacement steps: GPlace a straightedge and feeler gauge across the cylinder head. GMeasure the warpage. GIf the warpage is out of specification, resur- face the cylinder head. GPlace a 400 ~ 600 grit wet abrasive paper on the surface plate, and resurface the head using a figure-eight sanding pattern. NOTE: Rotate the cylinder head several times for an even resurfacement. ***********************************************
Halaman 90
4 - 13 ENG CYLINDER HEAD TIMING CHAIN TENSIONER INSPECTION 1.Check: G timing chain tensioner Cracks/damage/rough movement → Replace. *********************************************** a. Lightly press the timing chain tensioner rod into the timing chain tensioner housing by hand. NOTE: While pressing the timing chain tensioner rod, wind it clockwise with stopper 1 until it stops. b. Remove your finger and slowly release the timing chain tensioner rod. c. Make sure that the timing chain tensioner rod comes out of the timing chain tensioner housing smoothly. If there is rough move- ment, replace the timing chain tensioner. ***********************************************
Halaman 91
4 - 14 ENG CYLINDER HEAD CYLINDER HEAD INSTALATION 1.Install: G Cylinder Bolt: 22 Nm (2.2 m • kg) Bolt: 20 Nm (2.0m • kg) T R . . 2.Install: G Camshaft sprocket G Timing chain G Washer G Bolt (camshaft sprocket) *********************************************** Camshaft sprocket installing steps (rear cylinder): GTurn the crankshaft counter clockwise with wrench. GAlign the mark “l” on the flywheel with the slit on the crankcase cover. GInstall the camshaft sprocket with the “I” mark facing outward. GForce the camshaft counter clockwise to remove the cam chain slack. GInsert your finger into the cam chain ten- sioner hole, and push the cam chain damper inward. GWhile pushing the cam chain damper be sure the camshaft sprocket “I” mark 1 aligns with the stationary pointer 2 on the cylinder head at TDC. GIf marks are aligned, tighten the camshaft sprocket bolt temporary. GIf marks do not align, change the meshing position of sprocket and chain. *********************************************** 3.Install: G Gasket (new) G Timing chain tensioner NOTE: Use the gasket (new).
Halaman 92
4 - 15 ENG CYLINDER HEAD *********************************************** Timing chain tension installation steps: GTurn the stopper clockwise. GHold the stopper with the bolt 1. GInstall the tensioner with a new gasket into the cylinder. Bolt (tensioner-cylinder): 10 Nm (1.0 m • kg) T R . . *********************************************** 4.Tighten: G Bolt (camshaft sprocket) Bolt (camshaft sprocket): 60 Nm (6.0 m • kg) 5.Check: G Alignment marks If the marks do not align → Adjust. 6.Adjust: G Valve clearance Refer to the “VALVE CLEARANCE ADJUST- MENT” section in CHAPTER 3. Intake valve (cold): 0.05 ~ 0.10 mm Exhaust valve (cold): 0.10 ~ 0.15 mm 7.Install: G Tappet cover G Camshaft sprocket cover Tappet cover: 18 Nm (1.8 m • kg) Camshaft sprocket cover: 10 Nm (1.0 m • kg) T R . . 8.Install: G Spark plug G Carburetor joint Spark plug: 18 Nm (1.8 m • kg) Carburetor joint: 10 Nm (1.0 m • kg) T R . .
Halaman 93
ENG CAMSHAFT AND ROCKER ARMS CAMSHAFT AND ROCKER ARMS 1 Locknut 2 Valve adjuster 3 Rocker arm 4 Rocker arm shaft (exhaust) 5 Rocker arm shaft (intake) 6 O-ring 7 Bearing 8 Camshaft 9 Plate 4 - 16
Halaman 94
ENG CAMSHAFT AND ROCKER ARMS 4 - 17 ROCKER ARM AND CAMSHAFT REMOVAL NOTE: Prior to remove the rocker arm and camshaft, remove the cylinder head. 1.Loosen: G Locknut 1 G Valve adjuster 2 2.Remove G Stopper plate 3 3.Remove: G Camshaft 1 G Bearing 2 NOTE: Remove the camshaft and collar by using 10 mm bolt 3. 4.Attach: G Slide hammer set 1 Slide hammer bolt: 90890-01085 Weight: 90890-01084 5.Remove: G Rocker arm shaft G Rocker arm (intake/exhaust)
Halaman 95
ENG CAMSHAFT AND ROCKER ARMS 4 - 18 YP402052 CAMSHAFT INSPECTION 1.Inspect: G Cam lobes Pitting/Scratches/Blue discoloration → Replace. 2.Measure: G Cam lobes length a and b. Out of specification → Replace. Cam lobes length: Intake: a 36.52 ~ 36.62 mm <Limit: 36.42 mm> b 30.201 ~ 30.301 mm <Limit: 30.1 mm> Exhaust: a 36.564 ~ 36.664 mm <Limit: 36.46 mm> b 30.216 ~ 30.316 mm <Limit: 30.12 mm> 3.Inspect: G Camshaft oil passage Stuffed → Blow out oil passage with com- pressed the air. YP402060 ROCKER ARMS AND ROCKER ARM SHAFTS INSPECTION 1.Inspect: G Cam lobe contact surface 1 G Adjuster surface 2 Wear/Pitting/Scratches/Blue discoloration → Replace. *********************************************** Inspection steps: GInspect the two contact areas on the rocker arms for signs of unusual wear. GRocker arm shaft hole. GCam-lobe contact surface. GExcessive wear → Replace.
Halaman 96
ENG CAMSHAFT AND ROCKER ARMS 4 - 19 GInspect the surface condition of the rocker arm shafts. GPitting/scratches/blue discoloration → Replace or check lubrication. GMeasure the inside diameter of the rocker arm holes. Out of specification → Replace. Inside diameter (rocker arm): 14.992 ~ 15.000 mm <Limit: 15.02 mm> GMeasure the outside diameter of the rocker arm shafts. Out of specification → Replace. Outside diameter (rocker arm shaft): 14.960 ~ 14.981 mm <Limit 14.94 mm> *********************************************** YP****** CAMSHAFT AND ROCKER ARM INSTALLATION 1.Lubricate: G Rocker arm shaft G Rocker arm inner surface Rocker arm shaft: Engine oil Rocker arm inner surface: Molybdenum disulfide grease 2.Install: G Rocker arm 1 G Rocker arm shaft 2 NOTE: Install the rocker arm shaft (exhaust) com- pletely pushed in.
Halaman 97
ENG CAMSHAFT AND ROCKER ARMS 4 - 20 3.Lubricate: G Camshaft 1 Camshaft: Molybdenum disulfide grease Camshaft bearing: Engine oil 4.Install: G Plate 1 G Bolts 2 8 Nm (0.8 m • kg) T R . .
Halaman 98
ENG VALVES AND VALVE SPRINGS VALVES AND VALVE SPRINGS 1 Valve cotter 2 Upper spring seat 3 Lower spring seat 4 Oil seal 5 Inner valve spring 6 Outer valve spring 7 Valve 4 - 21
Halaman 99
ENG VALVES AND VALVE SPRINGS 4 - 22 VALVE AND VALVE SPRINGS REMOVAL NOTE: G Prior to remove the valves, remove the cylin- der head, rocker arm and camshaft. G Before removing the internal parts (Valve, valve spring, valve seat etc.) of the cylinder head, the valve sealing should be checked. 1.Check: G Valve sealing Leakage at valve seat → Inspect the valve face, valve seat and valve seat width. Refer to the “VALVE SEATS INSPECTION” section. *********************************************** Valve seat checking steps: GPour a clean solvent 1 into the intake and exhaust ports. GCheck the valve seating. There should be no leakage at the valve seat 2. ***********************************************
Halaman 100
ENG VALVES AND VALVE SPRINGS 4 - 23 2.Attach: G Valve spring compressor 1 Valve spring compressor: 90890-04019 3.Remove: G Valve cotters 1 G Upper spring seat 2 G Outer valve spring 3 G Inner valve spring 4 G Oil seal 5 G Lower spring seat 6 G Valve 7 NOTE: G Identify each part position very carefully so that it can be reinstalled in its original place. G Deburr any deformed valve stem end. Use an oil stone to smooth the stem end. 1 Deburr 2 Valve stem 4.Eliminate: G Carbon deposit From the combustion chamber. Use a rounded scraper. NOTE: Do not use a sharp instrument and avoid dam- aging or scratching: G Spark plug threads G Valve seat G Cylinder head
Halaman 101
ENG VALVES AND VALVE SPRINGS 4 - 24 YP****** VALVES AND VALVE SPRINGS INSPECTION 1.Measure: G Valve stem diameter a Out of specification → Replace. Valve stem diameter: Intake: 5.975 ~ 5.990 mm <Limit: 5.95 mm> Exhaust: 5.960 ~ 5.975 mm <Limit: 5.935 mm> YP402010 2.Measure: G Runout (valve stem) Out of specification → Replace. Runout limit 0.03 mm YP402030 3.Measure: G Free length (valve spring) a Out of specification → Replace. Valve spring free length: Inner valve spring: 36.17 mm <Limit: 34.47 mm> Outer valve spring: 36.63 mm <Limit: 34.63 mm> 4.Measure: G Compressed valve spring force a Out of specification → Replace. b Installed length Inner valve spring 30.5 mm at 7.65 ~ 9.35 kg Outer valve spring 32 mm at 13.1 ~ 16.1 kg YP402030 5.Measure: G Valve spring tilt a Out of specification → Replace. Spring tilt limit: 2.5°/16 mm
Halaman 102
ENG VALVES AND VALVE SPRINGS 4 - 25 6.Inspect: G Spring contact face Wear/Pitting/Scratches → Replace. 7.Measure: G Valve guide inside diameter Out of specification → Replace. Valve guide inside diameter: Intake: 6.000 ~ 6.012 mm <Limit: 6.042 mm> Exhaust: 6.000 ~ 6.012 mm <Limit: 6.042 mm> YP402010 8.Measure: Stem-to-guide clearance = Valve guide inside diameter a – Valve stem diameter Out of specification → Replace the valve guide. Stem-to-guide clearance limit: Intake: 0.08 mm Exhaust: 0.1 mm EB402020 VALVE SEATS INSPECTION 1.Eliminate: G Carbon deposits (from the valve face and valve seat) 2.Inspect: G Valve seats Pitting/wear → Reface the valve seat.
Halaman 103
ENG VALVES AND VALVE SPRINGS 4 - 26 3.Measure: G Valve seat width a Out of specification → Reface the valve seat. Valve seat width: Intake: 0.9 ~ 1.1 mm <Limit: 1.6 mm> Exhaust: 0.9 ~ 1.1 mm <Limit: 1.6 mm> *********************************************** Measurement steps: GApply Mechanic’s blueing dye (Dykem) 1 to the valve face. GInstall the valve into the cylinder head. GPress the valve through the valve guide and onto the valve seat to make a clear pattern. GMeasure the valve seat width. Where the valve seat and valve face made contact, blueing will have been removed. GIf the valve seat is too wide, too narrow, or the seat is not centered, the valve seat must be replaced. *********************************************** EB402020 4.Lap: G Valve face G Valve seat NOTE: After replacing the valve seat, valve and valve guide, the valve seat and valve face should be lapped. *********************************************** Lapping steps: GApply a coarse lapping compound a to the valve face. CAUTION: Do not let compound enter the gap between the valve stem and the guide. GApply molybdenum disulfide oil to the valve stem.
Halaman 104
ENG VALVES AND VALVE SPRINGS 4 - 27 GInstall the valve into the cylinder head. GTurn the valve unit the valve face and valve seat are evenly polished, then clean off all compound. NOTE: For best lapping results, lightly tap the valve seat while rotating the valve back and forth between your hand. GApply a fine lapping compound to the valve face and repeat the above steps. NOTE: Make sure to clean off all compound from the valve face and valve seat after every lapping operation. GApply Mechanic’s blueing dye (Dykem) b to the valve face. GInstall the valve into the cylinder head. GPress the valve through the valve guide and onto the valve seat to make a clean pattern. GMeasure the valve seat width c again. *********************************************** EB404032 VALVES AND VALVE SPRINGS INSTALLATION 1.Deburr: G Valve stem end Use an oil stone to smooth the stem end. 2.Apply: G Molybdenum disulfide oil (onto the valve stem 3 and seal 2) Molybdenum disulfide oil 3.Install: G Lower spring seat 1 G Oil seal 2 New G Valve 3 (into the cylinder head) G Inner valve spring 4 G Outer valve spring 5 G Upper spring seat 6 NOTE: Install the valve spring with the larger pitch a facing upwards. b Smaller pitch
Halaman 105
ENG VALVES AND VALVE SPRINGS 4 - 28 4.Install: G Valve cotters 1 NOTE: Install the valve cotters while compressing the valve spring with a valve spring compressor 2. Valve spring compressor: 90890-04019 5.Secure the valve cotters onto the valve stem by tapping lightly with a piece of wood. CAUTION: Do not hit so much as to damage the valve.
Halaman 106
ENG CYLINDER AND PISTON CYLINDER AND PISTON 1 Oil delivery pipe 2 Cylinder 3 O-ring 4 Gasket 5 O-ring 6 Dowel pin 7 Piston 8 Piston rings 9 Piston pin clip 0 Piston pin 4 - 29
Halaman 107
ENG CYLINDER AND PISTON 4 - 30 PISTON REMOVAL NOTE: Prior to remove the cylinder, remove the cylin- der head, carburetor joint and exhaust pipe. 1.Remove: G Oil delivery pipe 1 2.Remove: G Cylinder 1 G O-ring 2 G Dowel pin 3 G Gasket 4 (cylinder) G O-ring 5 3.Remove: G Piston pin clip 1 NOTE: Before removing the piston pin clip cover the crankcase with a clean rag 2 so you will not accidentally drop the clip into the crankcase. 4.Remove: G Piston pin 1 G Piston 2 NOTE: Before removing the piston pin, deburr the clip grooved and pin hole area. If the piston pin groove is deburred and piston pin is still diffi- cult to remove use the piston pin puller. CAUTION: Do not use a hammer to drive the piston pin out.
Halaman 108
ENG CYLINDER AND PISTON 4 - 31 5.Remove: G Piston rings 1 NOTE: When removing a piston rings, open the end gap with your fingers and lift the other side of the ring over the piston crown. YP402100 CYLINDER INSPECTION 1.Measure: G Cylinder bore Out of specification → Rebore or replace. NOTE: G Measure the cylinder bore with a cylinder bore gauge. G Measure the cylinder bore in parallel to and at right angles to the crankshaft. Then, find the average of the measurements. Cylinder bore: 70.000 ~ 70.018 mm <Limit: 70.1 mm> <Difference limit between A, B and C: 0.03 mm> 2.Measure: G Warpage Out of specification → Replace. Cylinder warpage limit: 0.01 mm
Halaman 109
ENG CYLINDER AND PISTON 4 - 32 YP****** PISTON AND PISTON PIN INSPECTION 1.Measure: G Piston skirt diameter Out of specification → Replace. a 4.0 mm form the piston bottom edge Piston skirt diameter: 69.977 ~ 69.996 mm Oversize (2) 70.50 mm Oversize (4) 71.00 mm 2.Calculate: G Piston-to cylinder-clearance Piston-to-cylinder clearance = Cylinder bore – Piston skirt diameter Refer to the “CYLINDER” section for cylinder bore measurement. Out of specification → Replace the piston and piston rings as a set. Piston-to-cylinder clearance: 0.020 ~ 0.025 mm <Limit: 0.05 mm> 3.Measure: G Piston pin bore diameter Out of specification → Replace. Piston pin bore diameter: 16.002 ~ 16.013 mm <Limit: 16.043 mm> 4.Measure: G Piston pin outside diameter Out of specification → Replace. Piston pin outside diameter: 15.996 ~ 16.000 mm <Limit 15.97 mm> 5.Inspect: G Piston pin Blue discoloration/groove → Clean or replace.
Halaman 110
ENG CYLINDER AND PISTON 4 - 33 YP402111 PISTON RINGS INSPECTION 1.Measure: G Side clearance Out of specification → Replace the piston and the piston rings as a set. NOTE: Eliminate the carbon deposits from the piston ring grooves and piston rings before measur- ing the side clearance. Side clearance (piston ring): Top ring: 0.03 ~ 0.07 mm <Limit 0.1 mm> 2 nd ring: 0.02 ~ 0.06 mm <Limit: 0.1 mm> 2.Position: G Piston rings (into the cylinder) NOTE: Push the ring with the piston crown so that the ring will be at a right angle to the cylinder bore. 3.Measure: End gap Out of specification → Replace. NOTE: You cannot measure the end gap on the expander spacer of the oil ring. If the oil ring rails show excessive gap, replace all three rings. a 40.0 mm End gap: Top ring 0.15 ~ 0.30 mm <Limit: 0.6 mm> 2 nd ring: 0.15 ~ 0.30 mm <Limit: 0.6 mm> Oil ring: 0.3 ~ 0.9 mm
Halaman 111
ENG CYLINDER AND PISTON 4 - 34 EB404184 PISTON RINGS, PISTON AND CYLINDER INSTALLATION 1.Install: G Top ring 1 G 2nd ring 2 G Oil ring 3 NOTE: G Make sure to install the piston rings so that the manufacture’s marks or numbers are located on the upper side of the rings. G Lubricate the pistons and piston rings liber- ally with engine oil. 2.Install: G Piston 1 G Piston pin 2 G Piston pin clip 3 New NOTE: G Apply engine oil onto the piston pins. The “→” mark a on the piston must face the exhaust side of the cylinder. G Before installing the piston pin clip, cover the crankcase opening with a clean rag to pre- vent the piston pin clip from falling into the crankcase. G Make sure to install each piston in its respec- tive cylinder. 3.Install: G O-ring G Gasket (cylinder) New G Dowel pins 4.Position: G Piston rings NOTE: Offset the piston ring end gaps as shown. a Top ring end b Oil ring end (lower) c Oil ring end (upper) d 2 nd ring end
Halaman 112
CYLINDER AND PISTON 4 - 35 ENG 5.Lubricate: G Piston outer surface G Piston ring G Cylinder inner surface Engine oil 6.Install: G Cylinder 1 NOTE: G Install the cylinder with one hand while com- pressing the piston rings with the other hand. G Pass the timing chain and timing chain guide (exhaust side) through the timing chain cav- ity. 7.Install: G Oil delivery pipe 1
Halaman 113
# GENERATOR | ENG --- ## GENERATOR | Left Column | Right Column | | :--- | :--- | | ① Drive sprocket cover | ⑧ Pickup coil | | ② Cover | ⑨ Generator rotor | | ③ O-ring | ⑩ Starter clutch | | ④ Crankcase cover (left) | ⑪ Starter clutch gear | | ⑤ Gasket | ⑫ Bearing | | ⑥ Dowel pin | ⑬ Starter clutch idle gear #2 | | ⑦ Stator assembly | ⑭ Starter clutch idle gear #1 | --- ### Torque Specifications & Notes * **Stator assembly / Pickup coil screws:** * 🔧 **7 Nm (0.7 m · kg)** * **Generator rotor bolt:** * 🔧 **60 Nm (6.0 m · kg)** * **Starter clutch bolts:** * 🔧 **30 Nm (3.0 m · kg)** * 🔒 Apply Loctite (**LT**) * **Gasket (⑤):** * **New** (Replace with a new one) * **Lubrication points (indicated by [E] icon):** * Apply engine oil to the starter clutch idle gear shafts, needle bearing (⑫), starter clutch (⑩) inner contact surface, and crankshaft splines. --- <center>4 - 36</center>
Halaman 114
4 - 37 ENG GENERATOR CRANKCASE COVER (LEFT) REMOVAL NOTE: Prior to remove the crankcase cover (left), remove the shift pedal and drain the engine oil. 1.Remove: G Fuel tank Refer to the “FUEL TANK” section in CHAP- TER 3. 2.Remove: G Left footrest bracket Refer to the “LEFT FOOTREST BRACKET” section. 3.Remove: G Drive sprocket cover 1 G Cover 2 4.Remove: G Starter idle gear #1 1 G Bearing 2 G Shaft 3 5.Remove: G Neutral switch leads 1 G Crankcase cover (left) NOTE: Working in a crisscross, loosen the bolts 1/4 turn each. Remove them after all are loos- ened. M6 × 40 mm bolts: 1 ~ 6 M6 × 30 mm bolts: 7 ~ 9 6.Remove: G Gasket G Dowel pin
Halaman 115
4 - 38 ENG GENERATOR GENERATOR ROTOR REMOVAL 1.Remove: G Bolt 1 NOTE: G Do not touch the projection a when install- ing the sheave holder. G Loosen the nut while holding the generator rotor with sheave holder 2. 2.Remove: G Generator rotor 1 Use a flywheel puller 2 Sheave holder: 90890-01701 Flywheel puller: 90890-01362 3.Remove G Woodruff key 1 4.Remove: G Washer 1 G Starter clutch idle gear #2 2 G Washer 3 G Starter clutch gear 4 G Bearing 5 G Washer 6
Halaman 116
4 - 39 ENG GENERATOR EAS00351 STARTER CLUTCH INSPECTION 1.Check: G Starter clutch idle gear #1 1 G Starter clutch idle gear #2 2 G Starter clutch gear 3 Burrs/chips/roughness/wear → Replace the defective part(-s). 2.Check: G Starter clutch gear’s contacting surfaces a Damage/pitting/wear → Replace the starter clutch gear. 3.Check: G Starter clutch operation *********************************************** a. Install the starter clutch gear 1 onto the starter clutch 2 and hold the starter clutch. b. When turning the starter clutch gear clock- wise È, the starter clutch and the starter clutch gear should engage. If the starter clutch gear and starter clutch do not engage, the starter clutch is faulty and must be replaced. c. When turning the starter clutch gear coun- terclockwise É, it should turn freely. If the starter clutch gear does not turn freely, the starter clutch is faulty and must be replaced. *********************************************** GENERATOR INSTALLATION 1.Install G Washer 1 G Bearing 2 G Starter clutch gear 3 G Washer 4 G Starter clutch idle gear #2 5 G Washer 6
Halaman 117
4 - 40 ENG GENERATOR 2.Install: G Woodruff key 1 G Generator rotor 2 G Washer 3 G Bolt 4 Use the sheave holder 5 Sheave holder: 90890-01701 NOTE: G Before installing the generator rotor, clean the outside of the crankshaft and inside of the generator rotor. G When installing the generator rotor, make sure the woodruff key is properly seated in the key way of the crankshaft. NOTE: Do not allow the special tool to touch the pro- jection a on the generator rotor. Nut (rotor): 60 Nm (6.0 m • kg) T R . . CRANKCASE COVER (LEFT) INSTALLATION 1.Install: G Stator coil 1 G Pickup coil 2 Bolts (starter coil): 7 Nm (0.7 m • kg) Screws (pickup coil): 7 Nm (0.7 m • kg) T R . . 2.Install: G Dowel pin G Gasket New
Halaman 118
4 - 41 ENG GENERATOR 3.Install: G Crankcase cover (left) NOTE: Tighten the bolts (crankcase cover-left) in a crisscross pattern. M6 × 40 mm bolts: 1 ~ 6 M6 × 30 mm bolts: 7 ~ 9 Bolts (crankcase cover-left): 7 Nm (0.7 m • kg) T R . . 4.Install: G Neutral switch lead 1 5.Install: G Starter clutch idle gear #1 G Cover 1 G Drive sprocket cover 2 6.Install: G Left footrest bracket Refer to the “LEFT FOOTREST BRACKET” section. 7.Install: G Fuel tank Refer to the “FUEL TANK” section in CHAP- TER 3.
Halaman 119
# CLUTCH ENG 1. Crankcase cover (right) 2. Gasket 3. Dowel pin 4. Compression spring 5. Pressure plate 6. Push plate 7. Push rod #1 8. Clutch plate 9. Friction plate (#1) 10. Cushion spring 11. Friction plate (#2) 12. Clutch boss 13. Thrust washer 14. Clutch housing 15. Ball 16. Push rod #2 17. Push lever assembly 18. Primary drive gear 19. Collar 20. Straight key  New   6 Nm (0.6 m • kg) 8 Nm (0.8 m • kg) New 70 Nm (7.0 m • kg) 80 Nm (8.0 m • kg) New    12 Nm (1.2 m • kg) 4 - 42
Halaman 120
4 - 43 ENG CLUTCH CRANKCASE COVER (RIGHT) REMOVAL NOTE: Prior to remove the crankcase cover (right), drain the engine oil. 1.Remove: G Oil filter cover 1 G Oil filter 2 G O-ring 3 (filter cover) G O-ring 4 2.Remove: G Oil delivery pipe 1 3.Remove: G Kick starter 1 4.Remove: G Crankcase cover (right) NOTE: G Working in a crisscross pattern, loosen screw 1/4 turn each. Remove them after all are loosened. G Be sure not to give damages to the mating surface. M6 × 55 mm bolt: 1 M6 × 50 mm bolts: 2 ~ 4 M6 × 35 mm bolt: 5 M6 × 25 mm bolts: 6 ~ C 5.Remove: G Gasket G Dowel pin
Halaman 121
4 - 44 ENG CLUTCH CLUTCH REMOVAL 1.Remove: G Bolts (clutch springs) G Clutch springs 2.Remove: G Pressure plate 1 G Friction plate (#1) 2 (5 pcs) G Friction plate (#2) 3 (1 pcs) G Clutch plate 4 (5 pcs) G Cushion spring 5 G Push plate 6 G Push rod (#1) 7 G Ball 8 G Push rod (#2) 9 3.Straighten: G Lock washer tab. NOTE: Slide the right side of crankcase to remove ball and push rod (#1). 4.Loosen: G Nut (clutch boss) G Nut (primary drive gear) NOTE: Loosen the nut (clutch boss) while holding the clutch boss with universal clutch holder 1. Universal clutch holder: 90890-04086
Halaman 122
4 - 45 ENG CLUTCH 5.Remove: G Nut 1 (clutch boss) G Lock washer 2 G Clutch boss 3 G Thrust washer 4 G Clutch housing 5 6.Remove: G Nut 1 (primary drive gear) G Lock washer 2 G Crow washer 3 G Primary drive gear 4 G Collar 5 G Straight key 6 T402181 CLUTCH INSPECTION 1.Inspect: G Friction plate (#1, #2) Damage/wear → Replace the friction plates as a set. 2.Measure: G Friction plate thickness Out of specification → Replace the friction plates as a set. Measure at four places. Thickness (friction plate #1, #2): 2.9 ~ 3.1 mm <Limit: 2.8 mm> 3.Inspect: G Clutch plates Damage → Replace the clutch plates as a set. 4.Measure: G Clutch plate warpage Out of specification → Replace the clutch plates as a set. Use a surface plate and a feeler gauge 1. Warp; limit (clutch plate): Less than 0.2 mm
Halaman 123
4 - 46 ENG CLUTCH 5.Inspect: G Compression springs Damage → Replace the compression springs as a set. 6.Measure: G Free length (compression spring) a Out of specification → Replace the clutch springs as a set. Free length (clutch spring): 34.9 mm <Limit: 33.2 mm> 7.Inspect: G Push rod (#2) Wear/crack/damage → Replace. 8.Measure: G Push rod (#2) Out of specification → Replace. Bending limit (push rod #2): 0.5 mm 9.Inspect: G Dogs on the housing Cracks/wear/damage → Deburr or replace. 10.Inspect: G Clutch housing bearing 1 Cracks/wear/damage → Replace.
Halaman 124
4 - 47 ENG CLUTCH 11.Inspect: G Clutch boss splines Scoring/wear/damage → Replace clutch boss assembly. 12.Inspect: G Oil filter Cracks/damage → Replace. Contamination → Clean the flushing oil. T****** CLUTCH INSTALLATION 1.Install: G Straight key G Collar 1 G Primary drive gear 2 G Crow washer 3 G Lock washer 4 New G Nut (primary drive gear) 5 80 Nm (8.0 m • kg) T R . . 2.Install: G Clutch housing G Thrust washer G Clutch bass G Lock washer 1 New G Nut 2 (clutch boss) 70 Nm (7.0 m • kg) T R . . NOTE: Install the primary drive gear and clutch boss nut 2 while holding the clutch boss with a clutch holding tool 3. Universal clutch holder: 90890-04086 3.Bend: G Lock washer tab 1 (primary drive gear and clutch boss) (along a flat side of the end)
Halaman 125
4 - 48 ENG CLUTCH 4.Install: G Friction plate (#1) 1 (3 pcs) G Clutch plate 2 (3 pcs) G Cushion spring 3 G Friction plate (#2) 4 G Clutch plate 5 (2 pcs) G Friction plate (#1) 6 (2 pcs) G Push rod (#2) 7 G Ball 8 G Push rod (#1) 9 G Push plate 0 NOTE: Install the clutch plates and friction plates alter- nately on the clutch boss, starting with a fric- tion plate and ending with a friction plate. 5.Install: G Pressure plate 1 G Compression springs G Bolts 2 (compression springs) 6 Nm (0.6 m • kg) T R . . NOTE: Tighten the bolts in a crisscross pattern. 6.Adjust: G Clutch mechanism free play *********************************************** Clutch mechanism free play adjustment steps: GLoosen the locknut 1 GPush the push lever toward the front of the engine with your finger to align the push lever tab with the alignment mark on the crankcase. GWith the push lever in this position, turn the screw 2 either in or out until the push lever mark 3 and crankcase match mark are aligned. GTighten the locknut. Locknut: 8 Nm (0.8 m • kg) T R . . ***********************************************
Halaman 126
4 - 49 ENG CLUTCH 7.Tighten G Screw (push lever axle) Screw: 12 Nm (1.2 m • kg) T R . . 8.Install: G Dowel pins 1 G Gasket 2 New 9.Install: G Crankcase cover (right) Bolts (crankcase cover-right): 10 Nm (1.0 m • kg) T R . . M6 × 55 mm bolt: 1 M6 × 50 mm bolts: 2 ~ 4 M6 × 35 mm bolt: 5 M6 × 25 mm bolts: 6 ~ C 10.Install: G Kick crank 1 NOTE: Align the lip a of kick crank boss with the bolt b as shown.
Halaman 127
ENG KICK STARTER AND SHIFT SHAFT KICK STARTER AND SHIFT SHAFT 1 Kick shaft 2 Kick segment gear 3 Kick pinion gear 4 Kick spring 5 Kick crank 6 Shift shaft assembly 7 Stopper lever 4 - 50
Halaman 128
ENG KICK STARTER AND SHIFT SHAFT 4 - 51 KICK SHAFT AND SHIFT SHAFT REMOVAL NOTE: Prior to remove the kick shaft, remove the clutch assembly. 1.Remove: G Clutch housing Refer to the “CLUTCH REMOVAL” section. 2.Remove: G Shift pedal Refer to the “LEFT FOOTREST BRACKET” section. 3.Remove: G Circlip 1 G Washer 2 G Kick pinion gear 3 G Washer 4 G Circlip 5 4.Remove: G Kick shaft assembly 1 G Shift shaft assembly 2 5.Remove: G Stopper lever assembly 1 T****** KICK STARTER INSPECTION 1.Inspect: G Kick segment gear 1 G Ratchet gear teeth 2 Wear/damage → Replace.
Halaman 129
ENG KICK STARTER AND SHIFT SHAFT 4 - 52 2.Inspect: G Kick spring Wear/crack → Replace. T402200 SHIFT SHAFT INSPECTION 1.Inspect: G Stopper lever Roller turns roughly → Replace. Bends/damage → Replace. 2.Inspect: G Stopper lever spring Wear/damage → Replace. 3.Inspect: G Shift shaft assembly G Shift shaft spring Bends/wear damage → Replace.
Halaman 130
ENG KICK STARTER AND SHIFT SHAFT 4 - 53 KICK SHAFT ASSEMBLING 1.Install: G Kick shaft 1 G Kick segment gear 2 G Ratchet gear 3 NOTE: Align the punch mark of kick shaft a to the kick segment gear b. SHIFT SHAFT AND KICK STARTER INSTALLATION 1.Install: G Stopper lever assembly 1 Bolt (stopper): 10 Nm (1.0 m • kg) LOCTITE® T R . . 2.Install: G Shift shaft assembly 1 G Kick shaft assembly 2 NOTE: Hook the kick spring onto the crankcase stop- per. 3.Install: G Circlip 1 G Washer 2 G Kick pinion gear 3 G Washer 4 G Circlip 5 4.Bend: G Lock washer
Halaman 131
4 - 54 ENG OIL PUMP OIL PUMP 1 Oil pump assembly 2 Oil pump gear 3 Circlip 4 Gasket 5 Oil strainer
Halaman 132
4 - 55 ENG OIL PUMP OIL PUMP REMOVAL NOTE: Prior to remove the oil pump, remove the clutch assembly. 1.Remove: G Oil strainer 1 G Circlip 2 G Oil pump gear 3 G Oil pump assembly 4 G Gasket 5 NOTE: Do not remove the screw, to avoid disassem- bling oil pump. T402140 OIL PUMP INSPECTION 1.Measure: G Tip clearance È (between the inner rotor 1 and the outer rotor 2) G Side clearance É (between the outer rotor 2 and the pump housing 3) Out of specification → Replace the oil pump assembly. G Housing and rotor clearance Ê (between the pump housing 3 and the rotors 1 2) Out of specification → Replace the oil pump assembly. Tip clearance È: 0.15 mm <Limit: 0.20 mm> Side clearance É 0.04 ~ 0.09 mm <Limit: 0.15 mm> Housing and rotor clearance Ê: 0.03 ~ 0.09 mm <Limit: 0.15 mm>
Halaman 133
4 - 56 ENG OIL PUMP 2.Inspect: G Oil stainer Cracks/damage → Replace. Contamination → Clean the flushing oil. OIL PUMP INSTALLATION 1.Install: G Gasket 1 G Oil pump assembly 2 G Oil pump gear 3 G Circlip 4 G Oil strainer 5 Bolt (oil pump): 6 Nm (0.6 m • kg) T R . .
Halaman 134
ENG CRANKCASE AND CRANKSHAFT CRANKCASE AND CRANKSHAFT 1 Crankcase (left) 2 Crankcase (right) 3 Dowel pin 4 Crank shaft assembly 5 Bearing 6 Timing chain drive sprocket 7 Timing chain 8 Timing chain guide (intake side) 9 Drain bolt 0 Gasket 4 - 57
Halaman 135
ENG CRANKCASE AND CRANKSHAFT 4 - 58 CRANKCASE SEPARATING NOTE: Prior to separate the crankcase, remove the engine and remove the cylinder head, cylinder, generator, clutch, kick axle, shift shaft and oil pump. 1.Remove: G Timing chain 1 G Timing chain guide (intake side) 2 G Timing chain drive sprocket 3 G Push lever (clutch) 2.Remove: G Neutral switch 1 G Crankcase bolts NOTE: Loosen each bolt 1/4 of a turn at a time, in stages and in a crisscross pattern. After all of the bolts are fully loosened, remove them. M6 × 70 mm bolts: 2 ~ 4 M6 × 60 mm bolts: 5, 6 M6 × 55 mm bolts: 7 ~ 9 M6 × 45 mm bolts: 0 ~ C 3.Remove: G Circlip 1 G Crankcase (right) NOTE: Align the shift drum 2 projections with the slots on the right crankcase before removing right crankcase. CAUTION: Use soft hammer to tap on the case half, tap only on reinforced portions of case. The slot for separating the crankcase is provided. Using the screwdriver, separate the case with even force applied to both side. Do not damage the crankcase mating surface.
Halaman 136
ENG CRANKCASE AND CRANKSHAFT 4 - 59 4.Remove: G Crankshaft 1 Use a crankcase separating tool 2. Crankcase separating tool: 90890-01135 T****** CRANKSHAFT INSPECTION 1.Measure: G Crankshaft runout 1 Out of specification → Replace crankshaft and/or bearing. NOTE: Measure the crankshaft runout with the crank- shaft assembly turning slowly. Runout limit: 0.03 mm 2.Measure: G Big end side clearance 2 Out of specification → Replace big end bear- ing, crank pin and/or connecting rod. Big end side clearance: 0.35 ~ 0.85 mm 3.Measure: G Crank width 3 Out of specification → Replace crankshaft. Crank width 69.25 ~ 69.30 mm 4.Inspect: G Bearing 1 Wear/crack/damage → Replace crankshaft.
Halaman 137
ENG CRANKCASE AND CRANKSHAFT 4 - 60 5.Inspect: G Crankshaft journal Clogged → Blow out the journal with com- pressed air. EAS00401 BEARINGS AND OIL SEALS INSPECTION 1.Check: G Bearings Clean and lubricate the bearings, then rotate the inner race with your finger. Rough movement → Replace. 2.Check: G Oil seals Damage/wear → Replace. EAS00207 TIMING CHAIN, TIMING CHAIN DRIVE SPROCKET AND TIMING CHAIN GUIDES INSPECTION 1.Check: G Timing chain Damage/stiffness → Replace the timing chain and camshaft sprocket as a set. 2.Check: G Timing chain drive sprocket More than 1/4 tooth a wear → Replace the camshaft sprocket and the timing chain as a set. a 1/4 tooth b Correct 1 Timing chain roller 2 Timing chain drive sprocket
Halaman 138
ENG CRANKCASE AND CRANKSHAFT 4 - 61 3.Check: G Timing chain guide (exhaust side) G Timing chain guide (intake side) Damage/wear → Replace the defective part(-s). CRANKSHAFT INSTALLATION 1.Install: G Crankshaft Into the crankcase (right) NOTE: Hold the connecting rod 1 at top dead center with one hand while turning the nut of the installing tool with the other. Operate the installing tool unit the crankshaft bottoms against the bearing. Crankshaft installer pot 2: 90890-01274 Crankshaft installer bolt 3: 90890-01275 Adaptor (M10) 4: 90890-01383 spacer 5: 90890-01288 CRANKCASE ASSEMBLING 1.Apply: G Sealant To the mating surface of both case halves 1. Yamaha bond No. 1215 90890-85505 2.Install: G Dowel pins 2 3.Fit the right crankcase onto the left case. Tap lightly on the case with a soft hammer. CAUTION: Before installing and torquing the crank- case holding bolts, be sure to check whether the transmission is functioning properly by manually rotating the shift cam either way.
Halaman 139
ENG CRANKCASE AND CRANKSHAFT 4 - 62 4.Tighten: G Crankcase bolts NOTE: G Tighten the crankcase bolts in stages and in a crisscross pattern. G Install a copper washer on bolts 1, 2, 3. M6 × 70 mm bolts: 1 ~ 3 M6 × 60 mm bolts: 4, 5 M6 × 55 mm bolts: 6 ~ 8 M6 × 45 mm bolts: 9 ~ B Bolt (left crankcase): 10 Nm (1.0 m • kg) T R . . 5.Install: G Neutral switch C 6.Install: G Push lever (clutch) G Timing chain drive sprocket 1 G Timing chain guide (intake side) 2 G Timing chain 3
Halaman 140
# TRANSMISSION | ENG ## TRANSMISSION | No. | Description | No. | Description | | :--- | :--- | :--- | :--- | | ① | Main axle/1st pinion gear | ⑧ | 4th wheel gear | | ② | 3rd/4th pinion gear | ⑨ | 5th wheel gear | | ③ | 5th pinion gear | ⑩ | 2nd wheel gear | | ④ | 2nd pinion gear | ⑪ | Drive sprocket | | ⑤ | Drive axle | ⑫ | Shift drum assembly | | ⑥ | 1st wheel gear | ⑬ | Shift fork "L" | | ⑦ | 3rd wheel gear | ⑭ | Shift fork "C" | | | | ⑮ | Shift fork "R" | --- 4 - 63
Halaman 141
4 - 64 ENG TRANSMISSION TRANSMISSION REMOVAL NOTE: Prior to remove the transmission, separate the crankcase. 1.Remove: G Dowel pin G Guide bar 1 G Shift fork “R” 2 G Shift fork “C” G Shift fork “L” 3 G Shift drum assembly 4 NOTE: Note the position of each part. Pay particular attention to the location and direction of shift forks. 2.Remove: G Transmission gear assembly 1 T402190 SHIFT FORK SHIFT CAM INSPECTION 1.Inspect: G Shift fork cam follower 1 G Shift fork pawl 2 Scoring/bends/wear/damage → Replace. 2.Inspect: G Shift drum grooves 1 Wear/damage/scratches → Replace. G Shift drum segment 2 Damage/wear → Replace.
Halaman 142
4 - 65 ENG TRANSMISSION 3.Inspect: G Shift fork “L” 1 G Shift fork “C” 2 G Shift fork “R” 3 G Shift fork guide bar 4 G Shift drum assembly 5 G Pin 6 Roll the shift fork guide bar on a flat surface. Bends → Replace. WARNING Do not attempt to straighten a bent shift fork guide bar. 4.Check: G Shift fork movement (along the shift fork guide bar) Unsmooth operation → Replace the shift fork and the shift fork guide bar. NOTE: When damaged the shift fork and mission gear, replace the facing each gear as set. EAS00424 TRANSMISSION INSPECTION 1.Measure: G Main axle runout (with a centering device and dial gauge 1) Out of specification → Replace the main axle. Main axle runout limit 0.08 mm 2.Measure: G Drive axle runout (with a centering device and dial gauge 1) Out of specification → Replace the drive axle. Drive axle runout limit 0.08 mm
Halaman 143
4 - 66 ENG TRANSMISSION 3.Check: G Transmission gears Blue discoloration/pitting/wear → Replace the defective gear(s). G Transmission gear dogs Cracks/damage/rounded edges → Replace the defective gear(s). 4.Check: G Transmission gear engagement (each pinion gear to its respective wheel gear) Incorrect → Reassemble the transmission axle assemblies. NOTE: When reassembling the main axle, press the 2nd pinion gear 1 onto it 2 as shown. 5.Check: G Transmission gear movement Rough movement → Replace the defective part(s). 6.Check: G Circlips Damage/bends/looseness → Replace.
Halaman 144
4 - 67 ENG TRANSMISSION TRANSMISSION INSTALLATION 1.Install: G Transmission gears assembly 1 G Shift drum assembly 2 G Shift fork “L” 3 G Shift fork “C” G Shift fork “R” 4 Into the crankcase (right) G Guide bar 5 NOTE: Facing the mark on shift fork down ward. 2.Check: G Shifter operation Unsmooth operation → Repair. NOTE: G Oil each gear and bearing thoroughly. G Before assembling the crankcase, be sure that the transmission is in neutral and that the gears turn freely.
Halaman 145
CARB ⌸ --- # CHAPTER 5. # CARBURETION **CARBURETOR** ................................................................................................... 5-1 * REMOVAL ............................................................................................. 5-2 * DISASSEMBLY ...................................................................................... 5-3 * INSPECTION ......................................................................................... 5-5 * ASSEMBLY ............................................................................................ 5-7 * INSTALLATION ..................................................................................... 5-9 * FUEL LEVEL ADJUSTMENT ................................................................... 5-10
Halaman 146
__________________________________________________ | CARB | [Icon] |
Halaman 147
CARBURETOR | CARB | --- | --- | # CARBURETION ## CARBURETOR | | | | | :--- | :--- | :--- | | ① Vacuum chamber cover <br> ② Piston valve spring <br> ③ Jet needle set <br> ④ Pilot screw set <br> ⑤ Piston valve <br> ⑥ Starter plunger assembly | ⑦ Needle jet <br> ⑧ Pilot jet <br> ⑨ Throttle stop screw set <br> ⑩ Gasket <br> ⑪ Main jet <br> ⑫ Needle valve assembly <br> ⑬ Needle valve holder | ⑭ Drain hose <br> ⑮ Float pivot pin <br> ⑯ Float <br> ⑰ Drain screw <br> ⑱ Pilot air jet <br> ⑲ Coasting enricher <br> ⑳ Coasting enricher spring | --- ### Diagram Key Labels: * **New** (Indicated near item ⑩ Gasket) --- 5 - 1
Halaman 148
5 - 2 CARB CARBURETOR REMOVAL WARNING Gasoline is highly flammable. Avoid spilling fuel on the hot engine. 1.Remove: G Fuel tank Refer to the “FUEL TANK” section in CHAPTER 3. 2.Remove: G Battery Refer to the “BATTERY INSPECTION” sec- tion in CHAPTER 3. 3.Remove: G Drive chain guard 1 4.Remove: G Battery case 1 5.Remove: G CDI unit 1 G Starter relay 2 G Fuse 3
Halaman 149
5 - 3 CARB CARBURETOR 6.Remove: G Air filter case 1 7.Drain: G Loosen the drain screw 1 and drain the gas- oline 8.Loosen: G Lock nut 2 (throttle cable) 9.Remove: G Throttle cable 3 10.Loosen: G Screw 1 (carburetor joint) 11.Remove: G Carburetor 1 DISASSEMBLY 1.Remove: G Vacuum chamber cover 1 2.Remove: G Piston valve spring 2 G Piston valve 3
Halaman 150
# CARBURETOR | CARB --- ### 3. Remove: * Jet needle set ① --- ### 4. Remove: * Pilot screw set ① --- ### 5. Remove: * Float chamber cover ① * Gasket --- ### 6. Remove: * Float pivot pin ① * Float ② * Needle valve ③ --- ### 7. Remove: * Needle valve holder ① --- <p align="center">5 - 4</p>
Halaman 151
5 - 5 CARB CARBURETOR 8.Remove: G Main jet 1 G Washer 2 G Needle jet 3 G Pilot jet 4 9.Remove: G Starter plunger assembly 1 INSPECTION 1.Inspect: G Carburetor body G Fuel passage Contamination → Clean as indicated. ***************************************************** Carburetor cleaning steps: GWash carburetor in petroleum based solvent. (Do not use any caustic carburetor cleaning solution.) GBlow out all passages and jets with a com- pressed air. ***************************************************** 2.Inspect: G Float Damage → Replace. 3.Inspect: G Needle valve assembly 1 Damage/wear/contamination → Replace as a set.
Halaman 152
5 - 6 CARB CARBURETOR 4.Inspect: G Piston valve 1 Cracks → Replace. G Rubber diaphragm 2 Tears → Replace. G Jet needle 3 Bend → Replace. NOTE: If you suspect the piston valve has been dam- aged, check the component for cracks by pouring gasoline into the valve. If it leaks, replace with a new piston valve. 5.Check: G Free movement Insert the throttle valve into the carburetor body, and check for free movement. Stick → Replace. 6.Inspect: G Main jet 1 G Needle jet 2 G Pilot jet 3 G Pilot screw 4 G Pilot air jet 5 Bends/wear/damage → Replace. Contamination → Blow out jets with a com- pressed air. 7.Inspect: G Starter plunger assembly 1
Halaman 153
5 - 7 CARB CARBURETOR ASSEMBLY To assemble the carburetor reverse the disas- sembly procedures. Note the following points. NOTE: G Before reassembling wash all parts in clean gasoline. G Always use a new gasket. 1.Install: G Jet needle set To piston valve assembly NOTE: Be sure to install the jet needle plate so that the projection a is located toward the hole b in the piston valve. 2.Install: G Pilot screw set 1 ***************************************************** Note the following installation points: GScrew in the pilot screw 4 until it is lightly seated. GBack out by the specified number of turns. Pilot screw (turn out): 2-1/2 *****************************************************
Halaman 154
5 - 8 CARB CARBURETOR 3.Install: G Needle jet To carburetor NOTE: Be sure to insert the slot a onto the projection b. 4.Install: G Needle valve holder Screw (float valve holder): 2 Nm (0.2 m • kg) T R . . 5.Install: G Float chamber cover 1 Screw (float chamber cover): 5 Nm (0.5 m • kg) T R . . 6.Install: G Piston valve assembly 1 G Piston valve spring 2 G Vacuum chamber cover 3 Screw (vacuum chamber cover): 4 Nm (0.4 m • kg) T R . . NOTE: Match the tab a on the rubber diaphragm to the matching recess b in the piston valve.
Halaman 155
5 - 9 CARB CARBURETOR INSTALLATION Reverse the “REMOVAL” procedure. Note the following points: 1.Install: G Carburetor NOTE: Be sure to insert the projection a into the slot b of carburetor joint. 2.Adjust: G Engine idle speed Refer to the “IDLING SPEED ADJUST- MENT” section in CHAPTER 3. Engine idle speed: 1,350 ~ 1,450 r/min 3.Adjust: G Throttle cable free play a (throttle grip) Refer to the “THROTTLE CABLE ADJUST- MENT” section in CHAPTER 3. Throttle cable free play: 3 ~ 5 mm
Halaman 156
5 - 10 CARB CARBURETOR FUEL LEVEL ADJUSTMENT 1.Measure: G Fuel level a Out of specification → Adjust. Fuel level: 2.7 ~ 4.7 mm below the float chamber line ***************************************************** Fuel level measurement and adjustment steps: GPlace the motorcycle on a level surface. GUse centerstand to ensure that the carbure- tor is positioned vertically. GConnect the fuel level gauge 1 to the drain pipe 2 using a level gauge adapter. Fuel level gauge: 90890-01312 GLoosen the drain screw 3. GMeasure the fuel level a with the gauge. GIf the fuel level in incorrect, adjust the fuel level. GRemove the carburetor. GInspect the needle valve. GIf it is worn, replace it. GIf it is fine, adjust float level by bending the float tang b slightly. GInstall the carburetor. GRecheck the fuel level. *****************************************************
Halaman 157
CHAPTER 6. CHASSIS FRONT WHEEL AND BRAKE DISC ............................................................ 6-1 FRONT WHEEL REMOVAL .................................................................. 6-2 FRONT WHEEL DISASSEMBLY .......................................................... 6-2 FRONT WHEEL INSPECTION ............................................................. 6-3 BRAKE DISC INSPECTION .................................................................. 6-4 FRONT WHEEL ASSEMBLY ................................................................ 6-5 FRONT WHEEL INSTALLATION .......................................................... 6-5 REAR WHEEL AND REAR BRAKE ............................................................ 6-7 REAR WHEEL REMOVAL .................................................................... 6-8 REAR WHEEL DISASSEMBLY ............................................................ 6-8 REAR WHEEL INSPECTION ................................................................ 6-8 REAR BRAKE INSPECTION ................................................................ 6-9 BRAKE SHOE PLATE ASSEMBLY .................................................... 6-10 REAR WHEEL ASSEMBLY ................................................................ 6-10 REAR WHEEL INSTALLATION .......................................................... 6-11 FRONT BRAKE .......................................................................................... 6-12 FRONT BRAKE CALIPER .................................................................. 6-12 MASTER CYLINDER .......................................................................... 6-13 BRAKE PAD REPLACEMENT ............................................................ 6-14 FRONT BRAKE CALIPER REMOVAL ................................................ 6-16 FRONT BRAKE CALIPER INSPECTION ........................................... 6-17 FRONT BRAKE CALIPER INSTALLATION ........................................ 6-17 MASTER CYLINDER REMOVAL ........................................................ 6-20 MASTER CYLINDER INSPECTION ................................................... 6-20 MASTER CYLINDER INSTALLATION ................................................ 6-21 FRONT FORK ............................................................................................. 6-24 FRONT FORK REMOVAL .................................................................. 6-25 FRONT FORK DISASSEMBLY ........................................................... 6-25 FRONT FORK INSPECTION .............................................................. 6-27 FRONT FORK ASSEMBLY ................................................................. 6-27 FRONT FORK INSTALLATION .......................................................... 6-30 STEERING HEAD AND HANDLEBAR ...................................................... 6-32 HANDLEBAR ...................................................................................... 6-32 STEERING HEAD ............................................................................... 6-33 HANDLEBAR REMOVAL .................................................................... 6-34 STEERING HEAD REMOVAL ............................................................ 6-35 STEERING HEAD AND HANDLEBAR INSPECTION ........................ 6-36 STEERING HEAD INSTALLATION .................................................... 6-37 HANDLEBAR INSTALLATION ............................................................ 6-39 CHAS
Halaman 158
REAR SHOCK ABSORBER AND SWINGARM ........................................ 6-41 REAR SHOCK ABSORBER AND SWINGARM REMOVAL ............... 6-42 REAR SHOCK ABSORBER INSPECTION ......................................... 6-43 SWINGARM INSPECTION ................................................................. 6-43 RELAY ARM INSPECTION ................................................................. 6-44 CONNECTING ARM INSPECTION .................................................... 6-44 DRIVE CHAIN INSPECTION .............................................................. 6-44 REAR WHEEL CLUTCH HUB INSPECTION ..................................... 6-46 DRIVEN SPROCKET ASSEMBLY ...................................................... 6-46 REAR SHOCK ABSORBER AND SWINGARM INSTALLATION ....... 6-46 CHAS
Halaman 159
CHAS FRONT WHEEL AND BRAKE DISC CHASSIS FRONT WHEEL AND BRAKE DISC 1 Front wheel axle 2 Collar 3 Oil seal 4 Bearing 5 Spacer 6 Meter clutch 7 Speedometer gear unit 8 Brake disc 6 - 1
Halaman 160
CHAS FRONT WHEEL AND BRAKE DISC 6 - 2 FRONT WHEEL REMOVAL WARNING Securely support the motorcycle so there is no danger of it falling over. 1.Place the motorcycle on level place. 2.Remove: G Speedometer cable 1 G Front wheel axle nut 2 3.Remove: G Front wheel axle 1 G Collar 2 G Speedometer gear unit 3 G Front wheel 4 T****** FRONT WHEEL DISASSEMBLY 1.Remove: G Bearings 1 G Spacer 2 Remove the bearings using a general bear- ing puller 3.
Halaman 161
CHAS FRONT WHEEL AND BRAKE DISC 6 - 3 T700021 FRONT WHEEL INSPECTION 1.Inspect: G Front wheel axle (by rolling it on a flat surface) Bends → Replace. WARNING Do not attempt to straighten a bent axle. Wheel axle bending limit: 0.25 mm 2.Inspect: G Front tire Wear/damage → Replace. Refer to the “TIRE INSPECTION” section in CHAPTER 3. G Front wheel Refer to the “WHEEL INSPECTION” section in CHAPTER 3. 3.Check: G Spokes Bends/damage → Replace. Loose spokes → Retighten. Turn the wheel and tap the spokes with a screwdriver. NOTE: A tight spoke will emit a clear, ringing tone; a loose spoke will sound flat. 4.Tighten: G Loose spokes G Nipple NOTE: Check the front wheel runout after tightening the spokes.
Halaman 162
CHAS FRONT WHEEL AND BRAKE DISC 6 - 4 5.Measure: G Front wheel runout Over the specified limits → Replace. Front wheel runout limits: Radial: 2.0 mm Lateral: 2.0 mm 6.Inspect: G Front wheel bearings Bearings allow free play in the wheel hub or the wheel does not turn smoothly → Replace. G Oil seals Wear/damage → Replace. 7.Inspect: G Collar Grooved wear → Replace the collar and the oil seal as a set. BRAKE DISC INSPECTION 1.Inspect: G Brake disc Galling/damage → Replace. 2.Measure: G Brake disc deflection a Out of specification → Inspect the wheel runout. If wheel runout is within the limits, replace the brake disc. Brake disc maximum deflection: 0.15 mm Measuring point 2 mm G Brake disc thickness b Out of specification → Replace. Brake disc minimum thickness: 3.5 mm
Halaman 163
CHAS FRONT WHEEL AND BRAKE DISC 6 - 5 FRONT WHEEL ASSEMBLY 1.Install: G Bearing 1 G Spacer G Bearing G Oil seal NOTE: G Apply the lithium soap base grease on the bearing and oil seal lip when installing. G Use a socket that matches the outside diam- eter of the race of the bearing. G Always use a new oil seal. G Install the oil seal with its manufacturer’s marks or numbers facing outward. CAUTION: Do not strike the inner race of balls of the bearing. Contact should be made only with the outer race. FRONT WHEEL INSTALLATION 1.Install: G Brake disc 1 23 Nm (2.3 m • kg) T R . . NOTE: G Apply LOCTITE® to the threads of the brake disc bolts. G Tighten the brake disc bolts in stages using a crisscross pattern. 2.Install: G Speedometer gear unit 1 NOTE: Be sure that projections a inside the wheel hub mesh with the slots b in the gear unit assembly.
Halaman 164
CHAS FRONT WHEEL AND BRAKE DISC 6 - 6 3.Tighten: G Front wheel axle nut 58 Nm (5.8 m • kg) T R . . NOTE: Be sure that the projection (torque stopper) a of the gear unit housing is positioned correctly. 4.Connect: G Speedometer cable
Halaman 165
CHAS REAR WHEEL AND REAR BRAKE REAR WHEEL AND REAR BRAKE 1 Drive chain puller 2 Brake camshaft lever 3 Brake shoe wear indicator 4 Spacer 5 Brake shoe plate 6 Brake camshaft 7 Brake shoe 6 - 7 8 Oil seal 9 Bearing 0 Spacer A Rear wheel clutch hub damper B Rear wheel clutch hub C Driven sprocket D Collar E Rear wheel axle
Halaman 166
CHAS REAR WHEEL AND REAR BRAKE 6 - 8 REAR WHEEL REMOVAL 1.Remove: G Adjuster 1 G Brake rod 2 G Tension bar 3 NOTE: Depress the brake pedal to remove the brake rod. 2.Loosen: G Rear wheel axle nut 1 G Locknuts G Drive chain adjuster nuts 3.Remove: G Rear wheel axle nut 1 G Rear wheel axle 2 G Washers G Spacer 3 G Rear wheel 4 4.Remove: G Brake shoe plate T****** REAR WHEEL DISASSEMBLY 1.Remove: G Bearings 1 G Spacer 2 Refer to the “FRONT WHEEL AND BRAKE DISC” section. T701020 REAR WHEEL INSPECTION 1.Inspect: G Rear wheel axle G Rear wheel G Rear wheel bearings G Oil seals Refer to the “FRONT WHEEL AND BRAKE DISC” section. 2.Check: G Spokes Refer to the “FRONT WHEEL AND BRAKE DISC” section. 3.Measure: G Rear wheel runout Refer to the “FRONT WHEEL AND BRAKE DISC” section.
Halaman 167
CHAS REAR WHEEL AND REAR BRAKE 6 - 9 4.Inspect: G Rear wheel clutch hub damper Wear/damage → Replace. REAR BRAKE INSPECTION 1.Inspect: G Brake shoes Glazed parts → Sand with coarse sandpa- per. NOTE: After using the sandpaper, clean of the pol- ished particles with a cloth. 2.Measure: G Brake shoe thickness a Out of specification → Replace. Brake shoe thickness (limit): 1.0 mm b Measure point 3.Inspect: G Brake shoe spring Wear/damage → Replace. 4.Inspect: G Brake drum inner surface Oil/scratches → Remove. Oil Use a rag soaked in lacquer thinner or solvent. Scratch Use an emery cloth (lightly and evenly polishing). 5.Measure: G Brake drum inside diameter a Out of specification → Replace. Standard 130 mm Wear limit 131 mm
Halaman 168
CHAS REAR WHEEL AND REAR BRAKE 6 - 10 6.Inspect: G Brake shoe plate 1 Cracks/damage → Replace. G Brake camshaft 2 G Camshaft hole 3 Scratches/excessive wear → Replace. T****** BRAKE SHOE PLATE ASSEMBLY 1.Install: G Brake camshaft 1 G Brake shoe wear indicator 2 *********************************************** Installation steps: GSet the camshaft with its punched mark a facing the direction as shown. GAlign the projection b on the indicator with the camshaft notch and install. GCheck the proper position of the brake shoe. *********************************************** 2.Install: G Brake camshaft lever 1 Install the camshaft lever with its slit and the indicator at right angle as shown. T****** REAR WHEEL ASSEMBLY 1.Install: G Bearing 1 G Spacer 2 Refer to the “FRONT WHEEL AND BRAKE DISC” section.
Halaman 169
CHAS REAR WHEEL AND REAR BRAKE 6 - 11 T701032 REAR WHEEL INSTALLATION Reverse the “REMOVAL” procedure. Note the following points. 1.Install: G Brake shoe plate assembly G Rear wheel assembly NOTE: Make sure that the slot in the rear wheel clutch hub damper fits over the tab on the rear wheel clutch hub assembly. 2.Install: G Rear wheel G Spacer G Rear wheel axle G Rear wheel axle nut 3.Install: 85 Nm (8.5 m • kg) T R . . G Tension bar 16 Nm (1.6 m • kg) T R . . 4.Adjust: G Brake pedal free play Brake pedal free play: 20 ~ 30 mm 5.Adjust: G Drive chain slack Refer to the “DRIVE CHAIN SLACK ADJUSTMENT” section in CHAPTER 3. Drive chain slack: 20 ~ 30 mm
Halaman 170
FRONT BRAKE | CHAS 🏍️ --- # FRONT BRAKE ### FRONT BRAKE CALIPER ① Brake caliper ② Brake pad ③ Brake pad spring ④ Retaining bolt ⑤ Brake caliper piston ⑥ Brake caliper piston seal ⑦ Bleed screw kit ⑧ Brake caliper bolt --- ### Torque Specifications * **Brake caliper bolt (⑧):** 30 Nm (3.0 m • kg) * **Retaining bolt (④):** 27 Nm (2.7 m • kg) * **Bleed screw kit (⑦):** 6 Nm (0.6 m • kg) --- 6 - 12
Halaman 171
FRONT BRAKE | CHAS ⚙️ --- ### MASTER CYLINDER ① Brake master cylinder ② Brake master cylinder kit ③ Reservoir diaphragm ④ Reservoir cap ⑤ Master cylinder holder ⑥ Brake hose ⑦ Union bolt ⑧ Copper washer --- ### TORQUE SPECIFICATIONS * **Master cylinder holder bolt:** 7 Nm (0.7 m · kg) * **Union bolt (top):** 26 Nm (2.6 m · kg) * **Union bolt (bottom):** 26 Nm (2.6 m · kg) *Note: Always use **New** copper washers (⑧) during reassembly.* --- 6 - 13
Halaman 172
6 - 14 CHAS FRONT BRAKE CAUTION: Disc brake components rarely require dis- assembly. DO NOT: G Disassemble components unless abso- lutely necessary; G Use solvents on internal brake compo- nents; G Use spent brake fluid for cleaning; (use only clean brake fluid) G Allow brake fluid to come in contact with the eyes, as this may cause eye injury; G Splash brake fluid onto painted surfaces or plastic parts, as this may cause dam- age; G Disconnect any hydraulic connection, as this would require the entire brake sys- tem to be disassembled, drained, cleaned, properly filled and bled after reassembly. BRAKE PAD REPLACEMENT NOTE: It is not necessary to disassemble the brake caliper and brake hose to replace the brake pads. 1.Loosen: G Retaining bolts 2.Remove: G Brake caliper bolts G Brake caliper 3.Remove: G Retaining bolts 1 G Brake pads 2 NOTE: G Install new brake pad springs when the brake pads have to be replaced. G Replace the brake pads as a set if either is found to be worn to the wear limit. 4.Measure: G Brake pad wear limit a Out of specification → Replace the brake pads as a set. Brake pad wear limit: 0.8 mm
Halaman 173
6 - 15 CHAS FRONT BRAKE 5.Install: G Brake pads G Brake pads springs *********************************************** Installation steps: GConnect a suitable hose 1 tightly to the brake caliper bleed screw 2. Put the other end of this hose into an open container. GLoosen the brake caliper bleed screw and using a finger push the caliper pistons into the brake caliper. GTighten the brake caliper bleed screw. Brake caliper bleed screw: 6 Nm (0.6 m • kg) T R . . GInstall new brake pad springs and a new brake pads. GInstall the brake caliper 3 and retaining bolts 4/brake caliper bolts 5. Retaining bolt: 27 Nm (2.7m • kg) Brake caliper bolt: 30 Nm (3.0 m • kg) T R . . *********************************************** 6.Inspect: G Brake fluid level Refer to the “BRAKE FLUID LEVEL INSPECTION” section in CHAPTER 3. a “LOWER” level line 7.Check: G Brake lever operation Soft or spongy feeling → Bleed the brake system. Refer to the “AIR BLEEDING (HYDRAULIC BRAKE SYSTEM)” section in CHAPTER 3.
Halaman 174
6 - 16 CHAS FRONT BRAKE EAS00619 FRONT BRAKE CALIPER REMOVAL NOTE: Before disassembling the brake caliper, drain the brake fluid from the entire brake system. 1.Remove: G Union bolt 1 G Copper washers 2 G Brake hose NOTE: Put the end of the brake hose into a container and pump out the brake fluid carefully. 2.Remove: G Retaining bolts 1 G Brake caliper 2 3.Remove: G Brake caliper pistons 1 G Brake caliper piston seals 2 *********************************************** a.Blow compressed air into the brake hose joint opening to force out the pistons from the brake caliper. WARNING G Cover the brake caliper pistons with a rag. Be careful not to get injured when the pis- tons are expelled from the brake caliper. G Never try to pry out the brake caliper pis- tons. b.Remove the brake caliper piston seals. ***********************************************
Halaman 175
6 - 17 CHAS FRONT BRAKE EAS00633 FRONT BRAKE CALIPER INSPECTION Recommended brake component replacement schedule: Brake pads If necessary Piston seals Every two years Brake hoses Every four years Brake fluid Replace when brakes are disas- sembled. 1.Check: G Brake caliper pistons 1 Rust/scratches/wear → Replace the brake caliper. Piston assembly. G Brake caliper cylinders 2 Scratches/wear → Replace the brake cali- per. G Brake caliper 3 Cracks/damage → Replace G Brake fluid delivery passages (brake caliper body) Obstruction → Blow out with compressed air. WARNING Whenever a brake caliper is disassembled, replace the brake caliper piston seals. FRONT BRAKE CALIPER INSTALLATION WARNING G Before installation, all internal brake com- ponents should be cleaned and lubricated with clean or new brake fluid. G Never use solvents on internal brake components as they will cause the piston seals to swell and distort. G Whenever a brake caliper is disassem- bled, replace the brake caliper piston seals. Recommended brake fluid: DOT 3 or 4
Halaman 176
6 - 18 CHAS FRONT BRAKE 1.Install: G Brake caliper 1 (temporarily) G Copper washers 2 New G Brake hose 3 G Union bolt 4 26 Nm (2.6 m • kg) T R . . WARNING Proper brake hose routing is essential to insure safe motorcycle operation. Refer to the “CABLE ROUTING” section. CAUTION: When installing the brake hose onto the brake caliper 1, make sure that the brake pipe a touches the projection b on the brake caliper. 2.Install: G Brake pad springs G Brake pads G Brake caliper G Brake caliper retaining bolt 27 Nm (2.7 m • kg) T R . . 3.Fill: G Brake master cylinder reservoir (with the specified amount of the recom- mended brake fluid) Recommended brake fluid: DOT 3 or 4 WARNING G Use only the designated brake fluid. Other brake fluids may cause the rubber seals to deteriorate, causing leakage and poor brake performance. G Refill with the same type of brake fluid that is already in the system. Mixing brake fluids may result in a harmful chemical reaction, leading to poor brake performance.
Halaman 177
6 - 19 CHAS FRONT BRAKE G When refilling, be careful that water does not enter the reservoir. Water will signifi- cantly lower the boiling point of the brake fluid and could cause vapor lock. CAUTION: Brake fluid may damage painted surfaces and plastic parts. Therefore, always clean up any spilt brake fluid immediately. 4.Bleed: G Brake system Refer to the “AIR BLEEDING (HYDRAULIC BRAKE SYSTEM)” section in CHAPTER 3. 5.Check: G Brake fluid level Below the minimum level mark a → Add the recommended brake fluid to the proper level. Refer to the “BRAKE FLUID LEVEL INSPECTION” section in CHAPTER 3. 6.Check: G Brake level operation Soft or spongy feeling → Bleed the brake system. Refer to the “AIR BLEEDING (HYDRAULIC BRAKE SYSTEM)” section in CHAPTER 3.
Halaman 178
6 - 20 CHAS FRONT BRAKE EAS00588 MASTER CYLINDER REMOVAL NOTE: Before removing the front brake master cylin- der, drain the brake fluid from the entire brake system. 1.Remove: G Brake lever/compression spring G Brake switch 1 2.Remove: G Union bolt 2 G Copper washers G Brake hose 3 NOTE: To collect any remaining brake fluid, place a container under the master cylinder and the end of the brake hose. 3.Remove: G Master cylinder holder G Brake master cylinder EAS00592 MASTER CYLINDER INSPECTION The following procedure applies to the both of the brake master cylinders. 1.Check: G Brake master cylinder 1 Damage/scratches/wear → Replace. G Brake fluid delivery passages 2 (brake master cylinder body) Obstruction → Blow out with compressed air. 2.Check: G Brake master cylinder kit 1 Damage/scratches/wear → Replace.
Halaman 179
6 - 21 CHAS FRONT BRAKE 3.Check: G Brake fluid reservoir 1 Cracks/damage → Replace. G Reservoir diaphragm 2 Cracks/damage → Replace. 4.Check: G Brake hose 1 Cracks/damage/wear → Replace. EAS00598 MASTER CYLINDER INSTALLATION WARNING G Before installation, all internal brake com- ponents should be cleaned and lubricated with clean or new brake fluid. G Never use solvents on internal brake components. Recommended brake fluid: DOT 3 or 4 1.Install G Brake master cylinder 1 G Master cylinder holder 7 Nm (0.7 m • kg) T R . . G Brake lever/compression spring NOTE: G Install the master cylinder bracket with the “UP” mark facing up. G Adjust the brake master cylinder to the proper angle, as shown. G First, tighten the upper bolt, then the lower bolt.
Halaman 180
6 - 22 CHAS FRONT BRAKE 2.Install: G Copper washers 1 New G Brake hose 2 G Union bolt 3 26 Nm (2.6 m • kg) T R . . WARNING Proper brake hose routing is essential to insure safe motorcycle operation. Refer to the “CABLE ROUTING” section. NOTE: G While holding the brake hose, tighten the union bolt as shown. G Turn the handlebar to the left and to the right to make sure that the brake hose does not touch other parts (e.g., wire harness, cables, leads). Correct if necessary. 3.Fill: G Brake master cylinder reservoir (with the specified amount of the recom- mended brake fluid) Recommended brake fluid: DOT 3 or 4 WARNING G Use only the designated brake fluid. Other brake fluids may cause the rubber seals to deteriorate, causing leakage and poor brake performance. G Refill with the same type of brake fluid that is already in the system. Mixing brake fluids may result in a harmful chemical reaction, leading to poor brake performance. G When refilling, be careful that water does not enter the reservoir. Water will signifi- cantly lower the boiling point of the brake fluid and could cause vapor lock. CAUTION: Brake fluid may damage painted surfaces and plastic parts. Therefore, always clean up any spilt brake fluid immediately.
Halaman 181
6 - 23 CHAS FRONT BRAKE 4.Bleed: G Brake system Refer to the “AIR BLEEDING (HYDRAULIC BRAKE SYSTEM)” section in CHAPTER 3. 5.Check: G Brake fluid level Below the minimum level mark a → Add the recommended brake fluid to the proper level. Refer to the “BRAKE FLUID LEVEL INSPECTION” section in CHAPTER 3. 6.Check: G Brake lever operation Soft of spongy feeling → Bleed the brake system. Refer to the “AIR BLEEDING (HYDRAULIC BRAKE SYSTEM)” section in CHAPTER 3.
Halaman 182
FRONT FORK CHAS 🏍️ FRONT FORK ① Cap bolt ② O-ring ③ Spacer ④ Spring seat ⑤ Fork spring ⑥ Rebound spring ⑦ Damper rod ⑧ Oil lock piece ⑨ Inner tube ⑩ Dust seal ⑪ Oil seal clip ⑫ Oil seal ⑬ Outer tube 23 Nm (2.3 m • kg) 30 Nm (3.0 m • kg) New New New LT New 30 Nm (3.0 m • kg) 6 - 24
Halaman 183
6 - 25 CHAS FRONT FORK EAS00649 FRONT FORK REMOVAL The following procedure applies to both of the front fork legs. 1.Stand the motorcycle on a level surface. WARNING Securely support the motorcycle so that there is no danger of it falling over. 2.Remove: G Front wheel Refer to the “FRONT WHEEL AND BRAKE DISC” section. 3.Remove: G Bolts 1 (front fender) G Collars 2 G Front fender 3 4.Loosen: G Cap bolt 1 G Handle crown pinch bolt 2 G Lower bracket pinch bolt 3 WARNING Before loosening the upper and lower bracket pinch bolts, support the front fork leg. 5.Remove: G Front fork leg FRONT FORK DISASSEMBLY The following procedure applies to both of the front fork legs. 1.Remove: G Cap bolt G O-ring G Spacer G Spring seat G Fork spring
Halaman 184
6 - 26 CHAS FRONT FORK 2.Drain: G Fork oil 3.Remove: G Dust seal 1 G Oil seal clip 2 (with a flat-head screwdriver) CAUTION: Do not scratch the inner tube. 4.Remove: G Damper rob bolt G Copper washer NOTE: While holding the damper rod with the damper rod holder 1 and T-handle 2, loosen the damper rod bolt 3. Damper rod holder (19mm): 90890-04084 T-Handle: 90890-01326 5.Remove: G Inner tube G Damper rod Pull out the inner tube with damper rod. 6.Remove: G Oil seal 1 CAUTION: Never reuse the oil seal. 2 Rag
Halaman 185
6 - 27 CHAS FRONT FORK EAS00657 FRONT FORK INSPECTION The following procedure applies to both of the front fork legs. 1.Check: G Inner tube 1 G Outer tube 2 Bends/damage/scratches → Replace. WARNING Do not attempt to straighten a bent inner tube as this may dangerously weaken it. 2.Measure: G Spring free length a Over the specified limit → Replace. Spring free length limit: 384 mm 3.Check: G Damper rod 1 Damage/wear → Replace. Obstruction → Blow out all of the oil pas- sages with compressed air. G Oil lock piece 2 Damage → Replace. CAUTION: When disassembling and assembling the front fork leg, do not allow any foreign material to enter the front fork. 4.Check: G Cap bolt O-ring Damage/wear → Replace. EAS00659 FRONT FORK ASSEMBLY The following procedure applies to both of the front fork legs. WARNING G Make sure that the oil levels in both front fork legs are equal. G Uneven oil level can result in poor han- dling and a loss of stability.
Halaman 186
6 - 28 CHAS FRONT FORK NOTE: G When assembling the front fork leg, be sure to replace the following parts: -oil seal -dust seal G Before assembling the front fork leg, make sure that all of the components are clean. 1.Install: G Damper rod 1 G Oil lock piece 2 CAUTION: Allow the damper rod to slide slowly down the inner tube until it protrudes from the bottom of the inner tube. Be careful not to damage the inner tube. 2.Lubricate: G Inner tube’s outer surface Recommended lubricant: Fork oil 10 W or equivalent 3.Tighten: G Damper rod bolt 1 30 Nm (3.0 m • kg) T R . . NOTE: While holding the damper rod with the damper rod holder 2 and T-handle 3, tighten the damper rod bolt 1. Damper rod holder (19 mm): 90890-04084 T-handle: 90890-01326 4.Install: G Oil seal 1 (with the fork seal driver weight and adapter) Fork seal driver weight 2: 90890-01367 Fork seal driver attachment (ø33) 3: 90890-01368
Halaman 187
6 - 29 CHAS FRONT FORK CAUTION: Make sure that the numbered side of the oil seal faces up. NOTE: G Before installing the oil seal, apply lithium soap base grease onto its lips. G Apply fork oil onto the outer surface of the inner tube. G Before installing the oil seal, cover the top of the front fork leg with a plastic bag 1 to pro- tect the oil seal during installation. 5.Install: G Oil seal clip 1 NOTE: Adjust the oil seal clip so that it fits into the outer tube’s groove. 6.Install: G Dust seal 1 (with the fork seal driver weight) Fork seal driver weight: 90890-01367 Front fork seal driver attachment (ø33): 90890-01368 7.Fill G Front fork leg (with the specified amount of the recommend fork oil) Quantity (each front fork leg): 252 cm3 Yamaha fork and shock oil 10 W or equivalent.
Halaman 188
6 - 30 CHAS FRONT FORK Front fork leg oil level a (from the top of the inner tube, with the inner tube fully compressed and without the fork spring): 95 mm NOTE: G While filling the front fork leg, keep it upright. G After filling, slowly pump the front fork leg up and down to distribute the fork oil. G Be sure to stroke the inner tube slowly because the for oil may spurt out. 8.Install: G Spring 1 G Spring seat 2 G Spacer 3 G Cap bolt 4 NOTE: G Install the spring with the smaller pitch facing up. G Before installing the cap bolt, apply grease onto the O-ring. G Temporarily tighten the cap bolt. EAS00662 FRONT FORK INSTALLATION The following procedure applies to both of the front fork legs. 1.Install: G Front fork leg Temporarily tighten the handle crown pinch bolt and lower bracket pinch bolt. NOTE: Make sure that the inner fork tube is flush with the top of the handlebar holder.
Halaman 189
6 - 31 CHAS FRONT FORK 2.Tighten: G Lower bracket pinch bolt 1 30 Nm (3.0 m • kg) T R . . G Handle crown pinch bolt 2 23 Nm (2.3 m • kg) T R . . G Cap bolt 3 23 Nm (2.3 m • kg) T R . . WARNING Make sure that the brake hoses are routed properly. 3.Install: G Front fender G Collars G Bolts (front fender) 4.Install: 7 Nm (0.7 m • kg) T R . . G Front wheel Refer to the “FRONT WHEEL AND BRAKE DISC” section.
Halaman 190
CHAS STEERING HEAD AND HANDLEBAR STEERING HEAD AND HANDLEBAR HANDLEBAR 1 Grip end 2 Throttle grip 3 Handlebar 4 Throttle cable 5 Clutch cable 6 - 32
Halaman 191
CHAS STEERING HEAD AND HANDLEBAR STEERING HEAD 1 Handlebar holder 2 Bolt cap 3 Lock washer 4 Upper ring nut 5 Rubber washer 6 - 33 6 Lower ring nut 7 Ball race cover 8 Bearing 9 Bearing 0 Bearing race A Lower bracket
Halaman 192
CHAS STEERING HEAD AND HANDLEBAR 6 - 34 HANDLEBAR REMOVAL 1.Remove: G Handlebar switch 1 (left) 2.Remove: G Grip end 1 (left) G Handlebar grip 2 (left) G Clutch cable 3 G Clutch lever holder 4 NOTE: Before removing the clutch lever holder 4, remove the clutch switch leads and clutch cable. 3.Remove: G Handlebar switch 1 (right) 4.Remove: G Throttle cable 1 5.Remove: G Grip end 1 (right) G Throttle grip 2 G Brake lever holder 3
Halaman 193
CHAS STEERING HEAD AND HANDLEBAR 6 - 35 6.Remove: G Bolt cap 1 G Handlebar holders 2 7.Remove: G Handlebar STEERING HEAD REMOVAL WARNING Securely support the motorcycle so there is no danger of its falling over. 1.Place the motorcycle on the centerstand and place a suitable stand under the engine to elevate the front wheel. 2.Remove: G Handlebar G Headlight unit 1 3.Remove: G Leads 1 G Headlight body 2 G Speedometer cable 3 G Tachometer cable 4 G Speedometer assembly 5 G Holder 6
Halaman 194
CHAS STEERING HEAD AND HANDLEBAR 6 - 36 4.Remove: G Front wheel G Front fork Refer to the “FRONT WHEEL AND FRONT FORK REMOVAL” section. NOTE: It is not necessary to remove the cap bolts when removing front fork. 5.Remove: G Handle crown 1 G Upper ring nut 2 G Rubber washer G Lower ring nut 3 Use the steering nut wrench to remove the upper ring nut and lower ring nut. Steering nut wrench: 90890-01403 G Lower bracket WARNING Support the lower bracket so that it may not fall down. STEERING HEAD AND HANDLEBAR INSPECTION 1.Wash the bearing race and ball with solvent. 2.Inspect: G Lower bracket 1 G Bearings 2 G Bearing races 3 G Inner surface 4 (handle crown) Scratches/damage → Replace.
Halaman 195
CHAS STEERING HEAD AND HANDLEBAR 6 - 37 3.Remove: G Ball race cover 1 G Bearing race 2 G Bearing 3 *********************************************** Bearing race replacement steps: GRemove the bearing race on the lower bracket using the floor chisel 4 and the hammer as shown. GInstall the new bearing races. *********************************************** NOTE: Always replace bearings and races as a set. 4.Inspect: G Handlebar Bends/damage → Replace. STEERING HEAD INSTALLATION Reverse the “REMOVAL” procedures. Note the following points: 1.Lubricate: G Bearing (upper/lower) G Bearing race Lithium-soap base grease
Halaman 196
CHAS STEERING HEAD AND HANDLEBAR 6 - 38 2.Install: G Bearing (lower) Onto the bearing race. G Lower bracket WARNING Support the lower bracket until it is secured. G Bearing (upper) G Bearing race (upper) G Bearing race cover G Ring nuts 3.Tighten: G Ring nut Refer to the “STEERING HEAD INSPEC- TION” section in CHAPTER 3. 4.Install: G Holder Pass the brake cable and wire harness through the holder. 5.Install: G Front fork leg Temporarily tighten the upper and lower bracket pinch bolts. 6.Install: G Handle crown Nut (steering stem): 110 Nm (11.0 m • kg) T R . . 7.Install: G Front fork Refer to the “FRONT FORK” section. Pinch bolt (lower bracket): 30 Nm (3.0 m • kg) Pinch bolt (handle crown): 23 Nm (2.3 m • kg) T R . . 8.Install: G Front wheel Refer to the “FRONT WHEEL AND BRAKE DISC” section. Nut (front wheel axle): 58 Nm (5.8 m • kg) T R . .
Halaman 197
CHAS STEERING HEAD AND HANDLEBAR 6 - 39 HANDLEBAR INSTALLATION 1.Install: G Speedometer assembly G Handlebar 1 G Handlebar holders 2 G Bolt cap 3 NOTE: G Punch mark 1 should be flush with upper bracket when installing the handlebar. G Arrow marks 2 should be pointed toward when installing handlebar holder. Bolt (handlebar holder): 19 Nm (1.9 m • kg) T R . . 2.Install: G Clutch lever 1 G Grip 2 (left) G Grip end 3 (left) G Handlebar switch 4 (left) NOTE: G Align the handlebar switch projection with the hole on the handlebar. G Apply lithium-soap base grease to clutch cable end when installing left handlebar switch. 3.Install: G Brake lever holder 1 G Throttle grip 2 (right) G Throttle grip end 3 G Handlebar switch 4 (right) G Throttle cable 5 NOTE: G Align the handlebar switch projection with the hole on the handlebar. G Apply lithium-soap base grease to throttle cable end when installing right handlebar switch.
Halaman 198
STEERING HEAD AND HANDLEBAR 6 - 40 CHAS WARNING It should have 1 ~ 3 mm when installing throttle grip end. Bolt (throttle grip end): 23 Nm (2.3 m • kg) T R . . 4.Adjust: G Throttle cable free play Refer to the “THROTTLE CABLE FREE PLAY ADJUSTMENT” section in CHAPTER 3. Throttle cable free play: 3 ~ 5 mm
Halaman 199
CHAS REAR SHOCK ABSORBER AND SWINGARM REAR SHOCK ABSORBER AND SWINGARM 1 Rear shock absorber 2 Bush 3 Swingarm 4 Bearing 5 Dust cover 6 Bush 7 Drive chain guide 6 - 41 8 Relay arm 9 Bush 0 Oil seal A Collar B Connecting arm C Bush D Oil seal E Collar
Halaman 200
CHAS REAR SHOCK ABSORBER AND SWINGARM 6 - 42 EAS00703 REAR SHOCK ABSORBER AND SWINGARM REMOVAL 1.Stand the motorcycle on a level surface. WARNING Securely support the motorcycle so that there is no danger of it falling over. 2.Remove: G Air filter case Refer to the “CARBURETOR” section in CHAPTER 5. 3.Remove: G Bolt (rear shock absorber) 1 NOTE: When removing the rear shock absorber lower bolt, hold the swingarm so that it does not drop down. 4.Remove: G Bolt (rear shock absorber) 1 G Rear shock absorber 5.Check: G Swingarm side play È G Swingarm vertical movement É *********************************************** a.Check the tightening torque of the pivot shaft nut. Pivot shaft nut: 59 Nm (5.9 m • kg) T R . . b.Check the swingarm side play È by moving the swingarm from side to side. c.If the swingarm side play is large, check the spacers, bearings, washers, and dust cov- ers. d.Check the swingarm vertical movement É by moving the swingarm up and down. If swingarm vertical movement is not smooth or if there is binding, check the spacers, bearings, washers, and dust covers. ***********************************************
Halaman 201
CHAS REAR SHOCK ABSORBER AND SWINGARM 6 - 43 EAS00696 REAR SHOCK ABSORBER INSPECTION 1.Inspect: G Rear shock absorber rod Bends/damage → Replace the rear shock absorber assembly. G Rear shock absorber Gas leaks/oil leaks → replace the rear shock absorber assembly. G Spring Damage/wear → Replace the rear shock absorber assembly. G Bushings Damage/wear → Replace. G Dust seals Damage/wear → Replace. G Bolts Bends/damage/wear → Replace. EAS00707 SWINGARM INSPECTION 1.Inspect: G Swingarm Bends/cracks/damage → Replace. 2.Inspect: G Pivot shaft Roll the pivot shaft on a flat surface. Bends → Replace. WARNING Do not attempt to straighten a bent pivot shaft. 3.Wash: G Pivot shaft G Dust covers G Collars G Washers G Bearings G Bushes Recommended cleaning solvent Kerosine
Halaman 202
CHAS REAR SHOCK ABSORBER AND SWINGARM 6 - 44 4.Inspect: G Dust covers 1 G Bush 2 Damage/wear → Replace. G Bearings 3 Damage/pitting → Replace. EC574210 RELAY ARM INSPECTION 1.Inspect: G Bushs 1 G Collar 2 Free play exists/unsmooth revolution/rust → Replace bush and collar as a set. 2.Inspect: G Oil seals 3 Damage → Replace. EC574310 CONNECTING ARM INSPECTION 1.Inspect: G Bushs 1 G Collars 2 Free play exists/unsmooth revolution/rust → Replace bush and collar as a set. 2.Inspect: G Oil seals 3 Damage → Replace. T701020 DRIVE CHAIN INSPECTION 1.Inspect: G Drive chain stiffness Stiffness → Clean and lubricate or replace. 2.Inspect: G Drive chain 1 G Driven sprocket 2 More than 1/2 tooth a wear → Replace the drive chain. Use new driven sprocket.
Halaman 203
CHAS REAR SHOCK ABSORBER AND SWINGARM 6 - 45 3.Measure: G 10 link length a (drive chain) Out of specification → Replace the drive chain. 10 link length limit: 119.5 mm NOTE: G Tighten the drive chain with a finger before measuring. G 10 link length is the distance between the inside edge of roller 1 and A as shown. G 10 link length measurement should be done at two or three different places. 4.Clean: G Drive chain Put it in kerosene, and brush off as much dirt as possible. Then remove the drive chain from the kerosene and dry it. Drive chain lubricant: Engine oil or chain lubricant for O-ring chain CAUTION: This motorcycle has a drive chain with small rubber O-rings 1 between the drive chain side plates. Never use high-pressure water or air, steam, gasoline, certain sol- vents (e.g., benzene), or a coarse brush to clean the drive chain. Don’t soak drive drain in kerosine for more than ten minutes. O-ring is damage by ker- osine. 5.Check: G O-rings 1 Damage → Replace the drive chain. G Drive chain rollers 2 Damage/wear → Replace the drive chain. G Drive chain side plates 3 Cracks/damage/wear → Replace the drive chain.
Halaman 204
CHAS REAR SHOCK ABSORBER AND SWINGARM 6 - 46 T***** REAR WHEEL CLUTCH HUB INSPECTION 1.Inspect: G Rear wheel clutch hub Wear/damage/cracks → Replace. T****** DRIVEN SPROCKET ASSEMBLY 1.Install: G Driven sprocket 1 G Lock washers 2 New G Bolts 3 30 Nm (3.0 m • kg) T R . . NOTE: Tighten the bolts in a crisscross pattern. 2.Bend: G Lock washer tab 1 (along a flat side of the end) EAS00711 REAR SHOCK ABSORBER AND SWINGARM INSTALLATION Reverse the “REMOVAL” procedure. Note the following points. 1.Lubricate: G Bearings G Collars G Dust covers G Pivot shaft G Bushes Recommended lubricant Lithium soap-base grease
Halaman 205
CHAS REAR SHOCK ABSORBER AND SWINGARM 6 - 47 2.Install: G Bush 1 G Bearings 2 G Chain guide 3 G Collar (chain guide) 4 G Bolt (chain guide) 5 G Dust covers 6 (to the swingarm). 3.Install: G Collar 1 G Bushes 2 G Oil seals 3 (to the relay arm). 4.Install: G Collars 1 G Bushes 2 G Oil seals 3 (to the connecting arm). 5.Install: G Connecting arm 1 G Bolt (connecting arm-relay arm) 2 G Washer 3 G Nut (connecting arm-relay arm) 4 59 Nm (5.9 m • kg) T R . . NOTE: G Apply the lithium soap-base grease on the bolt. G Install the nut on the right side of the chassis.
Halaman 206
CHAS REAR SHOCK ABSORBER AND SWINGARM 6 - 48 6.Install: G Connecting arm 1 G Bolt (connecting arm-swingarm) 2 G Washer 3 G Nut (connecting arm-swingarm) 4 59 Nm (5.9 m • kg) T R . . NOTE: Apply the lithium soap-base grease on the bolt. 7.Install: G Swingarm 1 G Pivot shaft 2 G Washer G Nut 59 Nm (5.9 m • kg) T R . . NOTE: G Apply the lithium soap-base grease on the pivot shaft. G Insert the pivot shaft from right side 8.Install: G Bolt (relay arm-frame) 1 G Washer 2 G Nut (relay arm-frame) 3 59 Nm (5.9 m • kg) T R . . NOTE: Apply the lithium soap-base grease on the bolt. 9.Install: G Bolt (rear shock absorber-frame) 1 59 Nm (5.9 m • kg) T R . . NOTE: Apply the lithium soap-base grease on the bolt. 10.Install: G Bolt (rear shock absorber-relay arm) 1 G Washer 2 G Nut (rear shock absorber-relay arm) 3 59 Nm (5.9 m • kg) T R . . NOTE: G Apply the lithium soap-base grease on the bolt. G Insert the bolt from left side.
Halaman 207
CHAPTER 7. ELECTRICAL ELECTRICAL COMPONENTS ..................................................................... 7-1 SWITCHES ................................................................................................... 7-3 CHECKING SWITCH CONTINUITY ..................................................... 7-3 CHECKING THE SWITCHES ....................................................................... 7-4 CHECKING OF BULBS ................................................................................ 7-6 KINDS OF BULBS ................................................................................. 7-6 CHECKING BULB CONDITION ............................................................ 7-6 IGNITION SYSTEM ...................................................................................... 7-8 CIRCUIT DIAGRAM .............................................................................. 7-8 .......................................................................... 7-9 ELECTRIC STARTING SYSTEM ............................................................... 7-13 CIRCUIT DIAGRAM ............................................................................ 7-13 STARTING CIRCUIT OPERATION .................................................... 7-14 ........................................................................ 7-15 STARTER MOTOR ............................................................................. 7-19 CHARGING SYSTEM ................................................................................. 7-25 CIRCUIT DIAGRAM ............................................................................ 7-25 ........................................................................ 7-26 LIGHTING SYSTEM ................................................................................... 7-28 CIRCUIT DIAGRAM ............................................................................ 7-28 ........................................................................ 7-29 LIGHTING SYSTEM CHECK .............................................................. 7-31 SIGNALING SYSTEM ................................................................................ 7-34 CIRCUIT DIAGRAM ............................................................................ 7-34 ........................................................................ 7-36 SIGNAL SYSTEM CHECK .................................................................. 7-38 – + ELEC
Halaman 208
_________________________________________________________________ | ELEC | ⁻ 🔋 ⁺ | | | _ |
Halaman 209
ELECTRICAL COMPONENTS | ELEC [- +] ========================================= # ELECTRICAL ## ELECTRICAL COMPONENTS ① Fuel sender ② Starting circuit cut-off relay ③ Rectifier/regulator ④ Rear brake switch ⑤ Starter relay ⑥ Battery ⑦ Main switch --- *(Diagram of Electrical Components)* [FWD] --- 7 - 1
Halaman 210
ELECTRICAL COMPONENTS ELEC ① Ignition coil ② Flasher relay ③ CDI unit ④ Neutral switch ⑤ Horn FWD 7 - 2
Halaman 211
7 - 3 – + ELEC SWITCHES EAS0010 SWITCHES CHECKING SWITCH CONTINUITY Check each switch for continuity with the pocket tester. If the continuity reading is incorrect, check the wiring connections and if necessary, replace the switch. CAUTION: Never insert the tester probes into the cou- pler terminal slots 1. Always insert the probes from the opposite end of the cou- pler, taking care not to loosen or damage the leads. Pocket tester 90890-03112 NOTE: G Before checking for continuity, set the pocket tester to “0” and to the “Ω × 1” range. G When checking for continuity, switch back and forth between the switch positions a few times. The terminal connections for switches (e.g., main switch, engine stop switch) are shown in an illustration similar to the one on the left. The switch positions a are shown in the far left column and the switch lead colors b are shown in the top row in the switch illustration. NOTE: “ ” indicates a continuity of electricity between switch terminals (i.e., a closed circuit at the respective switch position). The example illustration on the left shows that: There is continuity between black/white and black when the switch is set to “OFF” or “LOCK”. There is continuity between brown and red when the switch is set to “ON”.
Halaman 212
– + ELEC CHECKING THE SWITCHES EAS00731 CHECKING THE SWITCHES Check each switch for damage or wear, proper connections, and also for continuity between the ter- minals. Refer to the “CHECKING SWITCH CONTINUITY” section. Damage/wear → Repair or replace the switch. Improperly connected → Properly connect. Incorrect continuity reading → Replace the switch. 6 B R Br B/W 9 = LOCK OFF ON L/W B/W OFF ON R B Br B/W 3 1 P B B/Y L/Y OFF ON 5 Br/W Dg Ch L/Y P L Br Br/W Ch R Dg B L N B/Y 7 L Br OFF ON PO 2 Y Br OFF ON 4 Y G HI LO B 7 - 4 8 G/Y Br B OFF RUN A 10A C Sb
Halaman 213
– + ELEC CHECKING THE SWITCHES 1 Clutch switch 2 Pass switch 3 Horn switch 4 Dimmer switch 5 Turn switch 6 Main switch 7 Lights switch 8 Front brake switch 9 Engine stop switch 0 Start switch A Fuse B Rear brake switch C Neutral switch 7 - 5
Halaman 214
– + ELEC CHECKING OF BULBS 7 - 6 CHECKING OF BULBS (FOR HEADLIGHT, TAIL/BLAKE LIGHT, FLASHER LIGHT, METER LIGHT, ETC.) To determine the condition of a bulb check for continuity at the bulb terminal. KINDS OF BULBS The bulbs used in motorcycles can be classi- fied by shape of socket and use. A and B are the main types used in head- lights. C is mainly used for the flasher light and tail/ brake light. D and E are mainly used for meter lights and other indicator lights. CHECKING BULB CONDITION 1.Remove the bulb. NOTE: G Bulbs of the A and B type uses a bulb holder. Remove the bulb holder before removing the bulb itself. Most of the bulb holders for this type can be removed by turn- ing counterclockwise. G Most of the bulbs of C and D type can be removed from the bulb sockets by pushing and turning them counterclockwise. G Bulbs of the E type can just be pulled out. CAUTION: Be sure to hold the socket firmly when removing the bulb. Never pull the lead. Oth- erwise, the lead may be pulled off the termi- nal in the coupler. WARNING Headlight bulbs become very hot even after a short time. Keep flammable products away from a hot headlight bulb and be careful never to touch it, before it had time to cool down.
Halaman 215
– + ELEC CHECKING OF BULBS 7 - 7 2.Check for continuity at the bulb terminals. ***************************************************** Checking steps: GSet the pocket tester selector to “Ω × 1”. GConnect the tester leads to the respective bulb terminals. Take for example a 3-termi- nal bulb as shown left. First check the conti- nuity between the terminals 1 and 2 by connecting the tester (+) lead to the terminal 1 and the tester (–) lead to the terminal 2. Then check the continuity between the termi- nals 1 and 3 by connecting the tester (+) lead still to the terminal 1 and the tester (–) lead to the terminal 3. If the tester shows “∞” in either case, replace the bulb. ***************************************************** 3.Check the bulb socket by installing a proven bulb to it. As in the checking of bulbs, con- nect the pocket tester leads to the respective leads of the socket and check for continuity in the same manner as mentioned above.
Halaman 216
# IGNITION SYSTEM ## CIRCUIT DIAGRAM ### IGNITION SYSTEM | ELEC --- ``` ┌───────┐ ┌─┤ (6) ├─┐ │ └───────┘ │ │ ┌───┐ │ └───┤(5)├───┘ └───┘ ┌───┐ │(4)│ └───┘ ┌───┐ ┌───┐ │(2)│ │(3)│ └───┘ └───┘ ``` #### Switch Connection Tables ##### (1) Main Switch | | | | | :--- | :---: | :---: | | **LOCK** | | | | **OFF** | | | | **ON** | ◯ | ◯ | ##### (7) & (8) Engine Stop Switch | | | | | :--- | :---: | :---: | | **OFF** | ◯ | ◯ | | **ON** | | | | | | | | :--- | :---: | :---: | | **OFF** | | | | **RUN** | ◯ | ◯ | ##### (14) | | | | | :--- | :---: | :---: | | **OFF** | | | | **ON** | ◯ | ◯ | ##### (15) | | | | | | :--- | :---: | :---: | :---: | | **OFF** | | | | | **PO** | ◯ | ◯ | | | **ON** | ◯ | ◯ | ◯ | ##### (16) | | | | | :--- | :---: | :---: | | **OFF** | | | | **ON** | ◯ | ◯ | ##### (17) | | | | | :--- | :---: | :---: | | **HI** | ◯ | ◯ | | **LO** | ◯ | | ##### (18) | | | | | :--- | :---: | :---: | | **R** | ◯ | ◯ | | **N** | | | | **L** | ◯ | ◯ | --- ### Legend * **①** Main switch * **③** CDI magneto * **④** CDI unit * **⑤** Ignition coil * **⑥** Spark plug * **⑧** Engine stop switch --- **7-8**
Halaman 217
IF IGNITION SYSTEM SHOULD BECOME INOPERATIVE (NO SPARK OR INTERMITTENT SPARK) Procedure Check; 1.Spark plug 2.Ignition spark gap 3.Spark plug cap resistance 4.Ignition coil resistance 5.Main switch NOTE: G Remove the following parts before troubleshooting. 1)Headlight unit 2)Seat 3)Fuel tank G Use the following special tools in this troubleshooting. Pocket tester: 90890-03112 1.Spark plug G Check the spark plug type, condition and gap. Refer to the “SPARK PLUG INSPECTION” section in CHAPTER 3. Standard spark plug: D8EA (NGK) or X24ES-U (DENSO) Spark plug gap: 0.6 ~ 0.7 mm CORRECT * 7 - 9 – + ELEC IGNITION SYSTEM 6.Engine stop switch 7.Source coil resistance 8.Pickup coil resistance 9.Wiring connection (ignition system) Ignition checker: 90890-06754 INCORRECT Repair or replace spark plug.
Halaman 218
* C0NTINUITY 2.Ignition spark gap G Disconnect the spark plug cap from the spark plug. G Connect the ignition checker 1 between cylinder head and spark plug cap 2, and set the specified spark gap 3. G Turn the main switch to “ON”, then apply clutch lever or shift the transmission into neutral. G Push the start switch or kick the kick crank. G Check the ignition spark condition. Minimum spark gap: 6 mm OUT OF SPECIFICATION 3.Spark plug cap resistance G Remove the spark plug cap. G Connect the pocket tester (Ω × 1k) to the spark plug cap. G Checking the spark plug cap for the speci- fied resistance. Spark plug cap resistance: 10 kΩ at 20°C MEETS SPECIFICATION * 7 - 10 – + ELEC IGNITION SYSTEM SPARK Ignition circuit is good. OUT OF SPECIFICATION Replace spark plug cap.
Halaman 219
* C0NTINUITY 4.Ignition coil resistance G Disconnect the ignition coil lead (Orange) from the wire harness. G Connect the pocket tester to the ignition coil. Primary coil: (Ω × 1) Tester (+) lead → Orange 1 terminal Tester (–) lead → Ignition coil base 2 Secondary coil: (Ω × 1k) Tester (+) lead → Spark plug lead 3 Tester (–) lead → Ignition coil base 2 G Measure the primary and secondary coil resistances. Primary coil resistance È: 0.32 ~ 0.48 Ω at 20°C Secondary coil resistance É: 5.68 ~ 8.52 kΩ at 20°C BOTH MEETS SPECIFICATIONS 5.Main switch G Check the main switch for continuity. Refer to the “CHECKING THE SWITCHES” section. CORRECT 6.Engine stop switch G Check the engine stop switch for continuity. Refer to the “CHECKING THE SWITCHES” section. CORRECT * 7 - 11 – + ELEC IGNITION SYSTEM OUT OF SPECIFICATIONS Replace ignition coil. INCORRECT Replace main switch. INCORRECT Replace handlebar switch (right).
Halaman 220
* C0NTINUITY 7.Source coil resistance G Disconnect the CDI magneto coupler from the wire harness. G Connect the pocket tester (Ω × 100) to the source coil. Tester (+) lead → Brown 1 terminal Tester (–) lead → Green 2 terminal 3 CDI magneto G Measure the source coil resistance. Source coil resistance: 688 ~ 1,032 Ω at 20°C MEETS SPECIFICATION 8.Pickup coil resistance G Disconnect the CDI magneto coupler from the wire harness. G Connect the pocket tester (Ω × 100) to the pickup coil. Tester (+) lead → Red 1 terminal Tester (–) lead → White 2 terminal 3 CDI magneto G Measure the pickup coil resistance. Pickup coil resistance: 248 ~ 372 Ω at 20°C MEETS SPECIFICATION 9.Wiring connection G Check the entire ignitions system for con- nections. Refer to the “WIRING DIAGRAM” section. CORRECT CDI unit is faulty. Replace it. 7 - 12 – + ELEC IGNITION SYSTEM OUT OF SPECIFICATION Replace source coil. OUT OF SPECIFICATION Replace pickup coil. POOR CONNECTION Correct.
Halaman 221
# ELECTRIC STARTING SYSTEM | ELEC --- ## ELECTRIC STARTING SYSTEM ### CIRCUIT DIAGRAM * **①** Main switch * **⑦** Start switch * **⑧** Engine stop switch * **⑲** Clutch switch * **㉕** Neutral switch * **㉝** Starter motor * **㉞** Battery * **㉟** Fuse * **㊱** Starter relay * **㊲** Starting circuit cut-off relay --- ### SWITCH SCHEMATICS & COLOR CODES (Representative Text) #### ① Main Switch | | | | | :--- | :---: | :---: | | **LOCK** | | | | **OFF** | | | | **ON** | ◯ | ◯ | #### ⑦ Start Switch | | | | | :--- | :---: | :---: | | **OFF** | | | | **ON** | ◯ | ◯ | #### ⑧ Engine Stop Switch | | | | | :--- | :---: | :---: | | **OFF** | ◯ | ◯ | | **RUN** | ◯ | ◯ | --- ### WIRE COLOR ABBREVIATIONS * **B**: Black * **Br**: Brown * **Dg**: Dark green * **G**: Green * **L**: Blue * **R**: Red * **Sb**: Sky blue * **W**: White * **Y**: Yellow * **B/W**: Black / White * **Br/W**: Brown / White * **L/Y**: Blue / Yellow * **L/W**: Blue / White * **R/W**: Red / White * **Y/R**: Yellow / Red --- <br> **7 - 13**
Halaman 222
– + ELEC ELECTRIC STARTING SYSTEM 7 - 14 STARTING CIRCUIT OPERATION The starting circuit on this model consist of the starter motor, starter relay, and the relay unit (starting circuit cut-off relay). If the engine stop switch and the main switch are both closed, the starter motor can operate only if: The transmission is in neutral (the neutral switch is closed). or if The clutch lever is pulled to the handlebar (the clutch switch is closed). The starting circuit cut-off relay prevents the starter from operating when neither of these conditions has been met. In this instance, the starting circuit cut-off relay is open so current cannot reach the starter motor. When one of both of the above conditions have been met, however, the starting circuit cut-off relay is closed, and the engine can be started by pressing the starter switch. WHEN THE TRANSMISSION IS IN NEUTRAL WHEN THE CLUTCH LEVER IS PULLED IN 1 Battery 2 Starter relay 3 Starter motor 4 Main switch 5 Starting circuit cut-off relay (relay assembly) 6 Clutch switch 7 Neutral switch 8 Start switch 9 Engine stop switch
Halaman 223
– + ELEC ELECTRIC STARTING SYSTEM STARTER MOTOR DOES NOT OPERATE. Procedure Check; 1.Fuse 2.Battery 3.Starter motor 4.Starter relay 5.Starting circuit cut-off relay (relay assembly) NOTE: G Remove the following parts before troubleshooting. 1)Side cover (right) 2)Headlight unit 3)Seat 4)Fuel tank G Use the following special tool in this troubleshooting. Pocket tester: 90890-03112 1.Fuse G Connect the pocket tester “Ω × 1” to the fuse. G Check the fuse for continuity. CONTINUITY 2.Battery G Check the battery condition. G Check the battery fluid level, battery termi- nals and specific gravity. Specific gravity: 1.280 at 20°C CORRECT * 7 - 15 6.Main switch 7.Engine stop switch 8.Neutral switch 9.Clutch switch 10.Start switch 11.Wiring connection (electric starting system) INCORRECT Replace fuse. INCORRECT G Refill battery fluid. G Clean battery terminals. G Recharge or replace battery.
Halaman 224
– + ELEC ELECTRIC STARTING SYSTEM * C0NTINUITY 3.Starter motor G Connect the battery positive terminal 1 and starter motor cable 2 using the jumper lead 3 . * G Check the starter motor operation. C0NTINUITY 4.Starter relay G Disconnect the starter relay coupler from the wire harness. G Connect the battery (12 V) to the starter relay terminals, using the jumper leads . * Battery (+) lead → Yellow/Red 1 terminal Battery (–) lead → Black 2 terminal G Check the starter motor for operation. MOVES * 7 - 16 * WARNING G A wire for the jumper lead must have the equivalent capacity as that of the battery lead or more, otherwise it may cause the jumper lead to be burned. G This check is likely to produce sparks, so be sure that no flammable gas or fluid is in the vicinity. INOPERATIVE Repair or replace starter motor. * WARNING G A wire for the jumper lead must have the equivalent capacity as that of the battery lead or more, otherwise it may cause the jumper lead to be burned. G This check is likely to produce sparks, so be sure that no flammable gas or fluid is the vicinity. DOES NOT MOVES Replace starter relay.
Halaman 225
– + ELEC ELECTRIC STARTING SYSTEM * C0NTINUITY 5.Starting circuit cut-off relay G Disconnect the relay lead coupler from the wire harness. G Connect the pocket tester (Ω × 1) and bat- tery (12 V) to relay. Step 1: Battery (+) lead → Brown terminal 1 Battery (–) lead → Sky blue terminal 2 Tester (+) lead → Brown terminal 1 Tester (–) lead → Red/White terminal 4 Step 2: Battery (+) lead → Brown terminal 1 Battery (–) lead → Blue/Yellow terminal 3 Tester (+) lead → Brown terminal 1 Tester (–) lead → Red/White terminal 4 G Check the relay for continuity. CONTINUITY 6.Main switch G Check the main switch for continuity. Refer to the “CHECKING THE SWITCHES” section. CORRECT 7.Engine stop switch G Check the engine stop switch for continuity. Refer to the “CHECKING THE SWITCHES” section. CORRECT * 7 - 17 NO CONTINUITY Replace relay. INCORRECT Replace main switch. INCORRECT Replace handlebar switch (right).
Halaman 226
– + ELEC ELECTRIC STARTING SYSTEM * C0NTINUITY 8.Neutral switch G Check the neutral switch for continuity. Refer to the “CHECKING THE SWITCHES” section. CORRECT 9.Clutch switch G Check the clutch switch for continuity. Refer to the “CHECKING THE SWITCHES” section. CORRECT 10.Start switch G Check the start switch for continuity. Refer to the “CHECKING THE SWITCHES” section. CORRECT 11.Wiring connection G Check the entire ignition system for conti- nections. Refer to the “WIRING DIAGRAM” section. 7 - 18 INCORRECT Replace neutral switch. INCORRECT Replace clutch switch. INCORRECT Replace handlebar switch (right). POOR CONNECTION Correct.
Halaman 227
**ELECTRIC STARTING SYSTEM** | **ELEC** 🔋 --- ### STARTER MOTOR ① Brush ② Armature ③ O-ring ④ O-ring --- | | Specification | | :---: | :--- | | **A** | **BRUSH LENGTH LIMIT:**<br>3.5 mm | | **B** | **COMMUTATOR WEAR LIMIT:**<br>21 mm | | **C** | **MICA UNDER CUT:**<br>1.5 mm | | **D** | **ARMATURE COIL RESISTANCE:**<br>0 Ω at 20°C | --- *[FWD]* --- **7 - 19**
Halaman 228
– + ELEC ELECTRIC STARTING SYSTEM 7 - 20 Removal 1.Remove: G Carburetor Refer to the “CARBURETOR” section in CHAPTER 5. 2.Remove: G Clutch cable Refer to the “WIRE, CABLE AND TUBE” section in CHAPTER 4. 3.Disconnect: G Starter motor lead 1 4.Remove: G Starter motor 2 5.Remove: G Bolts (starter motor front cover) 6.Remove: G Starter motor yoke 1 G O-ring 2 7.Remove: G Armature 1 Inspection and repair 1.Inspect: G Commutator Dirty → Clean it with #600 grit sandpaper. 2.Measure: G Commutator diameter a Out of specification → Replace starter motor. Commutator wear limit: 21 mm
Halaman 229
– + ELEC ELECTRIC STARTING SYSTEM 7 - 21 3.Measure: G Mica undercut b Out of specification → Scrape the mica to proper value use a hacksaw blade can be ground to fit. Mica undercut: 1.5 mm NOTE: the mica insulation of the commutator must be undercut to ensure proper operation of com- mutator. 4.Inspect: G Armature coil (continuity/insulation) Defects (s) → Replace starter motor. ***************************************************** Inspecting steps: GConnect the pocket tester for continuity check 1 and insulation check 2. Pocket tester: 90890-03112 GMeasure the armature coil resistances. Armature coil resistance: Continuity check 1: (Ω × 1) 0 Ω at 20°C Insulation check 2: (Ω × 1k) More than 1 MΩ at 20°C GIf the resistance is incorrect, replace the starter motor. ***************************************************** 5.Measure: G Brush length a Out of specification → Replace. Brush length limit: 3.5 mm
Halaman 230
– + ELEC ELECTRIC STARTING SYSTEM 7 - 22 6.Measure: G Brush spring pressure Fatigue/out of specification → Replace as a set. Brush spring pressure: 560 ~ 840 g 7.Inspect G Bearing G Oil seal G O-ring Wear/damage → Replace. Assembly Reverse the “Removal” procedure. Note the following points. 1.Install: G Brush G Brush spring Using a thin screw driver.
Halaman 231
– + ELEC ELECTRIC STARTING SYSTEM 7 - 23 2.Install G Armature 1 3.Install: G O-ring 1 G Starter motor yoke 2 4.Install G Starter motor assembly NOTE: Align the groove a on the starter motor assembly with the groove b on the housing. 5.Install: G O-ring 1 New G Screw WARNING Always use a new O-ring. 6.Install: G O-ring 2 WARNING Always use a new O-ring. NOTE: Apply a lightly grease to the O-ring 2.
Halaman 232
# ELECTRIC STARTING SYSTEM | ELEC ### Installation 1. Install: * Starter motor ① * Starter motor lead ② | | | | :---: | :--- | | **T.R.** | **Bolt (starter motor):**<br>**10 Nm (1.0 m • kg)** | <br> 7 - 24
Halaman 233
# CHARGING SYSTEM ## CIRCUIT DIAGRAM ### CHARGING SYSTEM | ELEC | --- *(Diagram of the Electrical Circuit)* --- ### Legend * **②** Rectifier/regulator * **③** CDI magneto * **㉞** Battery * **㉟** Fuse --- ### Diagram Details & Labels * **Main Switch (1):** * Positions: `LOCK`, `OFF`, `ON` * **Rectifier/Regulator (2):** * Connector: `(GREEN)` * **Fuse (35):** `10A` * **Battery (34)** * **Switches:** * **(7):** `OFF`, `ON` * **(8):** `OFF`, `RUN` * **(13), (14), (15), (16):** `OFF`, `ON`, `PO` * **(17):** `HI`, `LO` * **(18):** `R`, `N`, `L` * **Color/Type Indicators:** * `(BLACK)` * `(BLUE)` * `(GREEN)` --- 7 - 25
Halaman 234
– + ELEC CHARGING SYSTEM THE BATTERY IS NOT CHARGED. Procedure Check; 1.Fuse 2.Battery 3.Charging voltage NOTE: G Remove the following parts before troubleshooting. 1)Side cover (right) 2)Seat 3)Fuel tank G Use the following special tools in this troubleshooting. Pocket tester: 90890-03112 1.Fuse G Connect the pocket tester (Ω × 1) to the fuse. G Check the fuse for continuity. CORRECT 2.Battery G Check the battery condition. G Check the battery fluid level, battery termi- nals and specific gravity. Refer to the “BATTERY INSPECTION” section in CHAPTER 3. Specific gravity: 1.280 at 20°C CORRECT * 7 - 26 4.Charging coil resistance 5.Wiring connection (charging system) Inductive tachometer: 90890-03113 NO CONTINUITY Replace fuse. INCORRECT G Refill battery fluid. G Clean battery terminals. G Recharge or replace battery.
Halaman 235
– + ELEC CHARGING SYSTEM * C0NTINUITY 3.Charging voltage G Connect the Indicative tachometer to the spark plug lead. G Connect the pocket tester (DC 20 V) to the battery. Tester (+) lead → Battery (+) terminal 1 Tester (–) lead → Battery (–) terminal 2 G Start the engine. G Measure the charging voltage. Charging voltage: 12 V or more at 3,000 r/min 14.5 V or less at 8,000 r/min OUT OF SPECIFICATION 4.Charging coil resistance G Disconnect the CDI magneto coupler from the wire harness. G Connect the pocket tester (Ω × 1) to the stator coil. Battery (+) lead → White 1 terminal Battery (–) lead → Black 2 terminal G Measure the charging coil resistance. Charging coil resistance: 0.32 ~ 0.48 Ω at 20°C (White - Black) MEETS SPECIFICATION 5.Wiring connection G Check the entire charging system for con- nections. Refer to the “WIRING DIAGRAM” section. CORRECT Replace rectifier/regulator. 7 - 27 MEETS SPECIFICATION Replace battery. OUT OF SPECIFICATION Replace stator assembly. POOR CONNECTION Correct.
Halaman 236
# LIGHTING SYSTEM ## CIRCUIT DIAGRAM # LIGHTING SYSTEM ELEC 3 CDI magneto 15 Lights switch 16 Pass switch 17 Dimmer switch 20 Tail/black light 23 Headlight 24 Auxiliary light 29 Meter light 30 High beam indicator light (BLACK) (BLACK) (11) (BLACK) (BLACK) (19) (10) BR/W BR (18) (17) HI LO ON OFF OFF ON (16) (15) (14) (13) OFF ON ON OFF (9) (9) (3) (4) W Y W R W G R V Br G Br B (7) OFF ON CHO (8) OFF RUN CHO BR/W Br L Y/R O G B (23) (23) (23) (24) (24) (30) (29) (1) LOCK OFF ON (2) (GREEN) W B R Y/R G R R W W W W R/W (37) LgY P/W Br Br (36) R R/W (35) (31) (34) (32) (BLUE) (BLUE) (28) (28) (28) (28) (28) (28) L L/W B O Br (27) (26) (25) (22) (GREEN) (GREEN) 7 - 28
Halaman 237
HEADLIGHT, HIGH BEAM INDICATOR LIGHT, TAILLIGHT AND/OR METER LIGHT DO NOT COME ON. Procedure Check; 1.Lighting coil resistance 2.Lights switch 3.Dimmer switch NOTE: G Remove the following parts before troubleshooting. 1)Side cover (right) 2)Headlight unit 3)Seat G Use the following special tool (s) in this troubleshooting. Pocket tester: 90890-03112 1.Lighting coil resistance G Disconnect the CDI magneto coupler from the wire harness. G Connect the pocket tester (Ω × 1) to the stator coil. Tester (+) lead → Yellow 1 terminal Tester (–) lead → Black 2 terminal G Measure the lighting coil resistance. Lighting coil resistance. 0.24 ~ 0.36 Ω at 20°C (Yellow - Black) MEETS SPECIFICATION 2.Lights switch G Check the lights switch for continuity. Refer to the “CHECKING THE SWITCHES” section. CORRECT * 7 - 29 – + ELEC LIGHTING SYSTEM 4.Pass switch 5.Wiring connection (entire lighting system) OUT OF SPECIFICATION Replace stator assembly. INCORRECT Lights switch is faulty, replace handlebar switch (right).
Halaman 238
* C0NTINUITY 3.Dimmer switch G Check the dimmer switch for continuity. Refer to the “CHECKING THE SWITCHES” section. CORRECT 4.Pass switch G Check the pass switch for continuity. Refer to the “CHECKING THE SWITCHES” section. CORRECT 5.Wiring connection G Check the entire lighting system for con- nections. Refer to the “WIRING DIAGRAM” section. CORRECT Check condition of each circuit for lighting system. Refer to the “LIGHTING SYSTEM CHECK” section. 7 - 30 – + ELEC LIGHTING SYSTEM INCORRECT Dimmer switch is faulty, replace handlebar switch (left). INCORRECT Pass switch is faulty, replace handlebar switch (left). POOR CONNECTION Correct.
Halaman 239
LIGHTING SYSTEM CHECK 1.Headlight and high beam indicator light do not come on. 1.Bulb and bulb socket G Check the bulb and bulb socket for continu- ity. Refer to the “CHECKING OF BULBS” sec- tion. CONTINUITY 2.Voltage G Connect the pocket tester (DC 20 V) to the headlight and high beam indicator light leads. Headlight: Tester (+) lead → Yellow 2 or Green 1 lead Tester (–) lead → Black 3 lead High beam indicator light: Tester (+) lead → Yellow 4 lead Tester (–) lead → Black 5 terminal È When dimmer switch is “LO” position. É When dimmer switch is “HI” position. G Start the engine. G Turn the lights switch to “ON”. G Turn the dimmer switch to “LO” or “HI” posi- tion. G Check for voltage (12 V) on the “Green” and “Yellow” lead at bulb socket connector. MEETS SPECIFI- CATION (12 V) This circuit is good. 7 - 31 – + ELEC LIGHTING SYSTEM NO CONTINUITY Bulb and/or bulb socket are faulty, replace. Headlight High beam indicator light OUT OF SPECIFICATION Wiring circuit from main switch to bulb socket connector is faulty, repair.
Halaman 240
2.Meter light does not come on. 1.Bulb and bulb socket G Check the bulb and bulb socket for continu- ity. Refer to the “CHECKING OF BULBS” sec- tion. CONTINUITY 2.Voltage G Connect the pocket tester (DC 20 V) to the bulb socket leads. Tester (+) lead → Blue 1 terminal Tester (–) lead → Black 2 terminal G Start the engine. G Turn the lights switch to “ON” or “PO”. G Check for voltage (12 V) on the “Blue” lead at the bulb socket connector. MEETS SPECIFI- CATION (12 V) This circuit is good. 7 - 32 – + ELEC LIGHTING SYSTEM NO CONTINUITY Bulb and/or bulb socket are faulty, replace. OUT OF SPECIFICATION Wiring circuit from main switch to bulb socket connector is faulty, repair.
Halaman 241
3.Taillight does not come on 1.Bulb and bulb socket G Check the bulb and bulb socket for continu- ity. Refer to the “CHECKING THE SWITCHES” section. CONTINUITY 2.Voltage G Connect the pocket tester (DC 20 V) to the bulb socket leads. Tester (+) lead → Blue 1 terminal Tester (–) lead → Black 2 terminal G Start the engine. G Turn the lights switch to “ON” or “PO”. G Check for voltage (12 V) on the “Blue” lead at the bulb socket connector. MEETS SPECIFI- CATION (12 V) This circuit is good. 7 - 33 – + ELEC LIGHTING SYSTEM NO CONTINUITY Bulb and/or bulb socket are faulty, replace. OUT OF SPECIFICATION Wiring circuit from main switch to bulb socket connector is faulty, repair.
Halaman 242
# SIGNALING SYSTEM ## CIRCUIT DIAGRAM # SIGNALING SYSTEM | ELEC [ - + ] --- ### Main Switch (1) | | | | | :--- | :---: | :---: | | **LOCK** | | | | **OFF** | | | | **ON** | ◯- -◯ | ◯- -◯ | --- ### Switch (7) | | | | | :--- | :---: | :---: | | **OFF** | | | | **ON** | ◯- -◯ | ◯- -◯ | --- ### Switch (8) | | | | | :--- | :---: | :---: | | **OFF** | | ◯- -◯ | | **RUN** | ◯- -◯ | | --- ### Switch (14) | | | | | :--- | :---: | :---: | | **OFF** | | | | **ON** | ◯- -◯ | ◯- -◯ | --- ### Switch (15) | | | | | | :--- | :---: | :---: | :---: | | **OFF** | | | | | **PO** | ◯- -◯ | | | | **ON** | ◯- -◯ | ◯- -◯ | ◯- -◯ | --- ### Switch (16) | | | | | :--- | :---: | :---: | | **OFF** | | | | **ON** | ◯- -◯ | ◯- -◯ | --- ### Switch (17) | | | | | :--- | :---: | :---: | | **HI** | ◯- -◯ | | | **LO** | | ◯- -◯ | --- ### Switch (18) | | | | | :--- | :---: | :---: | | **R** | ◯- -◯ | | | **N** | | | | **L** | | ◯- -◯ | --- ### Connector Layouts & Color Codes #### Component (2) * **(GREEN)** #### Component (11) * **(BLACK) | (BLACK)** #### Component (19) * **(BLACK) | (BLACK)** * **Left Block:** | P | B/W | Ch | | :---: | :---: | :---: | | L/Y | B | Br | | B/Y | Dg | L | * **Right Block:** | Ch | B/W | P | | :---: | :---: | :---: | | Y/R | B | L/Y | | L | Dg | B | #### Component (32) / (33) * **(BLUE) | (BLUE)** * **Left Block:** | Dg | | Dg | | :---: | :---: | :---: | | Ch | | Ch | * **Right Block:** | G | Sb | | | :---: | :---: | :---: | | B | | B | | Br | L | Br | #### Component (25) / (26) * **(GREEN) | (GREEN)** --- 7 - 34
Halaman 243
# SIGNALING SYSTEM | ELEC ① Main switch ⑨ Horn ⑩ Flasher relay ⑪ Front brake switch ⑫ Rear brake switch ⑭ Horn switch ⑱ Turn signal switch ⑳ Tail/brake light ㉑ Rear turn signal light ㉒ Front turn signal light ㉕ Neutral switch ㉖ Fuel sender ㉘ Fuel gauge ㉛ Neutral indicator light ㉜ Turn indicator light ㉞ Battery ㉟ Fuse *** 7 - 35
Halaman 244
– + ELEC SIGNALING SYSTEM G FLASHER LIGHT, BRAKE LIGHT AND/OR INDICATOR LIGHT DO NOT COME ON. G HORN DOES NOT SOUND. G FUEL GAUGE DOES NOT OPERATED. Procedure Check; 1.Fuse 2.Battery 3.Main switch 4.Wiring connection (entire signal system) NOTE: G Remove the following parts before troubleshooting. 1)Side cover (right) 2)Headlight unit 3)Seat 4)Fuel tank G Use the following special tool (s) in this troubleshooting Pocket tester: 90890-03112 1.Fuse G Remove the fuse. G Connect the pocket tester (Ω × 1) to the fuse. G Check the fuse for continuity. Refer to the “FUSE INSPECTION” section in CHAPTER 3. CONTINUITY 2.Battery G Check the battery condition. Refer to the “BATTERY INSPECTION” section in CHAPTER 3. Specific gravity: 1.280 at 20°C CORRECT * 7 - 36 NO CONTINUITY Fuse is faulty, replace it. INCORRECT G Refill battery fluid. G Clean battery terminals. G Recharge or replace battery.
Halaman 245
– + ELEC SIGNALING SYSTEM * C0NTINUITY 3.Main switch G Check the main switch for continuity. Refer to the “CHECKING THE SWITCHES” section. CORRECT 4.Wiring connection G Check the entire signal system for connec- tions. Refer to the “WIRING DIAGRAM” section. CORRECT Check condition of each circuit for signal sys- tem. Refer to the “SIGNAL SYSTEM CHECK” section. 7 - 37 INCORRECT Main switch is faulty, replace it. POOR CONNECTION Correct.
Halaman 246
– + ELEC SIGNALING SYSTEM SIGNAL SYSTEM CHECK 1.Horn does not sound. 1.Horn switch G Check the horn switch for continuity. Refer to the “CHECKING THE SWITCHES” section. CORRECT 2.Voltage G Connect the pocket tester (DC 20 V) to the horn lead. Tester (+) lead → Brown 1 lead Tester (–) lead → Frame ground G Turn the main switch to “ON”. G Check for voltage (12 V) on the “Brown” lead at the horn terminal. MEETS SPECIFI- CATION (12 V) * 7 - 38 INCORRECT Horn switch is faulty, replace handlebar switch (left). OUT OF SPECIFICATION Wiring circuit from main switch to horn termi- nal is faulty, repair.
Halaman 247
– + ELEC SIGNALING SYSTEM * C0NTINUITY 3.Horn G Disconnect the “Pink” lead at the horn ter- minal. G Connect a jumper lead 1 to the horn termi- nal and ground the jumper lead. G Turn the main switch to “ON”. HORN IS NOT SOUNDED 4.Voltage G Connect the pocket tester (DC 20 V) to the horn at the Pink terminal. Tester (+) lead → Pink 1 lead Tester (–) lead → Frame ground G Turn the main switch to “ON”. G Check for voltage (12 V) on the “Pink” lead at the horn terminal. MEETS SPECIFI- CATION (12 V) Adjust or replace horn. 7 - 39 HORN IS SOUNDED Horn is good. OUT OF SPECIFICATION Horn is faulty, replace it.
Halaman 248
– + ELEC SIGNALING SYSTEM 2.Brake light does not come on. 1.Bulb and bulb socket G Check the bulb and bulb socket for continu- ity. Refer to the “CHECKING OF BULBS” sec- tion. CONTINUITY 2.Brake switch G Check the brake switches for continuity. Refer to the “CHECKING THE SWITCHES” section. CORRECT 3.Voltage G Connect the pocket tester (DC 20 V) to the bulb socket connector. Tester (+) lead → Yellow 1 terminal Tester (–) lead → Black 2 terminal G Turn the main switch to “ON”. G The brake level is pulled in or brake pedal is stopped down. G Check for voltage (12 V) on the “Yellow” lead at the bulb socket connector. MEETS SPECIFI- CATION (12 V) This circuit is good. 7 - 40 NO CONTINUITY Bulb and/or bulb socket are faulty, replace. INCORRECT Brake switch is faulty, replace it. OUT OF SPECIFICATION Wiring circuit from main switch to bulb socket connector is faulty, repair.
Halaman 249
– + ELEC SIGNALING SYSTEM 3.Flasher light and/or turn indicator light do not blink. 1.Bulb and bulb socket G Check the bulb and bulb socket for continu- ity. Refer to the “CHECKING OF BULBS” sec- tion. CONTINUITY 2.Turn signal switch G Check the turn signal switch for continuity. Refer to the “CHECKING THE SWITCHES” section. CORRECT 3.Voltage G Connect the pocket tester (DC 20 V) to the flasher relay. Tester (+) lead → Brown 1 terminal Tester (–) lead → Frame ground G Turn the main switch to “ON”. G Check for voltage (12 V) on the “Brown” lead at the flasher relay terminal. MEETS SPECIFI- CATION (12 V) * 7 - 41 NO CONTINUITY Bulb and/or bulb socket are faulty, replace. INCORRECT Turn signal switch is faulty, replace handle- bar switch (left). OUT OF SPECIFICATION Wiring circuit from main switch to flasher relay connector is faulty, repair.
Halaman 250
– + ELEC SIGNALING SYSTEM * C0NTINUITY 4.Voltage G Connect the pocket tester (DC 20 V) to the flasher relay. Tester (+) lead → Brown/White 1 terminal Tester (–) lead → Frame ground G Turn the main switch to “ON”. G Check for voltage (12 V) on the “Brown/ White” lead at the flasher relay terminal. MEETS SPECIFI- CATION (12 V) 5.Voltage G Connect the pocket tester (DC 20 V) to the bulb socket connector. At flasher light (left): Tester (+) lead → Chocolate 1 lead Tester (–) lead → Frame ground At flasher light (right): Tester (+) lead → Dark green 2 lead Tester (–) lead → Frame ground G Turn the main switch to “ON”. G Turn the turn signal switch to “L” or “R”. G Check for voltage (12 V) on the “Chocolate” lead or “Dark green” lead at the bulb socket connector. MEETS SPECIFI- CATION (12 V) This circuit is good. 7 - 42 OUT OF SPECIFICATION Flasher relay is faulty, replace it. OUT OF SPECIFICATION Wiring circuit from turn signal switch to bulb socket connector is faulty, repair.
Halaman 251
– + ELEC SIGNALING SYSTEM 4.Natural indicator light does not come on. 1.Bulb and bulb socket G Check the bulb and bulb socket for continu- ity. Refer to the “CHECKING OF BULBS” sec- tion. CONTINUITY 2.Neutral switch G Check the neutral switch for continuity. Refer to the “CHECKING THE SWITCHES” section. CORRECT 3.Voltage G Connect the pocket tester (DC 20 V) to the bulb socket connector. Tester (+) lead → Brown 1 terminal Tester (–) lead → Frame ground G Turn the main switch to “ON”. G Check for voltage (12 V) on the “Brown” lead at bulb socket connector. MEETS SPECIFI- CATION (12 V) This circuit is good. 7 - 43 NO CONTINUITY Bulb and/or bulb socket are faulty, replace. INCORRECT Neutral switch is faulty, replace it. OUT OF SPECIFICATION Wiring circuit from main switch to bulb socket connector is faulty, repair.
Halaman 252
– + ELEC SIGNALING SYSTEM 5.Fuel meter does not operate. 1.Fuel sender G Remove the fuel sender 1 from the fuel tank. G Connect the pocket tester to the fuel sender coupler. Tester (+) lead → Green 2 terminal Tester (–) lead → Black 3 terminal G Check the fuel sender for the specified resistance. Fuel sender resistance (Up 4): (Ω × 1) 4 ~ 10 Ω at 20°C Fuel sender resistance (Down 5): (Ω × 10) 90 ~ 100 Ω at 20°C BOTH MEET SPECIFICATION 2.Voltage G Connect the pocket tester (DC 20 V) to the fuel meter coupler. Tester (+) lead → Brown 1 terminal Tester (–) lead → Black 2 terminal G Turn the main switch to “ON”. G Check for voltage (12 V) on the “Brown” lead at the fuel meter coupler. MEETS SPECIFI- CATION (12 V) * 7 - 44 OUT OF SPECIFICATION Replace fuel sender. OUT OF SPECIFICATION Check the entire signal system for connec- tions.
Halaman 253
– + ELEC SIGNALING SYSTEM * C0NTINUITY 3.Fuel meter G Move the float to “UP 1” or “DOWN 2”. G Turn the main switch to “ON”. G Check the fuel meter needle moves “FULL” or “EMPTY”. MOVES 4.Wiring connection G Check the entire signal system for connec- tion. Refer to the “WIRING DIAGRAM” section. 7 - 45 NOTE: Before reading the meter, stay put the float for more than three minutes respectively at “UP” or “DOWN”. DOES NOT MOVE Replace fuel meter.
Halaman 254
TRBL SHTG CHAPTER 8. .................................................................................. 8-1 ELECTRICAL SYSTEM ........................................................................ 8-1 COMPRESSION SYSTEM .................................................................... 8-2 INTAKE AND EXHAUST SYSTEM ....................................................... 8-3
Halaman 255
| TRBL <br> SHTG | ? | | :--- | :---: |
Halaman 256
8 - 1 TRBL SHTG TROUBLESHOOTING TROUBLESHOOTING TROUBLESHOOTING ELECTRICAL SYSTEM
Halaman 257
TROUBLESHOOTING TRBL SHTG ? COMPRESSION SYSTEM INSUFFICIENT TIGHTNING TORQUE INSUFFICIENT TIGHTNING TORQUE WEAR/SCRATCH DAMEGE DAMEGE WEAR/CARBON DEPOSITS WEAR/STICK/BROKEN WEAR/SCRATCH/DAMEGE 8 - 2
Halaman 258
8 - 3 TRBL SHTG TROUBLESHOOTING INTAKE AND EXHAUST SYSTEM
Halaman 259
SX-4 WIRING DIAGRAM 1. Main switch 2. Rectifier/regulator 3. CDI magneto 4. CDI unit 5. Ignition coil 6. Spark plug 7. Start switch 8. Engine stop switch 9. Horn 10. Flasher relay 11. Front brake switch 12. Rear brake switch 13. Handlebar switch (left) 14. Horn switch 15. Lights switch 16. Pass switch 17. Dimmer switch 18. Turn signal switch 19. Clutch switch 20. Tail/brake light 21. Rear flasher light 22. Front flasher light 23. Headlight 24. Auxiliary light 25. Neutral switch 26. Fuel sender 27. Fuel gauge 28. Meter 29. Meter light 30. High beam indicator light 31. Neutral indicator light 32. Turn indicator light 33. Starter motor 34. Battery 35. Fuse 36. Starter relay 37. Starting circuit cut-off relay **COLOR CODE** B ..........Black Br .........Brown G ..........Green L ..........Blue O ..........Orange P ..........Pink R ..........Red Sb .........Sky blue W ..........White Y ..........Yellow B/W .......Black/White B/Y .......Black/Yellow Br/W ......Brown/White Ch ........Chocolate Dg ........Dark green G/Y .......Green/Yellow L/W .......Blue/White L/Y .......Blue/Yellow R/W .......Red/White Y/R .......Yellow/Red **Diagram Labels:** (GREEN) (BLACK) (BLUE) * **Main switch (1):** LOCK, OFF, ON * **Start switch (7):** OFF, ON * **Engine stop switch (8):** OFF, RUN * **Handlebar switch (left) (13):** OFF, ON * **Lights switch (15):** OFF, PO, ON * **Pass switch (16):** OFF, ON * **Dimmer switch (17):** HI, LO * **Turn signal switch (18):** R, N, L
Halaman 260
YAMAHA MOTOR CO., LTD. 2500 SHINGAI IWATA SHIZUOKA JAPAN
Halaman 261
Scorpio (new) SUPPLEMENTARY SERVICE MANUAL 5BP-F8197-B1
Halaman 262
PENDAHULUAN Buku Service Manual tambahan ini, dibuat untuk melengkapi Service Manual Scorpio yang sudah ada. Untuk mendapatkan petunjuk cara-cara perbaikan Sepeda Motor Scorpio dengan sempurna, sebaiknya buku ini dipadu dengan Buku Service Manual dibawah ini : SERVICE MANUAL SCORPIO : 5BP-F8197-B0 EAS00000 SERVICE MANUAL TAMBAHAN SCORPIO ©2006 oleh Yamaha Motor Co., Ltd. Cetakan pertama, Maret, 2006 dilarang memperbanyak tanpa seijin PT Yamaha Indonesia Motor Manufacturing dialih bahasakan oleh Technical Publication PT Yamaha Indonesia Motor Manufacturing di cetak di Indonesia
Halaman 263
EAS00002 KATA PENGANTAR Buku ini dibuat oleh Yamaha Motor Company, Ltd. dan dialih bahasakan oleh, Technical Publication Service Division PT Yamaha Indonesia Motor Manufacturing. diharapkan bisa dipakai oleh Mekanik Bengkel Resmi Yamaha. Kami menyadari bahwa tidak mungkin menjelaskan seluruh pelajaran teknik perbaikan sepeda motor dalam satu buku saja. sehingga kami menyarankan kepada para mekanik harus terlebih dahulu menguasai dasar-dasar perawatan sepeda motor Yamaha dengan mengikuti training-training reguler yang diadakan oleh Yamaha. tanpa pengetahuan ini, usaha perbaikan akan kurang sempurna. Yamaha Motor Indonesia akan terus menerus berusaha meningkatkan mutu produksinya, untuk itu jika ada perubahan yang mendasar, dalam spesifikasi dan prosedur pengerjaan, kami akan sampaikan keseluruh jaringan Yamaha melalui buletin "Service Information" CATATAN Bentuk dan spesifikasi, sewaktu-waktu dapat berubah mengikuti perkembangan model EAS00004 INFORMASI PENTING YANG ADA DIDALAM BUKU PETUNJUK INI : Informasi penting secara khusus ditandai dengan tanda-tanda sebagai berikut : Q Simbol ini, mengharuskan anda BERHATI-HATI MENYANGKUT KESELAMATAN ANDA. w memberikan petunjuk khusus, yang harus diikuti untuk menghindari kecelakaan bagi pengendara dan orang lain yang sedang memperbaiki sepeda motor. cPERHATIAN Perlu perhatian khusus, yang harus diikuti untuk menghindari kerusakan pada sepeda motor. CATATAN: Memberikan keterangan tambahan, untuk mempermudah pengerjaan.
Halaman 264
EASF0007 TEKNIK MEMBACA CEPAT BUKU PETUNJUK SUSNAN BUKU PETUNJUK Buku ini terdiri dari beberapa BAB utama yang didalamnya terdapat beberapa judul (lihat "simbol") Judul pertama 1 BAB yang disertai simbol, terletak disudut kanan atas, pada setiap halaman. Judul kedua 2 Judul ini adalah judul bagian BAB yang terletak hanya pada halaman pertama dari tiap-tiap bagian, judul ini terletak disudut kiri atas halaman. Judul ketiga 3 Judul ini adalah judul yang lebih spesifik FORMAT BUKU Semua prosedur dalam buku ini dikemas dalam rangkaian tahap demi tahap, sehingga petunjuk-petunjuk yang ada secara lengkap dapat diterima dengan mudah oleh para mekanik. Petunjuk yang ada meliputi berbagai hal, antara lain tentang cara membongkar, memperbaiki, dan pemeriksaan, jika ada prosedur yang penting, dan perlu perhatian khusus 4kami tambahkan gambar “L” (segi tiga hitam) dengan tanda seru didalamnya “ ! ”. INFORMASI PENTING 8Data spesifikasi dan special tool, diinformasikan dalam frame dengan gambar alat 5 . 8Angka didalam lingkaran 6 menunjukkan nama komponen dan penjelasan yang melengkapi gambar 7, ada kalanya kita gunakan huruf didalam segi empat/box 8 . 8Untuk menjelaskan tindakan lebih lanjut, kita gunakan tanda panah. sebagai contoh, tindakan lebih lanjut jika diluar spesifikasi dengan simbol panah --> 9 . DIAGRAM Semua BAB, dilengkapi dengan gambaran sebelum dibongkar, hal ini untuk mempermudah prosedur yang benar cara memasang dan membongkar.
Halaman 265
1 2 GEN INFO SPEC 3 4 CHK ADJ ENG 5 6 CARB CHAS 7 8 ELEC TRBL SHTG 9 0 q w e r t y u i o p a s d f LT New SIMBOL Simbol disamping ini, tidak selalu berhubungan dengan setiap sepeda motor. Simbol 1 hingga 8 menggambarkan isi setiap BAB. 1 Informasi umum 2 Spesifikasi 3 Perawatan berkala dan penyetelan 4 Mesin 5 Karburator 6 Rangka/Chassis 7 Sistim kelistrikan 8 Mengatasi masalah/Troubleshooting Simbol 9 hingga y menjelaskan sebagai berikut : 9 Perbaikan dengan mesin terpasang 0 Menambah cairan q Pelumasan w Alat spesial/special tool e Torsi pengencangan r Batas keausan/kelonggaran t Putaran mesin y Data kelistrikan Simbol uhingga spada gambar diagram menun- jukkan tipe pelumas dan bagian yang perlu dilu- masi. u Oli mesin i Oli gear o Oli Molybdenum-disulfide p Gemuk bearing roda/wheel-bearing grease a Gemuk Lithium-soap-based s Gemuk Molybdenum-disulfide Simbol dhingga fpada gambar diagram menun- jukkan perintah sebagai berikut : d Berikan cairan pengunci (LOCTITE®) f Ganti dengan spare part baru
Halaman 266
DAFTAR ISI SPESIFIKASI SPESIFIKASI UMUM ……………………………….................……………… 1 SPESIFIKASI PERAWATAN …………………………….............………… 2 MESIN ……………………………………………………….....…………… 2 TORSI PENGENCANGAN/TIGHTENING TORQUE…............………2 RANGKA/CHASSIS ……………...…………………………….………… 3 JALUR KABEL ....……………………...……………………………………… 4 PERAWATAN BERKALA DAN PENYETELAN MESIN .....………………………………………………………………………8 MEMERIKSA SISTIM PEMBUANGAN .………………………………… 8 MEMBONGKAR MESIN KEPALA CYLINDER / CYLINDER HEAD ………........…………………… 9 KARBURATOR AIR INDUCTION SYSTEM ………………………………………………… 10 AIR INJECTION…………………………………………………………… 10 AIR CUT-OFF VALVE …………………………………………………… 10 RANGKA/CHASSIS KEMUDI/STEERING HEAD DAN TANGKAI KEMUDI ……….………… 12 TANGKAI KEMUDI……………………………………..…………………12 SHOCK ABSORBER BELAKANG DAN LENGAN AYUN ………………13 MEMERIKSA RANTAI ……………..................…………………………13 KELISTRIKAN / ELECTRICAL SISTIM PENERANGAN ………………………………….…………………15 RANGKAIAN DIAGRAM …………………………………...…………… 15 MEMERIKSA SISTIM PENERANGAN ………………………………… 18 SISTIM SINYAL ………………………………………..........………………21 RANGKAIAN DIAGRAM …………………………………………………21 MEMERIKSA SISTIM SINYAL …………………………………………25 DIAGRAM KELISTRIKAN SCORPIO
Halaman 267
SPESIFIKASI UMUM SPESIFIKASI SPESIFIKASI UMUM Model SCORPIO Kode Model : 5BP4 Berat : Dengan Oli dan bensin penuh 136 kg (300 lb) Busi / Spark plug: Tipe / Pabrik pembuat D8EA - 9/NGK Kerenggangan 0.8 – 0.9 mm (0.0315 – 0.0354 in) Tekanan angin ban (kondisi dingin) Berat: Dengan oli dan bensin penuh 136 kg (300 lb) Beban maksimum * 180 kg (396 lb) *Berat total: barang bawaan, pengendara, penumpang dan aksesoris –1– SPEC
Halaman 268
SPEC SPESIFIKASI PERAWATAN SPESIFIKASI PERAWATAN MESIN Model Scorpio Karburator : I.D. mark 5BP4 00 Main jet (M.J.) #110 Main air jet (M.A.J.) #120 Jet needle (J.N.) 4EL10-2 Needle jet (N.J.) O-2M Pilot jet (P.J.) #17.5 Pilot air jet (P.A.J. #1) #90 (P.A.J. #2) 0.9 Setelan Pilot scre (P.S.) 3 putaran keluar Pilot outlet (P.O.) Ø0.8 Bypass (B.P.1) Ø0.9 (B.P.2) Ø0.8 (B.P.3) Ø0.8 Valve seat size (V.S.) Ø2.0 Starter jet (G.S.1) #25 (G.S.2) 0.7 Ketinggian bahan bakar 3,8 – 5,8 mm (0.15 – 0.23 in) dibawah sambungan rumah pelampung Putaran langsam mesin 1.350 – 1.450 r/min TORSI PENGENCANGAN BAUT/TIGHTENING TORQUE komponen yang dikencangkan nama ukuran ulir Q’ty Torsi pengencangan Keterangan Nm m·kg ft·lb Pipa Air induction system Baut M6 2 10 1.0 7.2 Unit Air cut-off valve Baut M6 2 10 1.0 7.2 –2–
Halaman 269
SPEC SPESIFIKASI PERAWATAN RANGKA/CHASSIS Keterangan Scorpio Tromol rem belakang : Tipe Leading dan trailing Diameter dalam tromol 130 mm (5.12 in) <Limit> <131 mm (5.16 in)> Ketebalan kampas rem 4 mm (0.16 in) <Limit> <1 mm (0.04 in)> Panjang per kampas rem Per 1 52 mm (2.05 in) Per 2 48 mm (1.89 in) –3–
Halaman 270
JALUR KABEL 1 Kabel Tachometer 2 Selang rem 3 Holder selang rem 4 Kabel bodi 5 Selang pernafasan 6 Kabel motor starter 7 Kabel negative Battery 8 Kabel positive Battery 9 Kabel switch rem belakang 0 Kabel sinyal belok belakang (sebelah kanan) q Kabel Fuel sender w Selang pernafasan e Selang pernafasan r Kabel gas/Throttle cable t Kabel kopling y Kabel magnet u Kabel switch netral i Kabel bodi o Kabel sinyal belok belakang (sebelah kiri) p Battery a Kabel kuning s Kabel biru ˚ ¬ µ o ˜ B B ˆ ∆ 0 ø 0 o a π C œ s d q w e ∂ ´ ƒ i D 0 E E 8 9 7 ç 6 8 f ® p –4– SPEC JALUR KABEL d Kabel hitam f Karet pengikat Battery å Klem kabel bodi ∫Masukkan kabel tachometer kedalam guide. ç Tempatkan terminal dibelakang bodi mesin ∂ikat kabel bodi dengan plastik pengikat. ´ Ikat kabel bodi pada bagian isolasi putih y u ˙ r t © å A 1 A 2 4 ∫ 3 ¨ 5 ß †
Halaman 271
ƒ ke tangki bensin © Ikat kabel gas dan kabel kopling dan jangan sampai kabel ko0ling menyentuh selang pernafasan mesin pada saat tangkai kemudi dibelokkan ke kiri. arahkan ujung klem menghadap ke atas ˙ Ikat kabel gas dan kabel kopling ˆ Masukkan selang pernafasan mesin kedalam rangka ∆Ikat kabel bodi dan dan arahkan ujung klem mengha- dap kedalam . ˚ Ikat kabel magnet dan kabel switch netral dan tekan kabel kearah dalam dari holder. ¬ Masukkan kabel sein kedalam lubang yang terdapat pada fender belakang sebelah kanan ˚ ¬ µ o ˜ B B ˆ ∆ 0 ø 0 o a π C œ s d q w e ∂ ´ ƒ i D 0 E E 8 9 7 ç 6 8 f ® p –5– SPEC JALUR KABEL µ Masukkan kabel lampu sinyal kedalam special washer (kanan dan kiri). ˜ Arahkan ke arah depan ø Bungkus kabel seperti pada gambar π Jangan mengikat pada kabel telanjang . œ Jangan mengikat pada kabel yang telanjang ® Jepit kabel positive Battery pada pengikat karet Battery ß Ke motor starter † Ke battery ¨ 30°±10° y u ˙ r t © å A 1 A 2 4 ∫ 3 ¨ 5 ß †
Halaman 272
1 Kabel kopling 2 Selang Air induction 3 Selang Vacuum sensing 4 Selang pernafasan 5 Kabel switch netral 6 Kabel Magneto 7 Selang pernafasan Battery 8 selang over flow karburator 9 Kabel speedometer 0 Kabel bodi q kabel Magneto w Selang Bend å Clamp selang pernafasan Battery, dan selang karburator over flow ∫Tepatkan kabel speedometer kedalam holder. ç Clamp kabel magneto dan kabel switch netral w ´ 7 1 8 0 9 ∫ –6– SPEC JALUR KABEL ∂Clamp kabel switch netral, terlebih dahulu dan selanjutnya clamp kabel magneto. ´ Clamp selang pernafasan Battery ∂ 5 5 q ç q 4 ∂ q 5 B ∂ B C C 2 3 4 A 5 6 7 8 å
Halaman 273
1 kabel saklar tangkai kemudi 2 kabel kopling 3 Kabel sinyal belok (kiri) 4 Kabel speedometer 5 Kabel bodi 6 Kabel Tachometer 7 Kabel sinyal belok (kanan) 8 Kabel gas 9 Selang rem 0 Kabel saklar rem depan q Kabel saklar tangkai kemudi w Kabel kunci kontak e Kabel meter å Clamp kabel saklar tangkai kemudi ∫Tepatkan klem kabel kopling ke- arah dalam baut pengunci handel crown. ç Masukkan kabel kopling kedalam guide penuntun. ∂Masukkan kabel bodi kedalam guide penuntun. ´ Clamp selang rem. ƒ Masukkan selang rem, kabel gas kedalam guide penuntun © Tepatkan kabel gas diluar baut pengunci handle crown. ˙ Clamp kabel saklar tangkai kemudi dan kabel switch rem e 8 w 1 q 9 0 ∆ 7 6 ˚ ˚ A q q w e ˆ 0 A B ˙ 9 © 8 ƒ 7 6 ∂ ´ –7– SPEC JALUR KABEL ˆ Kabel main switch jangan tertarik dan tepatkan dengan kabel meter ∆Clamp selang rem dan kabel gas. ˚ Ke head lamp ¬ Clamp kabel kopling µ Clamp kabel bodi, kabel lampu sein, kabel switch rem depan kabel saklar tangkai kemudi dan kabel kunci kontak di bagian pelindung. ˜ Clamp kabel bodi, kabel sinyal belok,, saklar tangkai kemudi kabel lampu meter, pada posisi isolasi putih. ¬ 2 3 4 e å w 1 3 1 0 ∫ 7 2 ç 3 4 µ ˜ 5
Halaman 274
CHK ADJ MEMERIKSA SISTIM PEMBUANGAN 2 7 4 7 5 3 6 4 1 –8– PEMERIKSAAN BERKALA DAN PENYETELAN. MESIN MEMERIKSA SISTIM PEMBUANGAN 1. Periksa: 9 Pipa Exhaust 1 9 Knalpot/Muffler 2 Retal/rusak/bocor →perbaiki 9 Joint pipa pembuangan 3 9 Gasket 4 Rusak/bocor →perbaiki 2. Kencangkan : 9 Pipa Muffler dan exhaust Mur (pipa pembuangan) 5: 18 Nm (1.8 m·kg, 13 ft·lb) Baut (joint pipa exhaust ) 6: 20 Nm (2.0 m·kg, 15 ft·lb) Baut (muffler) 7: 30 Nm (3.0 m·kg, 22 ft·lb)
Halaman 275
# CYLINDER HEAD ## MEMBONGKAR MESIN CYLINDER HEAD ENG | Column 1 | Column 2 | Column 3 | | :------------------------- | :------------------------ | :----------------------------------------- | | 1. O-ring | 7. Gasket | 13. Timing chain guide (sisi exhaust side) | | 2. Tappet cover | 8. Camshaft sprocket | 14. Gasket | | 3. O-ring | 9. Gasket | 15. Air induction system pipe | | 4. Camshaft sprocket cover | 10. Dowel pin | 16. O-ring | | 5. Plate | 11. Cylinder head | | | 6. Cam chain tensioner | 12. Busi/Spark plug | | ### Torque Specifications and New Parts * 20 Nm (2.0 m·kg, 15 ft·lb) * 8 Nm (0.8 m·kg, 6.0 ft·lb) * 22 Nm (2.2 m·kg, 16 ft·lb) * 10 Nm (1.0 m·kg, 7.2 ft·lb) * **New** (for Cam chain tensioner, item 6) * 18 Nm (1.8 m·kg, 13 ft·lb) * 60 Nm (6.0 m·kg, 44.3 ft·lb) * **New** (for Gasket, item 9) * 7 Nm (7.0 m·kg, 5.0 ft·lb) * **New** (for Gasket, item 14) * 18 Nm (1.8 m·kg, 13 ft·lb) * 10 Nm (1.0 m·kg, 7.2 ft·lb) --- -9-
Halaman 276
CARB AIR INDUCTION SYSTEM ç ∫ å Dari saringan udara/air filter ∫ke cylinder head ç ke manifold pemasukan å –10– KARBURATOR AIR INDUCTION SYSTEM AIR INJECTION Air Induction System (AIS) berfungsi menetra- lisir bahan bakar yang tidak terbakar, dengan cara menginjeksi udara segar, ke lubang pembu- angan. bertujuan untuk mengurangi kerapatan kadar emisi hydrocarbon. Jika tekanan negative timbul pada lubang pembuangan, reed valve terbuka, sehingga udara segar akan mengalir ke lubang pembuangan. Suhu untuk membakar gas buang diperlukan 600 to 700 °C. AIR CUT-OFF VALVE Air cutoff valve bekerja karena tekanan gas pemasukan. melalui diaphragma piston valve. Dalam kondisi normal, Air Cut Valve terbuka, sehingga udara mengalir ke lubang pembua- ngan (åke ∫). Pada saat deceleration (kondisi handel gas tiba-tiba tertutup), terjadi hisapan (negative presure) (ç) sehingga Air Cut Off Valve tertutup, untuk mencegah tekanan balik, atau after burning. Untuk itu, jika kecepatan tinggi, dan tekanan ber- kurang, Air Cut-Off Valve otomatis tertutup untuk menghindari tekanan balik dan hilangnya tenaga.
Halaman 277
# AIR INDUCTION SYSTEM CARB ① Pipa Air induction system ② Gasket ③ Selang Air induction system (unit air cut-off valve ke cylinder head) ④ Selang vacuum Air induction system ⑤ Unit Air cut-off valve ⑥ Selang Air induction system (unti air cut-off valve ke rumah saringan udara)  *Note: The image itself is a diagram with numbered parts corresponding to the list above.* **Torque Specifications:** 10 Nm (1.0 m·kg, 7.2 ft·lb) 10 Nm (1.0 m·kg, 7.2 ft·lb) **Labels:** New -11-
Halaman 278
KEMUDI DAN TANGKAI KEMUDI RANGKA/CHASSIS KEMUDI DAN TANGKAI KEMUDI TANGKAI KEMUDI 1 Holder tangkai kemudi 2 Baut cap 3 Washer pengunci 4 Mur ring atas 5 Washer karet 19 Nm (1.9 m¥kg, 14 ft¥lb ) 23 Nm (2.3 m¥kg, 17 ft¥lb ) 1st: 48 Nm (4.8 m¥kg, 35.4 ft¥lb ) 2nd: 18Nm (1.8 m¥kg, 13.3 ft¥lb ) 7 Nm (0.7 m¥kg, 5.2 ft¥lb ) LS 9 0 7 Nm (0.7 m¥kg, 5.2 ft¥lb ) q –12– CHAS 6 Mur ring bawah 7 Penutup ball race 8 Bearing 9 Bearing 0 Bearing race q Bracket bawah 110 Nm (11.0 m¥kg, 81.1 ft¥lb ) 2 1 3 4 5 6 7 8 LS
Halaman 279
SHOCK ABSORBER BELAKANG DAN LENGAN AYUN 1 2 3 4 5 6 7 8 9 0 q w e r t y a b 1 2 3 4 5 6 7 8 9 0 q w e r t y c –13– CHAS SHOCK ABSORBER BELAKANG DAN LENGAN AYUN EAS00710 MEMERIKSA RANTAI PENGGERAK 1. Ukur : 9 Ukur panjang rantai 15 mata pada bagian dalam adan sisi luar bdari pin, dan ju- mlahkan panjang keduanya. 9 Panjang cdiantara titik tengah pin = (panjang bagian dalam a + panjang bagian luar b)/2 9 Ukur 15-mata c dari rantai 9 Diluar spesifikasi →ganti rantai penggerak gear sprocket depan dan belakang satu set Panjang 15-mata rantai (maximum) 191.5 mm (7.54 in) CATATAN 9Pada saat mengukur 15 mata rantai tekan rantai kedalam untuk menghindari gaya tarik. 9Lakukan pengukuran pada dua tempat yang berbeda. 2. Periksa: 9 Rantai penggerak/Drive chain kaku →bersihkan dan lumasi.
Halaman 280
SHOCK ABSORBER BELAKANG DAN LENGAN AYUN 1 3 1 2 –14– CHAS 3. Pembersihan: 9 Rantai penggerak / Drive chain a. Bersihkan rantai dengan kain pembersih b. Rendam rantai dalam minyak tanah, dan ber- sihkan kotoran dari rantai. c. Setelah bersih, keringkan rantai dari minyak- tanah dengan sempurna. cPERHATIAN Rantai sepeda motor ini menggunakan "O" ring dari karet 1 yang terpasang diantara kedua plat. Jangan menggunakan udara ber- tekanan, bensin, dan larutan pembersih (a.l., bensin), dan jangan membersihkan rantai dengan sikat. Tekanan udara yang tinggi dan kandungan air akan merusak- kan rantai pada bagian dalam, dan cairan pembersih akan merusak O-rings. begitu juga ujung sikat akan merusakkan O-rings. Untuk itu hanya minyak tanah yang diijinkan jangan merendam dalam minyak tanah lebih dari 10 menit. hal ini akan merusakkan "O" ring pada rantai. 4. Periksa: 9 O-rings 1 Rusak →Ganti rantai penggerak 9 Roller rantai 2 Rusak/Aus →Ganti rantai 9 Plat rantai 3 Retak/Aus/karat →Ganti rantai penggerak 5. Lumasi : 9 Rantai penggerak Pelumas rantai yang dianjurkan Oli mesin atau pelumas rantai khusus untuk rantai dengan O-ring 6. Periksa: 9 Sprocket penggerak 9 Sprocket yang digerakkan Aus lebih dari 1/2 gigi a →Ganti rantai dan sprocket gear satu set Gigi bengkok →Ganti rantai dan Sprocket- gear satu set. b Kondisi normal 1 Rller rantai 2 Sprocket gear
Halaman 281
SISTIM PENERANGAN ELEC KELISTRIKAN SISTIM PENERANGAN DIAGRAM KELISTRIKAN (3) CDI magneto (15) Saklar lampu (16) Switch pass (17) Saklar dimmer (19) Lampu belakang/rem (20) Lampu depan (23) Lampu senja/posisi (24) Lampu meter (30) Lampu tanda lampu jauh (1) LOCK OFF ON (2) (GREEN) (3) (4) (7) OFF ON (8) OFF RUN ON (9) (10) (11) (BLACK) (13) (14) OFF ON (15) OFF PO ON (16) OFF ON (17) HI LO (18) R N L (19) (BLACK) (20) (21) (22) (BLUE) (23) (24) (25) (GREEN) (26) (GREEN) (27) (28) (29) (30) (31) (32) (33) (34) (35) (36) (37) -15-
Halaman 282
SISTIM PENERANGAN CARA MENGATASI MASALAH/ LAMPU DEPAN, LAMPU INDIKATOR LAMPU JAUH, LAMPU BELAKANG/LAMPU METER TIDAK MENYALA Prosedur : Periksa; 1. Tahanan Lighting coil 4. Saklar Pass 2. Saklar lampu 5. Sambungan kabel (pada sistim penerangan) 3. Saklar dimmer CATATAN: 9Buka komponen dibawah ini, sebelum melakukan perbaikan 1) Penutup samping (kanan) 2) Lampu depan 3) Tempat duduk 9Pergunakan alat spesial tool ini untuk perbaikan Pocket tester: 90890-03112 1.Tahanan Lighting coil 9Lepaskan coupler CDI magneto dari kabel bodi 9Pasangkan pocket tester (Ω×1) pada stator coil Kabel Tester (+) → terminal kuning 1 Kabel Tester (–) → terminal hitam 2 9ukur tahanan lighting coil Tahanan Lighting coil 0,24 ~ 0,36 Ω pada 20°C (68°F) (Kuning - Hitam) SESUAI SPESIFIKASI 2.saklar lampu 9Periksa sistim penyambungan saklar lampu lihat bagian “PEMERIKSAAN SAKLAR/ SWITCH” BAGUS * –16– ELEC 1 2 DILUAR SPESIFIKASI Ganti unit stator TIDAK BAGUS saklar lampu rusak --> ganti atau perbaiki saklar lampu (kanan).
Halaman 283
SISTIM PENERANGAN * 3.Saklar Dimmer 9Periksa sistim penyambungan saklar - dimmer. lihat bagian “PEMERIKSAAN SAKLAR/SWITCH. BAGUS 4.Saklar Pass 9Periksa sistim penyambungan saklar Pass lihat bagian “PEMERIKSAAN SAKLAR/ SWITCH". BAGUS 5.Sistim penyambungan kabel 9Periksa sistim penyambungan kabel pada sistim penerangan. Lihat bagian "DIAGRAM KELISTRIKAN" BAGUS Periksa kondisi kabel-kabel pada sistim penerangan lihat bagian “PEMERIKSAAN SISTIM PENERANGAN" –17– ELEC TIDAK BAGUS Saklar Dimmer rusak --> perbaiki, atau ganti saklar kemudi (sebelah kiri). TIDAK BAGUS Saklar Pass rusak -->perbaiki , atau ganti saklar kemudi (sebelah kiri) SAMBUNGAN BERMASALAH Perbaiki
Halaman 284
SISTIM PENERANGAN PEMERIKSAAN SISTIM PENERANGAN 1.lampu depan dan lampu indikator lampu jauh tidak menyala 1.Bohlam dan socket bohlam 9Periksa kondisi bohlam dan penyambu- ngan socket lihat bagian "PEMERIKSAAN BOHLAM" ADA PENYAMBUNGAN 2.Voltase 9Pasangkan pocket tester (DC 20 V) pada lampu depan dan kabel lampu indikator lampu jauh. Lampu depan : Kabel Tester (+) → Kabel Kuning 2 atau Hijau 1 Kabel Tester (–) → Kabel hitam 3 Lampu indikator lampu jauh : Kabel Tester (+) → Kabel kuning 4 Kabel Tester (–) → kabel hitam 5 A Jika posisi saklar dimmer “LO” B Jika posisi saklar dimmer “HI” 9Hidupkan mesin 9geser saklar lampu pada posisi “ON”. 9Geser saklar dimmer pada posisi “LO” atau posisi "HI" 9Periksa voltase (12 V) pada kabel "hijau" atau kabel kuning pada socket connector. SESUAI SPESIFIKASI (12V) rangkaian kabel dari kunci kontak ke socket bohlam rusak, perbaiki. rangkaian kabel OK –18– ELEC TIDAK ADA HUBUNGAN Ganti Bohlam/Socket Bohlam yang rusak Lampu depan lampu Indikator lampu jauh DILUAR SPESIFIKASI
Halaman 285
SISTIM PENERANGAN 2.Lampu meter tidak meyala 1.Bohlam dan socket bohlam 9periksa kondisi bohlam dan socket bohlam lihat bagian "PEMERIKSAAN BOHLAM" TERSAMBUNG 2.Voltase 9Pasangkan pocket tester (DC 20 V) pada kabel socket bohlam. Kabel Tester (+) → terminal biru 1 Kabel Tester (–) → terminal hitam 2 9Hidupkan mesin 9Geser saklar lampu ke posisi “ON” atau “PO”. 9Periksa voltase (12 V) pada kabel "biru" pada connector socket SESUAI SPESIFIKASI (12V) rangkaian dalam kondisi baik –19– ELEC TIDAK TERSAMBUNG Bohlam /Socket bohlam rusak, perbaiki/ganti TIDAK TERSAMBUNG Rangkaian kabel dari kunci kontak ke connector rusak, perbaiki
Halaman 286
ELEC SISTIM PENERANGAN 3.lampu belakang tidak menyala 1.Bohlam dan socket bohlam 9Periksa kondisi bohlam dan socket bohlam lihat bagian “PEMERIKSAAN SAKLAR" ADA HUBUNGAN 2.Voltase 9Pasangkan pocket tester (DC 20 V) pada kabel socket bohlam Kabel Tester (+) → terminal biru 1 Kabel Tester (–) → terminal hitam 2 1 L Y B 2 9Hidupkan mesin 9Geser saklar lampu ke posisi “ON” atau “PO”. 9Periksa voltase (12 V) pada kabel biru yang terdapat pada socket SESUAI SPESIFIKASI (12V) Rangkaian kabel dalam kodisi baik –20– TIDAK TERSAMBUNG Bohlam dan socket bohlam rusak, perbaiki TIDAK SESUAI Rangkaian kabel dari kunci kontak ke socket bohlam rusak, perbaiki.
Halaman 287
# SISTIM SINYAL ## DIAGRAM KELISTRIKAN --- ### SISTIM SINYAL | ELEC [ $\pm$ ] --- #### 1. Tabel Kontak Utama (Main Switch) | | R | Br | Br/W | B/W | | :--- | :---: | :---: | :---: | :---: | | **LOCK** | | | | | | **OFF** | | | | | | **ON** | ◯ | ◯ | ◯ | ◯ | --- #### 2. Tabel Saklar / Tombol Kelistrikan ##### Saklar (7) | | | | | :--- | :---: | :---: | | **OFF** | | | | **ON** | ◯ | ◯ | ##### Saklar (8) | | | | | :--- | :---: | :---: | | **OFF** | ◯ | ◯ | | **RUN** | ◯ | ◯ | ##### Saklar (14) | | | | | :--- | :---: | :---: | | **OFF** | | | | **ON** | ◯ | ◯ | ##### Saklar (15) | | | | | | | :--- | :---: | :---: | :---: | :---: | | **OFF** | | | | | | **PO** | ◯ | ◯ | | | | **ON** | ◯ | ◯ | ◯ | ◯ | ##### Saklar (16) | | | | | :--- | :---: | :---: | | **OFF** | | | | **ON** | ◯ | ◯ | ##### Saklar (17) | | | | | :--- | :---: | :---: | | **HI** | ◯ | ◯ | | **LO** | ◯ | ◯ | ##### Saklar (18) | | | | | :--- | :---: | :---: | | **R** | ◯ | ◯ | | **N** | | | | **L** | ◯ | ◯ | --- #### 3. Detail Konektor & Kode Warna Kabel ##### Konektor (Kiri) | P | Br/W | Ch | | :---: | :---: | :---: | | L/Y | B | Br | | B/Y | Dg | L | ##### Konektor (Kanan) | Ch | B/W | P | | :---: | :---: | :---: | | Y/R | B | L/Y | | L | Dg | B | * **15A** (Sekring / Fuse) * **Warna Utama Kabel:** * `R` : Red (Merah) * `Br` : Brown (Cokelat) * `W` : White (Putih) * `Y` : Yellow (Kuning) * `B` : Black (Hitam) * `Sb` : Sky Blue (Biru Muda) * `Dg` : Dark Green (Hijau Tua) * `Ch` : Chocolate (Cokelat Tua) * `L` : Blue (Biru) * `P` : Pink (Merah Muda) --- -21-
Halaman 288
**SIGNALING SYSTEM** | **ELEC [ - + ]** --- ① Kunci kontak ⑨ Klakson/Horn ⑩ Relay sinyal belok ⑪ Switch rem depan ⑫ Switch rem belakang ⑭ Tombol klakson ⑱ Saklar sinyal belok ⑳ Lampu belakang / rem ㉑ Lampu sinyal belok belakang ㉒ Lampu sinyal belok depan ㉕ Switch Netral ㉖ Sender bahan bakar ㉘ Meter bahan bakar ㉛ Lampu Indikator netral ㉜ Lampu indikator belok ㉞ Battery ㉟ Sekring <br> <p> <div align="center"><b>-22-</b></div> </p>
Halaman 289
MENGATASI MASALAH/ 9 LAMPU SINYAL BELOK, LAMPU REM ATAU INDIKATOR LAMPU TIDAK MENYALA 9 KLAKSON TIDAK BERFUNGSI 9 METER BAHAN BAKAR TIDAK BEKERJA Prosedur : Periksa : 1. Sekring 2. Battery 3. Kunci kontak 4. Sambungan kabel (pada sistim sinyal) CATATAN 9Lepaskan komponen-komponen dibawah ini sebelum bekerja : 1) Penutup samping (kanan) 2) Lampu depan 3) Tempat duduk 4) Tangki bensin 9Pergunakan alat dibawah ini untuk perbaikan. Pocket tester: 90890-03112 1.Sekring : 9Lepaskan sekring 9Pasangkan pocket tester (Ω×1) pada sekring 9periksa kondisi sekring lihat bagian "PEMERIKSAAN SEKRING" BAB 3. TERHUBUNG 2.Battery 9Periksa kondisi Battery lihat bagian 'PEMERIKSAAN BATTERY" BAB 3. Berat jenis air Battery 1,280 pada 20°C (68°F) SESUAI * –23– ELEC SISTIM SINYAL TIDAK TERSAMBUNG sekring putus, ganti sekring TIDAK SESUAI 9Isi air Battery (botol biru) 9Bersihkan terminal Battery 9Setrom Battery atau ganti Battery
Halaman 290
* 3.kunci kontak 9Periksa kondisi penyambungan kunci kontak lihat bagian "PEMERIKSAAN SAKLAR" BAGUS 4.Sambungan kabel 9Periksa sistim penyambungan kabel, pada sistim sinyal. lihat bagian 'DIAGRAM KELISTRIKAN" BAGUS Periksa kondisi kabel pada sistim sinyal lihat bagian "PEMERIKSAAN SISTIM SINYAL" –24– ELEC SISTIM SINYAL TIDAK BAGUS Kunci kontak rusak, perbaiki atau ganti SAMBUNGAN TIDAK BAGUS Perbaiki
Halaman 291
PEMERIKSAAN SISTIM SINYAL 1.Horn/Klakson tidak berfungsi 1.Tombol klakson/Horm 9Periksa sistim penyambungan tombol lihat bagian “PEMERIKSAAN SAKLAR" BAGUS 2.Voltase 9Pasangkan pocket tester (DC 20 V) pada kabel klakson. Kabel Tester (+)→ kabel coklat 1 KLabel Tester (–) → Masa/ ground P Br 1 DC20V 9Putar kunci kontak pada posisi “ON”. 9Periksa voltase (12 V) kabel "Coklat" pada terminal klakson SESUAI SPESIFIKASI (12V) * –25– ELEC SISTIM SINYAL TIDAK BAGUS tombol klakson rusak, perbaiki, atau ganti saklar kemudi DILUAR SPESIFIKASI Rangkaian kabel dari kunci kontakl ke ter- minal horn rusak, perbaiki.
Halaman 292
* 3.Klakson/Horn 9Lepaskan kabel warna “Pink” dari terminal klakson/horn 9Pasang kabel penghubung 1pada terminal dan hubungkan ke masa/ground 9Putar kunci kontak pada posisi “ON”. KLAKSON TIDAK BERBUNYI 4.Voltase 9Pasangkan pocket tester (DC 20 V) pada terminal klakson Kabel Tester (+) → kabel Pink 1 Kabel Tester (–) → Masa / ground 1 P Br DC20V 9Putar kunci kontak pada posisi “ON”. 9Periksa voltase (12 V) pada terminal kabel "Pink" (merah jambu) SESUAI SPESIFIKASI (12V) Setel atau Ganti Horn –26– ELEC SISTIM SINYAL KLAKSON BERBUNYI Klakson dalam kondisi baik DILUAR SPESIFIKASI Klakson dalam kondisi rusak, ganti/perbaiki
Halaman 293
2.lampu rem tidak menyala 1.Bohlam dan socket bohlam 9Periksa kondisi Bohlam dan Socket bohlam lihat bagian "PEMERIKSAAN BOHLAM" ADA HUBUNGAN 2.Saklar / Switch rem 9Periksa kondisi switch rem lihat bagian "PEMERIKSAAN SAKLAR" BAGUS 3.Voltase 9Pasangkan pocket tester (DC 20 V) pada socket bohlam. Kabel Tester (+) → terminal kabel kuning 1 Kabel Tester (–) → terminal kabel hitam 2 L Y B 1 2 9Putar kunci kontak pada posisi “ON”. 9Tarik tuas rem, atau injak pedal rem hingga posisi berhenti di bawah 9Periksa voltase (12 V) pada kabel kuning pada socket bohlam. SESUAI SPESIFIKASI (12V) Rangkaian kelistrikan dalam kondisi OK –27– ELEC SISTIM SINYAL TIDAK TERHUBUNG/PUTUS Bohlam dan Socket putus, ganti TIDAK BAGUS Switch rem rusak, ganti DILUAR SPESIFIKASI Rangkaian kabel dari kunci kontak ke socket bohlam rusak, perbaiki.
Halaman 294
3.lampu sein dan indikator lampu sein tidak berkedip 1.Bohlam dan socket bohlam 9Periksa kondisi bohlam dan socket bohlam lihat bagian 'PEMERIKSAAN BOHLAM" TERHUBUNG 2.Geser saklar pada posisi berbelok 9Periksa sistim penyambungan pada saklar lihat bagian "PEMERIKSAAN SAKLAR" BAGUS 3.Voltase 9Pasangkan pocket tester (DC 20 V) pada relay sinyal belok Kabel Tester (+) → terminal kabel coklat 1 Kabel Tester (–) → Masa / ground 9Putar kunci kontak pada posisi “ON”. 9Periksa voltase (12 V) pada kabel "coklat" pada terminal relay. SESUAI SSPESIFIKASI (12V) Rangkaian kabel dari kunci kontak ke relay rusak, perbaiki. * –28– ELEC SISTIM SINYAL TIDAK TERHUBUNG Bohlam dan socket bohlam rusak, ganti TIDAK BAGUS Saklar sein beloki rusak, perbaiki atau ganti saklar kemudi (kiri) DILUAR SPESIFIKASI
Halaman 295
* 4.Voltase 9Pasangkan pocket tester (DC 20 V) pada sinyal relay belok. Kabel Tester (+) → terminal Coklat/Putih 1 Kabel Tester (–) → masa/ground 9Putar kunci kontak pada posisi “ON”. 9Periksa voltage (12 V) pada kabel "Coklat/ Putih pada terminal relay belok. SESUAI SPESIFIKASI (12V) 5.Voltase 9Pasangkan pocket tester (DC 20 V) pada connector socket bohlam Geser saklar sinyal (kiri): Kabel Tester (+) → kabel coklat 1 kabel Tester (–) → Masa / ground Geser saklar sinyal (kanan): Kabel Tester (+) → kabel hijau tua 2 Kabel Tester (–) → Masa / ground 9Putar kunci kontak pada posisi “ON”. 9Geser saklar sein ke arah “L” atau “R”. 9Periksa voltase (12 V) pada kabel coklat atau kabel hijau tua pada connector sock- et bohlam SESUAI SPESIFIKASI (12V) rangkaian kelistrikan OK –29– ELEC SISTIM SINYAL DILUAR SPESIFIKASI Relay sinyal belok rusak, ganti DILUAR SPESIFIKASI rangkaian kabel dari sinyal belok ke connector sinyal belok rusak, perbaiki
Halaman 296
4.lampu indikator netral tidak menyala 1.Bohlam dan socket bohlam 9Periksa kondisi bohlam dan socket bohlam lihat bagian "PEMERIKSAN BOHLAM" ADA HUBUNGAN 2.Switch netral 9Periksa sistim kerja switch netral lihat bagian "PEMERIKSAAN SAKLAR" BAIK 3.Voltase 9Pasangkan pocket tester (DC 20 V) pada connector socket bohlam Kabel Tester (+) → terminal coklat 1 Kabel Tester (–) → Masa / ground Sb G G Sb B B Br L L Br 1 9Putar kunci kontak pada posisi “ON”. 9Periksa voltase(12 V) pada kabel coklat yang berada pada connector. SESUAI SPESIFIKASI (12V) Rangkaian dalam kondisi baik –30– ELEC SISTIM SINYAL TIDAK ADA HUBUNGAN Bohlam dan socket bohlam ruisak, perbaiki TIDAK SESUAI Switch netral rusak, perbaiki DILUAR SPESIFIKASI Rangkaian kabel dari kunci kontak ke socket bohlam rusak, perbaiki
Halaman 297
5.Meter bahan bakar tidak berfungsi 1.Sender bahan bakar 9Lepaskan sender bahan bakar 1 dari tangki bensin 9Pasangkan pocket tester pada coupler sender bahan bakar. Tester (+) lead →Green 2 terminal Tester (–) lead →Black 3 terminal 9Periksa tahanan sender bahan bakar Tahanan sender (keatas 4): (Ω×1) 4 ~ 10 Ω pada 20°C (68°F) Tahanan sender (kebawah 5): (Ω×1) 90 ~ 100 Ω pada 20°C (68°F) SESUAI SPESIFIKASI 2.Voltase 9Pasangkan pocket tester (DC 20 V) pada coupler meter bahan bakar. Kabel Tester (+) → terminal coklat 1 Kabel Tester (–) → terminal hitam 2 9Putar kunci kontak pada posisi “ON”. 9periksa voltase (12 V) pada kabel coklat pada coupler meter bahan bakar. SESUAI SPESIFIKASI (12V) * –31– ELEC SISTIM SINYAL DILUAR SPESIFIKASI Ganti sender bahan bakar 2 1 DILUAR SPESIFIKASI periksa sambungan kabel pada sistim sinyal.
Halaman 298
* 3.meter bahan bakar 9gerakkan ke “UP 1” atau “DOWN 2”. 9Putar kunci kontak pada posisi “ON”. 9Periksa pergerakan jarum ke “FULL” atau “EMPTY”. BERGERAK 4.jalur kabel 9Periksa jalur kabel pada bagian sistim sinyal lihat bagian 'DIAGRAM KELISTRIKAN" –32– ELEC SISTIM SINYAL CATATAN sebelum membaca tahanan, pada posisi atas maupun bawah, biarkan terlebih dahulu pada posisinya selama 10 detik JARUM TIDAK BERGERAK ganti meter bahan bakar
Halaman 299
YAMAHA MOTOR CO., LTD. 2500 SHINGAI IWATA SHIZUOKA JAPAN
Halaman 300
# DIAGRAM KELISTRIKAN SCORPIO ## DAFTAR KOMPONEN 1. Kunci kontak 2. Rectifier/regulator 3. CDI magneto 4. CDI unit 5. Ignition coil 6. Busi/Spark plug 7. Tombol starter 8. Engine stop switch 9. Klakson/Horn 10. Relay sinyal belok 11. Switch rem depan 12. Switch rem belakang 13. Saklar kemudi (kiri) 14. Tombol klakson 15. Saklar lampu 16. Saklar Pass 17. Saklar Dimmer 18. Saklar sinyal belok 19. Switch kopling 20. Lampu belakang / rem 21. Lampju sinyal belok belakang 22. Lampu sinyal belok depan 23. Lampu depan 24. Lampu senja/posisi 25. Switch netral 26. Sender bahan bakar 27. Meter 28. Meter bahan bakar 29. Lampu meter 30. Lampu indikator lampu jauh 31. Lampu indikator netral 32. Lampu indikator belok 33. Motor Styarter 34. Battery 35. Sekring 36. Starter relay 37. Relay rangkaian cut-off --- ## WARNA KABEL | Kode Kabel | Arti (Bahasa Indonesia / English) | | :--- | :--- | | **B** | Hitam / Black | | **Br** | Coklat / Brown | | **G** | Hijau / Green | | **L** | Biru / Blue | | **O** | Orange | | **P** | Merah Jambu / Pink | | **R** | Merah / Red | | **Sb** | Biru langit / Sky blue | | **W** | Putih / White | | **Y** | Kuning / Yellow | | **B/W** | Hitam / Putih (Black/White) | | **B/Y** | Hitam / Kuning (Black/Yellow) | | **Br/W** | Coklat / Putih (Brown/White) | | **Ch** | Coklat tua / Chocolate | | **Dg** | Hijau tua / Dark green | | **G/Y** | Hijau / Kuning (Green/Yellow) | | **L/W** | Biru / Putih (Blue/White) | | **L/Y** | Biru / Kuning (Blue/Yellow) | | **R/W** | Merah / Putih (Red/White) | | **Y/R** | Kuning / Merah (Yellow/Red) |